
- Published on
- Last updated:
How to setup & deploy an Express GraphQL server with Apollo, Prisma, TypeScript, Postgres & Heroku
This is a quick start guide to setting up a GraphQL API using Express, Apollo Server, Prisma, Heroku, Postgres, Docker and TypeScript.
When we're done, we'll have a GraphQL server that can be used by a front end to query and persist data from a Postres database.
I've noticed this tech stack rise in popularity in recent times.
Why? Probably because Heroku offers a free plan and the developer experience for Prisma and Apollo is 🔥.
Ready? Let's dive in 🤿.
Here's the Github repository if you'd like to review the code.
Table of Contents
Prerequisites
You'll need to ensure you have the following setup in order to complete this tutorial:
- Git and Node.js installed on your machine
- Docker installed on your machine. This is not required if you use something else for serving postgres locally
- A free Heroku account for deploying the API
Creating the project
Jump into your terminal, create the directory and push the code up to a new repository in Github. You can skip this section if you're familiar with this process.
mkdir graphql-typescript-api-starter
Then let's setup Node.js in the project:
cd graphql-typescript-api-starter
npm init
This will walk you through a few questions to answer. These are optional - hit enter in your keyboard to skip through them.
Next, still in your terminal, add a .gitignore file which tells git which files to ignore.
touch .gitignore
Open up the project in your favourite editor and add the following to your .gitignore file for now:
node_modules
Next, create a Github repository and in the terminal, push your code up to the repository:
git init
git add -A
git commit -am "first commit"
git branch -M main
git remote add origin <your remote Github repository url>
git push -u origin main
Configuring TypeScript
We're going to be using TypeScript in this tutorial.
If you're not too familiar with TypeScript - don't fret.
This tutorial doesn't focus on how to use TypeScript, just how to set it up for a Node JS server side project.
First of all, add TypeScript as a dependency to your project:
npm install typescript --save-dev
This give us access to the tsc command locally which will compile our code from TypeScript to Javascript.
Let's now add type safety and auto-completion for core Node APIs (like path, http and fs):
npm install @types/node --save-dev
Next, we need to add a tsconfig.json file which sets our TypeScript compiler options. First, add the file to the root of your project:
touch tsconfig.json
Then paste in these compiler options:
{
  "compilerOptions": {
    "target": "es6",
    "module": "commonjs",
    "lib": ["es6"],
    "allowJs": true,
    "outDir": "build",
    "rootDir": "src",
    "strict": true,
    "noImplicitAny": true,
    "esModuleInterop": true,
    "resolveJsonModule": true
  }
}
Take a look at the docs if you'd like to learn what each configuration means and if you'd like to add more configuration options.
Hot reloading and scripts
Hot reloading in your local set up is fundamental to a decent developer experience. Otherwise you'll need to quit and restart the server everytime you make changes to your code.
We're going to use the packages nodemon and ts-node to set up hot reloading:
npm install ts-node nodemon --save-dev
nodemon watches for any changes in your code and restarts the server automatically, while ts-node enables the server to understand TypeScript directly (removing the requirement for compiling).
Next add a nodemon.json config file to the root of your project:
touch nodemon.json
And then add the following configuration:
{
  "watch": ["src"],
  "ext": ".ts,.js",
  "ignore": [],
  "exec": "ts-node ./src/index.ts"
}
Whenever you use nodemon in the command line, it will use these configurations.
A typical script to run your local dev environment is:
npm run dev
Let's set that up now. Open up your package.json file and add this script:
{
  ...

  "scripts": {
    ...
    // for running the server on your local machine, using nodemon
    "dev": "nodemon"
  },

  ...
}
Now you can run npm run dev in the root of your project to start up your server (which we'll do in the next step when we add a index.ts file).
We'll set up the build and start scripts (for production) in a later step when we deploy to heroku.
Setting up the server with Apollo


With some of the admin out of the way, let's set up our server!
We're going to use 3 packages to get started:
express: The Javascript server side frameworkapollo-server-express: Allows us to setup a GraphQL API on top of Expressgraphql: Allows us to write GraphQL in Javascript
Let's add them to our project now:
npm install express apollo-server-express graphql
Instead of using express and apollo-server-express, we could've just gone with apollo-server which is easier and simpler to get going.
However, I've opted with the Express option because it means we can add Node.js middleware like authentication and rate-limiting - things you'll very likely need if you're building out an API for use in production 👌.
With the packages installed, we can now whip up a server.
Create an index.ts file inside a directory called src:
mkdir src
touch src/index.ts
Then add the following code to the new file:
import { createServer } from "http";
import express from "express";
import { ApolloServer, gql } from "apollo-server-express";

// 1
const startServer = async () => {

  // 2
  const app = express()
  const httpServer = createServer(app)

  // 3
  const typeDefs = gql`
    type Query {
      hello: String
    }
  `;

  // 4
  const resolvers = {
    Query: {
      hello: () => 'Hello world!',
    },
  };

  // 5
  const apolloServer = new ApolloServer({
    typeDefs,
    resolvers,
  })

  // 6
  await apolloServer.start()

  // 7
  apolloServer.applyMiddleware({
      app,
      path: '/api'
  })

  // 8
  httpServer.listen({ port: process.env.PORT || 4000 }, () =>
    console.log(`Server listening on localhost:4000${apolloServer.graphqlPath}`)
  )
}

startServer()
This code starts a server and listens on port 4000.
I've added numbered comments to the code - Let's dive into each part to understand what's going on here:
- Create an asynchronous function to start the server. At the end of the code, you can see the function is called
startServer(). - Here we are creating an instance of express with
const app = express()and then creating an HTTP server withconst httpServer = createServer(app) typeDefsdefine your API schema. Here you describe what data can be read and mutated by the frontend. For example:- Fetch a list of items
- Fetch details about a profile
- Login a user
- Sign up a user
resolversare responsible for handling the logic and response for eachtypeDefyou defined. It's where the business logic is executed. EachtypeDefwill have a matchingresolver. For example, in thetypeDefsyou might have defined aqueryto fetch a list of items. You'll need a matchingresolverto handle the query (e.g. find the items in the database and return them)- Here you initialize an instance of ApolloServer, passing in the
typeDefsandresolvers. This creates your GraphQL server, but as we're using Express, we'll need to apply it as middleware in the next step. - You must
await apolloServer.start()before applying the ApolloServer instance as middleware - The ApolloServer instance is applied as middleware to the Express instance, enabling the GraphQL server. GraphQL is served over a single endpoint in contrast to REST APIs which expose a range of endpoints. By default, Apollo sets this endpoint to
/graphql, but I've updated it to/api- this is optional. - If you've built any Express applicatons before, this step will be familiar to you. Here, we are telling the server to listen on a specific port, and log something to the server. We first look in a env file for the PORT key, and if it doesn't exist, then we'll use 4000 by default. The reason for the env lookup is for when we deploy with Heroku - using the env key allows the port to be defined by Heroku (otherwise there may be errors, such as a request timeout)
Nice work if you've made it this far!
Let's now start our server using the script we set up earlier.
npm run dev
In response, the terminal should output:
Server listening on localhost:4000/api
ss
Open localhost:4000/api in your browser and you'll be prompted to enter Apollo Studio. Press the "Query your server" button:

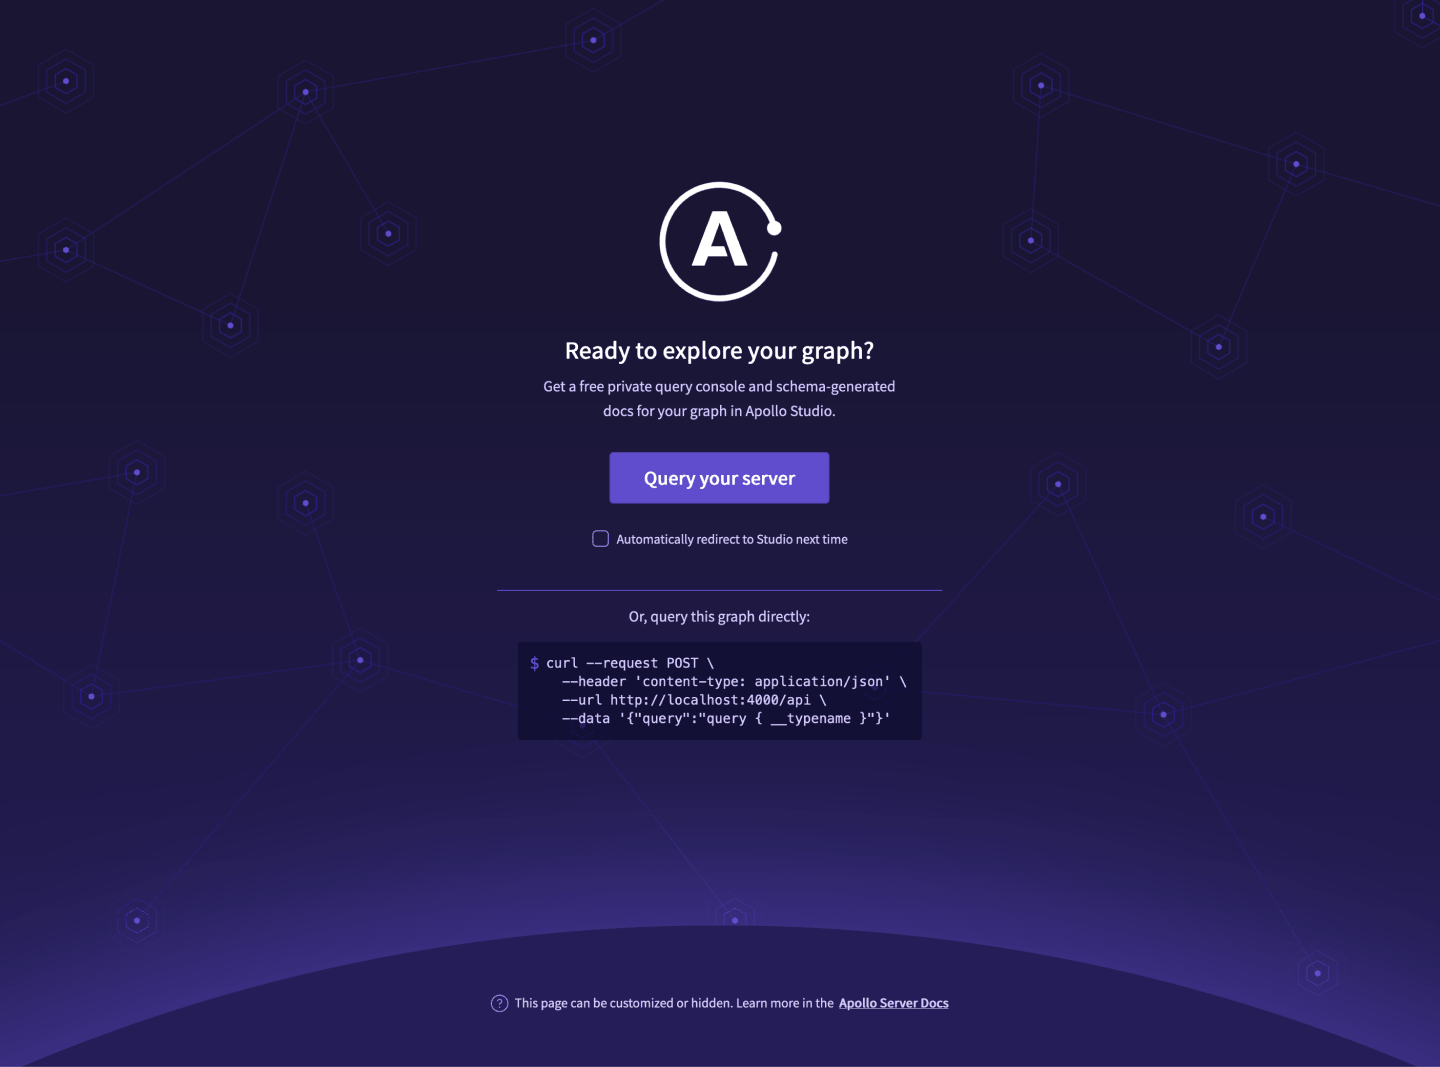
This is a testing environment for you to run your GraphQL queries and mutations.
For example, write the following query on the left side and hit the Run button:
query {
  hello
}
You should see on the right hand side the response:
{
  "data": {
    "hello": "Hello world!"
  }
}


You've just set up the foundations for a GraphQL API! Great work.
Everything you'll do from here will build on top of this foundational mental model:
typeDefsdescribe the queries and mutations available in the APIresolvershandle the logic and send the data back in the response
Next up, we'll be adding some more scripts and configuring our deployment to our production environment, Heroku.
Deploy to Heroku

You might be thinking:
"Isn't it too soon in the project to worry about deployment?"
Possibly. It's down to personal preference.
I prefer to release early and often.
Just like running the command npm run dev to run your server on your local machine, Heroku needs to know about a command so it can execute the script to start the server.
We'll create 2 scripts:
build- This will clean and compile our TypeScript code so it's ready for productionstart- This will first run thebuildcommand and then it will execute the compiled code
In order to run the build script, we need to install a package called rimraf which takes care of the cleaning for us:
npm install rimraf --save-dev
Then you can add both the build and start scripts to your package.json file:
{
  ...

  "scripts": {
    ...
    "dev": "nodemon",
    "build": "rimraf ./build && tsc",
    "start": "npm run build && node build/index.js",
  },

  ...
}
Okay nice work! Your scripts are all now set up, so let's configure Heroku for deployment.
Firstly, You need to add a Procfile (this is a special Heroku file that tells the server what command to run when the application launches) to the root of your project:
touch Procfile
Then go into this new Procfile and add the following (this leverages the script we defined in the package.json file we added earlier on).
web: npm start
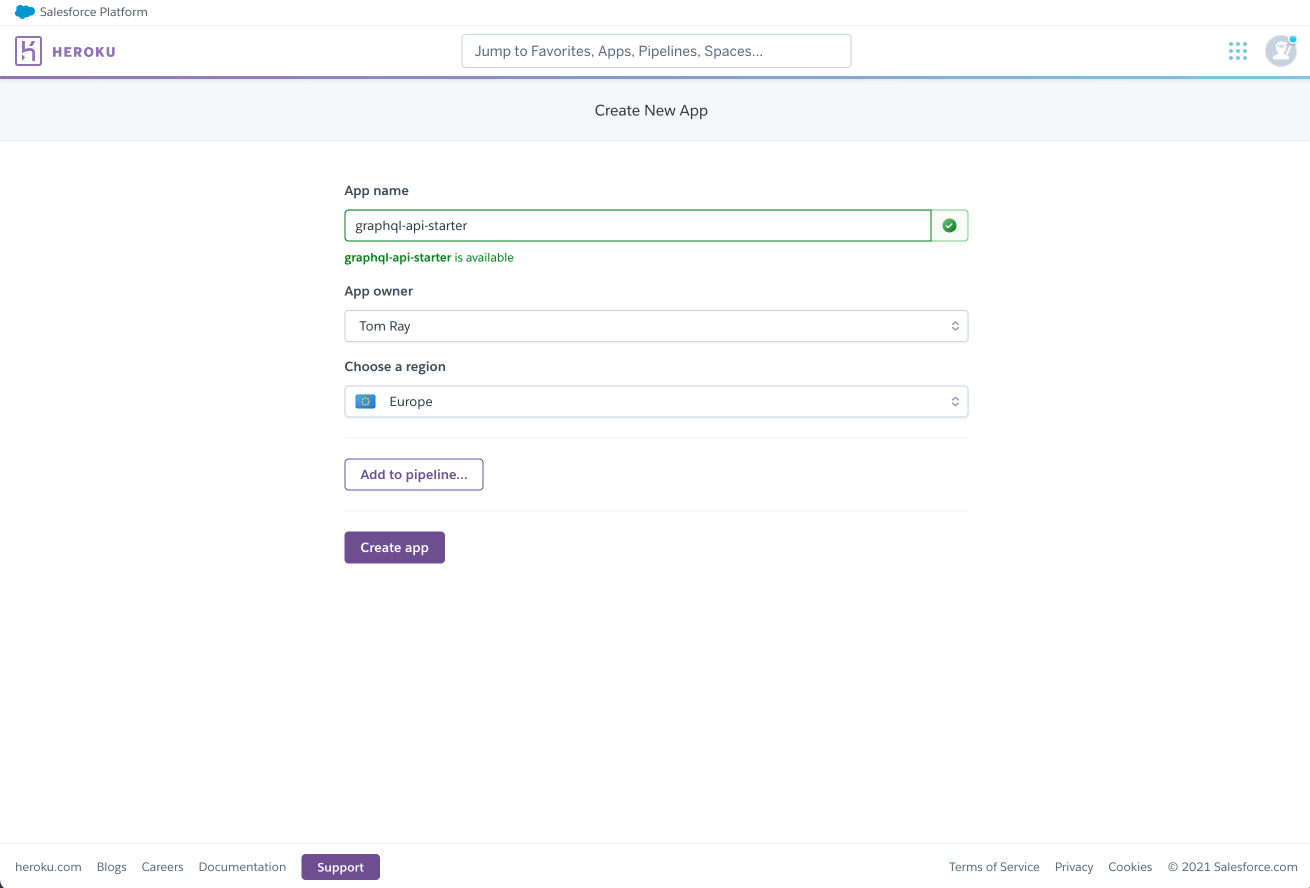
Okay! Make sure you've pushed up all the changes up to Github, then log in to your Heroku account.
First, create a new app:

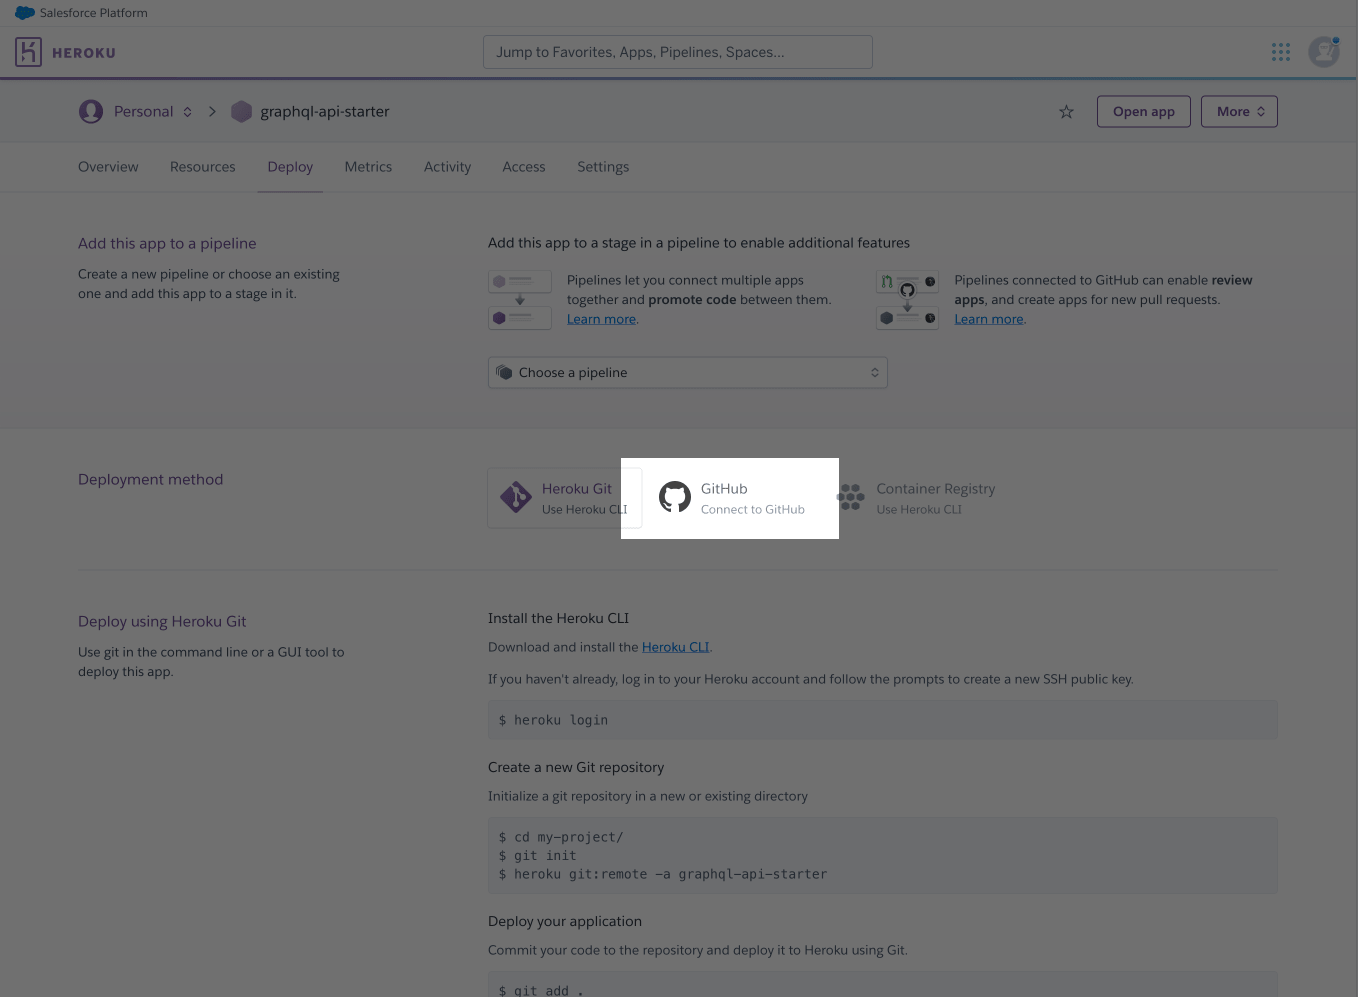
Then, connect the project to the Github repository:

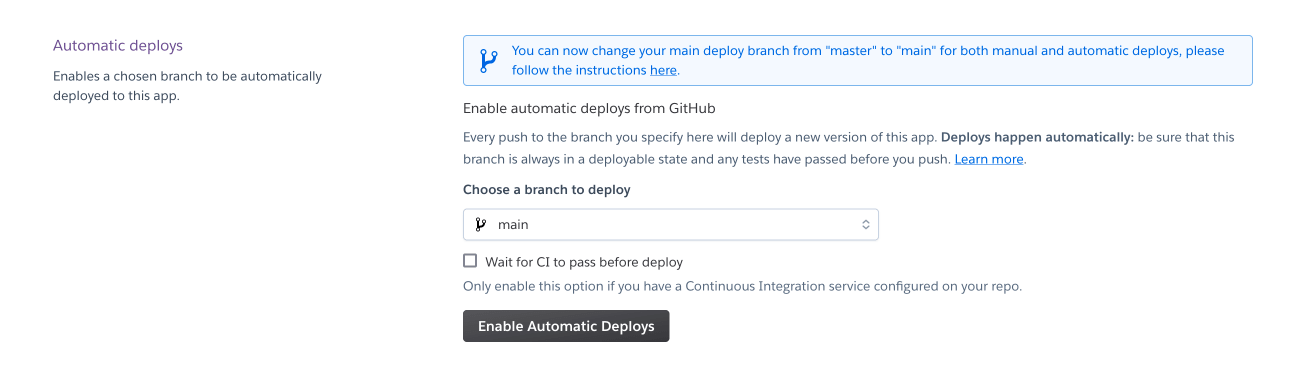
And then enable automatic deploys. This will mean every time you push a commit to the master branch, it will deploy a new version of the app:

By default, Heroku prunes the devDependencies when the server is launched. This is problematic as the server needs to use the rimraf script for the build script.
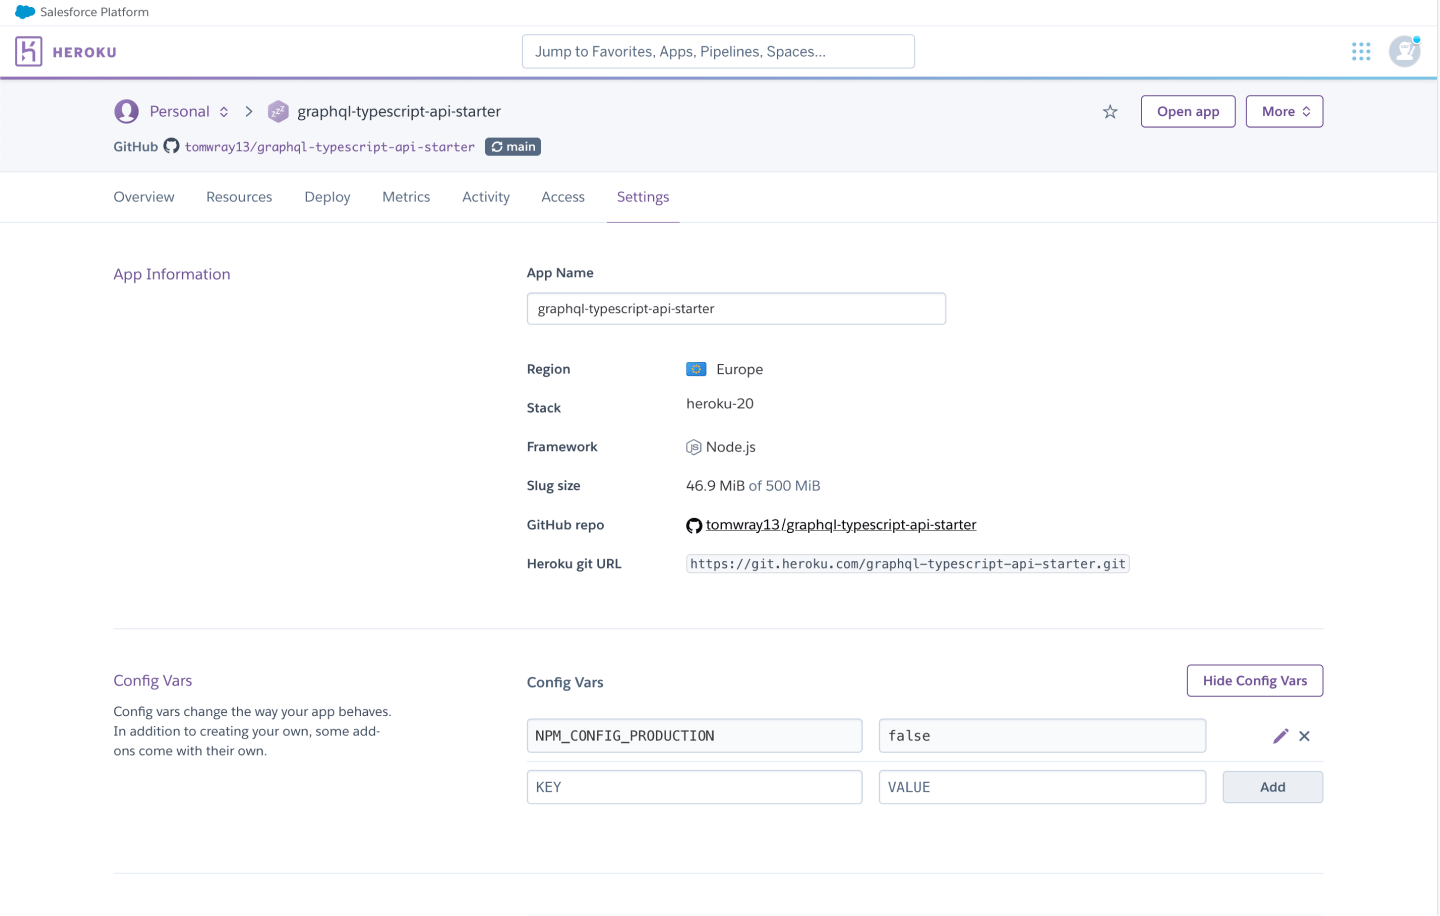
Therefore, you need to add an ENV variable in the Heroku app called NPM_CONFIG_PRODUCTION=false. Go to the Settings tab and add a Config Vars:

Finally, go back to the Deploy tab and press the Deploy Branch button to deploy the app:


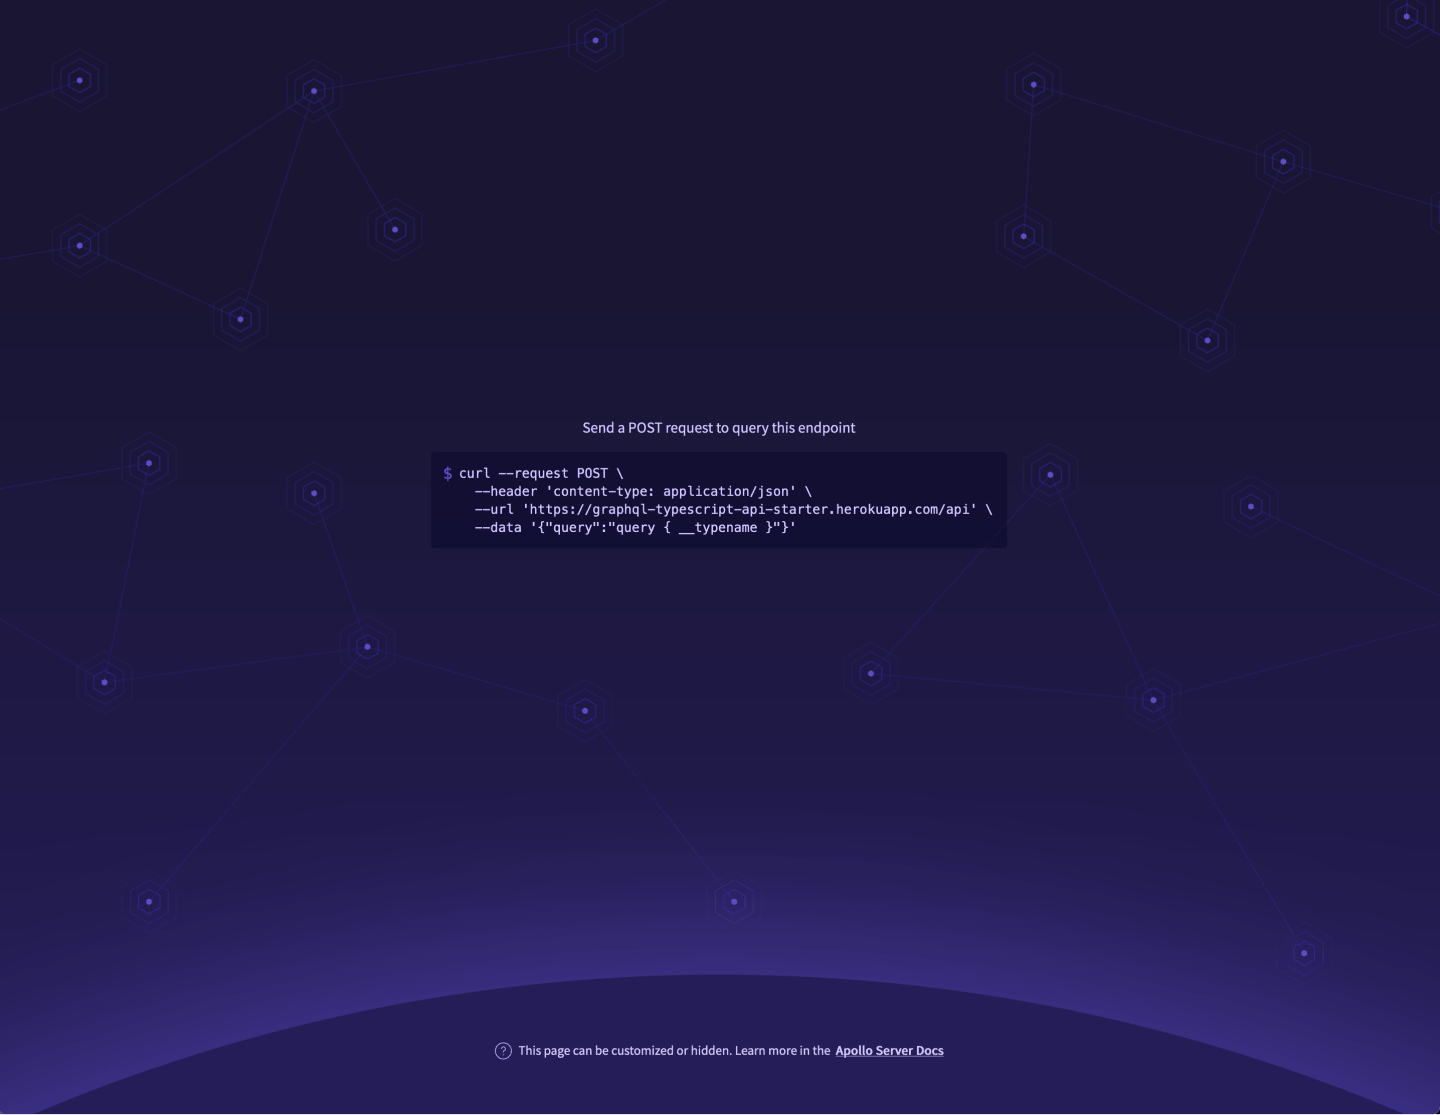
Once it's finished, press the "Open app" in the top right, and edit the url to end in /api which is the path you defined in an earlier step.
And there you have it, you should see Apollo's default screen:

If you'd like to enable the GraphQL playground on the production environment, take a look at the Apollo docs.
Nice work! You've just set up a very basic GraphQL API and deployed it to production.
Set up Postgres locally with Docker
There's a little more admin work we need to do before we get into the fun stuff.
The goal for this tutorial is build a GraphQL API that can query and mutate directly to a database.
That means we'll need access to a database in our local and deployed environments.
We will set up the Postgres server for our deployed application in Heroku in the final step.
We'll use Docker for our local database.

If you're comfortable configuring your database server locally (e.g. you might use the Postgres app instead of Docker), you can skip this section.
That being said, Docker is pretty simple to setup, so as long as you have Docker installed on your machine, I'll walk you through it.
First of all, add a new file to the root of your project:
touch docker-compose.yml
Then navigate to this file and add the following code:
version: '3.8'
services:
  postgres:
    image: postgres:10.3
    restart: always
    environment:
      - POSTGRES_USER=test-user
      - POSTGRES_PASSWORD=test-password
    volumes:
      - postgres:/var/lib/postgresql/data
    ports:
      - '5432:5432'
volumes:
  postgres:
This file is responsible for running the Postgres server on your local machine.
The environment variables set the credentials for the database which we'll use when connecting Prisma to the database.
Now go ahead and launch this server by running:
docker-compose up -d
If you're using VSCode, I recommend installing the official Docker extension.
Once installed, it will apear in your left menu and show you which containers (i.e. local servers) you have running:

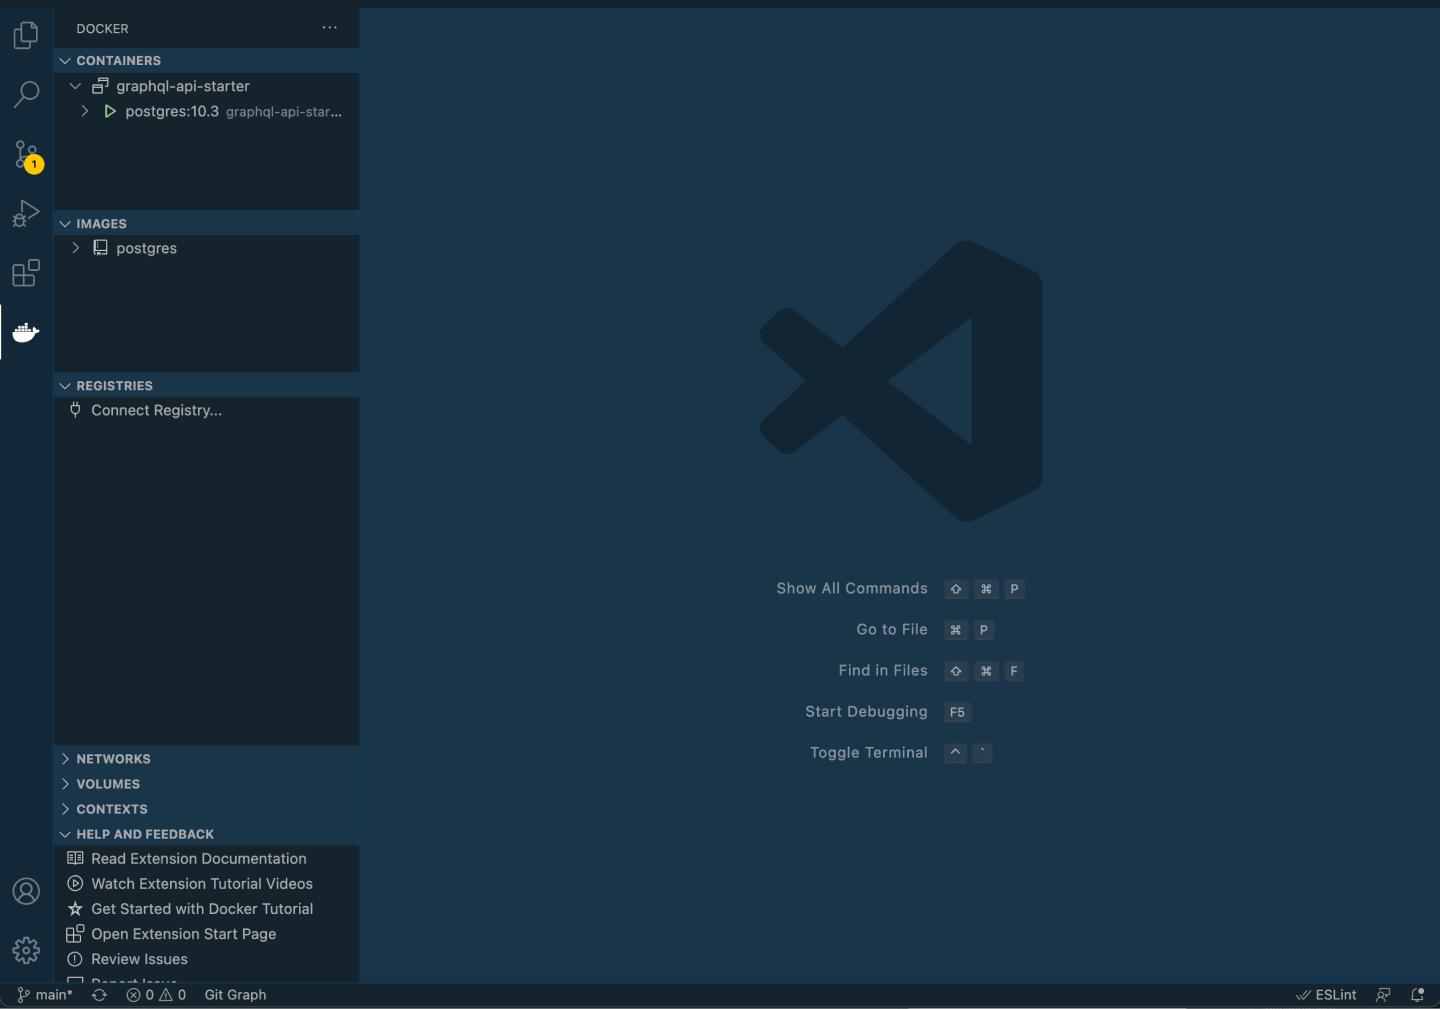
Nice work, your local Postgres server is now up and running.
Build your database schema with Prisma
In order for our GraphQL API to query and mutate data to a database, we first need to define how the database is structured.
We're going to use Prisma to define this structure. We'll also use Prisma in the next section to connect our GraphQL API to the database.

You can think of Prisma as a bridge between your database and your API - they provide a set of tools that make working with databases much easier.
First of all, add the Prisma CLI as a development dependency:
npm install prisma --save-dev
This allows you to use the Prisma CLI moving forward (the Prisma CLI is always prefixed with npx).
Next you need to set up Prisma in your project by running this command in the root of your project:
npx prisma init
This does two things:
- Creates a directory called
prismawith a file inside calledschema.prisma - Adds an
.envfile to the root of the project
Let's first move the prisma directory into the src directory to keep things clean:
mv prisma/ src/
Because we've moved the prisma directory, we just need to add this to our package.json file so Prisma knows where to find it:
{
  ...

  "prisma": {
    "schema": "src/prisma/schema.prisma"
  }

  ...
}
The schema.prisma file is the main configuration file for Prisma. If you open up the file, you'll see the following:
datasource db {
  provider = "postgresql"
  url      = env("DATABASE_URL")
}

generator client {
  provider = "prisma-client-js"
}
The datasource provides the connection to your Postgres database by looking up a url in the ENV file.
This is important - by using the env file, it allows us to have a different Postgres database for our various environments.
Right now, we have a local environment and a production environment in Heroku. We'll configure the Heroku Postgres database in the final step.
Your local Postgres server already exists (as we set this up in the previous step) - so we just need to grab these credentials and update our env file.
Open your docker-compose.yml file and grab the environment variables:
...
  postgres:
    ...
    environment:
      - POSTGRES_USER=test-user
      - POSTGRES_PASSWORD=test-password
...
In my case, the user is test-user and the password is test-password.
You can update these to your liking, but just make sure you restart your local Postgres server and then add the values to your env file:
DATABASE_URL="postgresql://test-user:test-password@localhost:5432/mydb?schema=public"
Now your Prisma configuration is using your local Postgres server as the data source.
It's now time to get to the fun stuff - creating tables in your database.
This is done inside the Prisma configuration file (schema.prisma) by adding models and then running a special Prisma command.
This tutorial won't get in to much detail on how to use Prisma - we'll stick to a simple example that you can expand on - their docs are very good.
Let's say we are building a Trello clone.
We could start with a model for the "Board". Add the following to your prisma.schema file:
datasource db {
  provider = "postgresql"
  url      = env("DATABASE_URL")
}

generator client {
  provider = "prisma-client-js"
}

model Board {
  id          Int       @id @default(autoincrement())
  createdAt   DateTime  @default(now())
  updatedAt   DateTime  @updatedAt
  title       String
  description String?
  path        String    @unique
}
The code is fairly self-explanatory (which is a testament to the Prisma team in itself!). Either way, here's a quick explainer of what's happening:
- A new model (i.e. table in the database) has been defined as "Board"
- The table is defined with a field name, a field type and optional attributes
- The field name maps to the column in that table. Typically is camelCase.
- The field type defines the native database type
- Attributes are handy modifiers Prisma provide you. E.g. the
@uniqueattribute on thepathfield means that each record in the "Board" table must have a unique string stored as a path. - You may have noticed the
?appended to theStringfield type for the description. This is a type modifier.?makes a field optional.
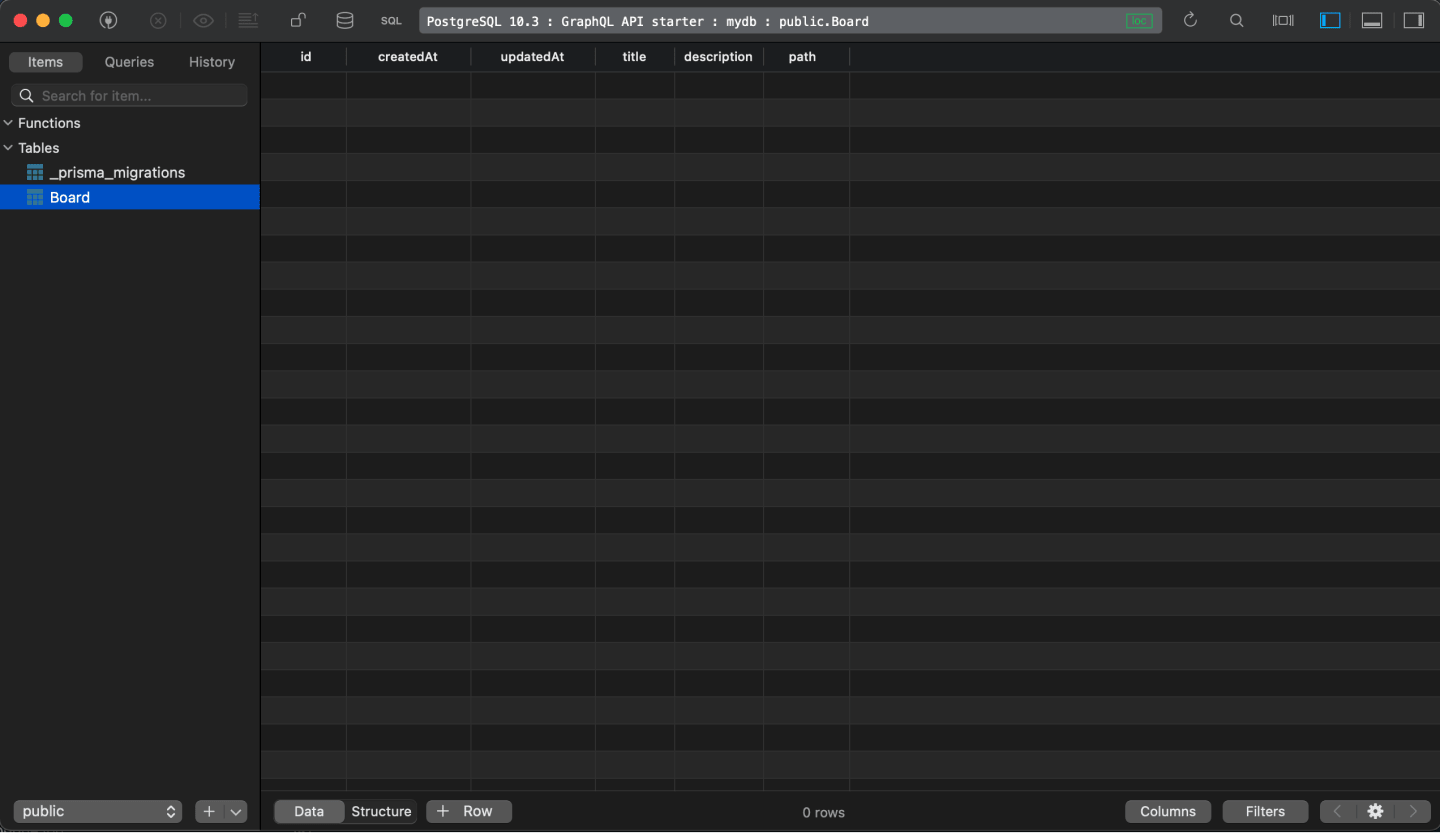
If you open a GUI tool like TablePlus and open up your local Postrgres server to view the tables, you'll see nothing.
That's because we need to run a Prisma command to map the model you've defined into your database (i.e. run "migrations").
Here's the command to run:
npx prisma migrate dev --name init
Everytime you add a new model (or tweak any existing model structure), you'll need to run this command. So I find it helpful to add a new script for this:
{
  ...

  "scripts": {
    "dev": "nodemon",
    "build": "rimraf ./build && tsc",
    "start": "npm run build && node build/index.js",
    // for running database migrations
    "migrate": "npx prisma migrate dev",
  },

  ...
}
Now anytime you need to run migrations you can run npm run migrate instead.
Great work, you just created your first table in a database with Prisma Migrate 🎉.
Now open up your GUI again and your table will be there:

You can take this example further by adding other models to your prisma.schema file, for example by adding some relations.
Just remember everytime you make changes to your models, you'll need to run your new script npm run migrate!
Whenever you run npm run migrate, you'll be prompted to add a name for the migration. This is optional, but a good idea to give the migration a name so you can easily look at your migration history.
Connect database to Graphql API
So we've defined the structure of our database with Prisma Models.
Now let's move into how we can access and manipulate that data.
We'll use Prisma Client to help make queries to our database. For that, we'll need to install an additional Prisma package:
npm install @prisma/client
One this package is installed, create a new file inside the prisma directory called client.ts:
touch prisma/client.ts
And then inside this new file, you need to instantiate the Prisma Client:
const { PrismaClient } = require('@prisma/client')

module.exports = {
  prisma: new PrismaClient(),
}
Now inside your src/index.ts file, you can import Prisma client so it's available to use for your queries and mutations:
const express = require('express')
const { ApolloServer, gql } = require('apollo-server-express')
const { prisma } = require('../prisma/client')

...
Okay, with that set up, let's build on our Trello clone example and use Prisma Client to fetch a list of "Boards" from the database.
Fetch a list of boards
Before we dive in to adding this a query for fetching a list of boards, it's worth adding some data to our database.
Otherwise, we'll build our query and get back empty results. Adding some records to the database will help us to validate our queries are working properly.
Thankfully, Prisma have made this super easy.
Run this command to open up Prisma Studio, a simple way to explore and manipulate the data in the database:
npx prisma studio
It will open Prisma Studio in a new tab in your browser, looking something like this:

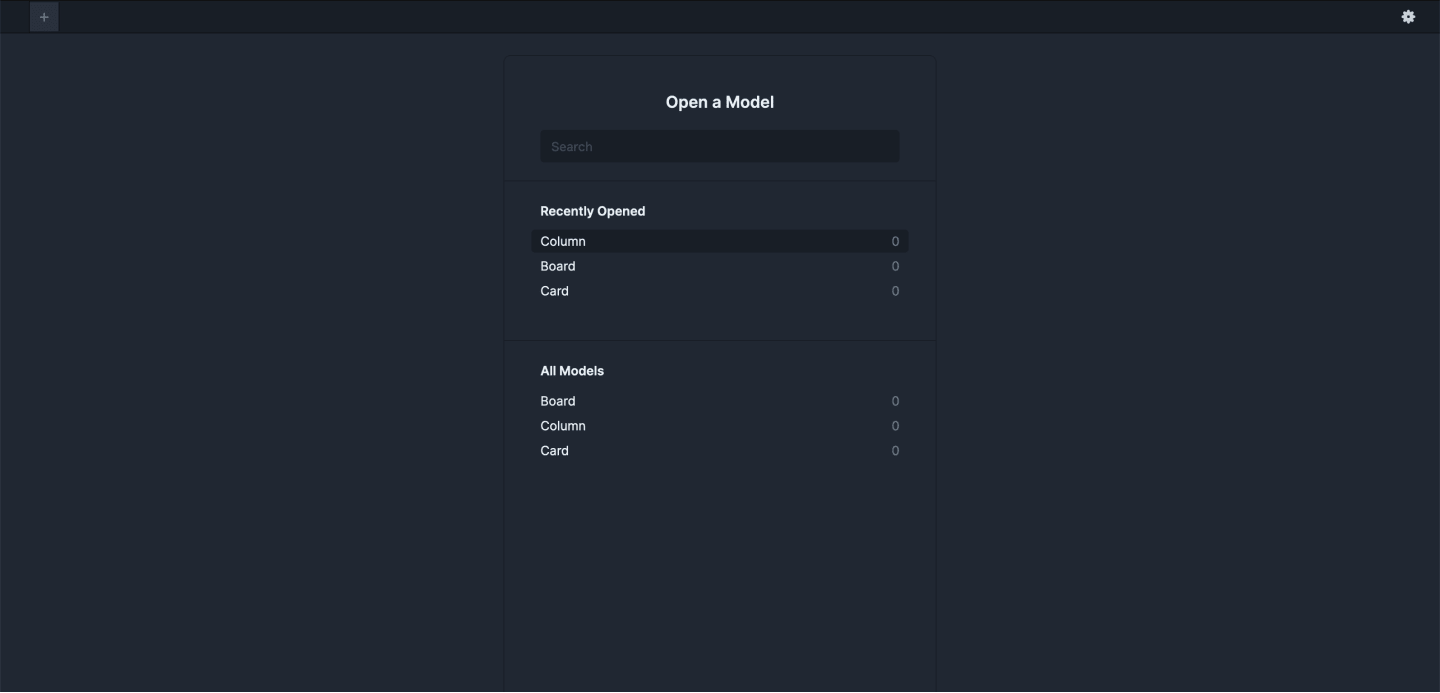
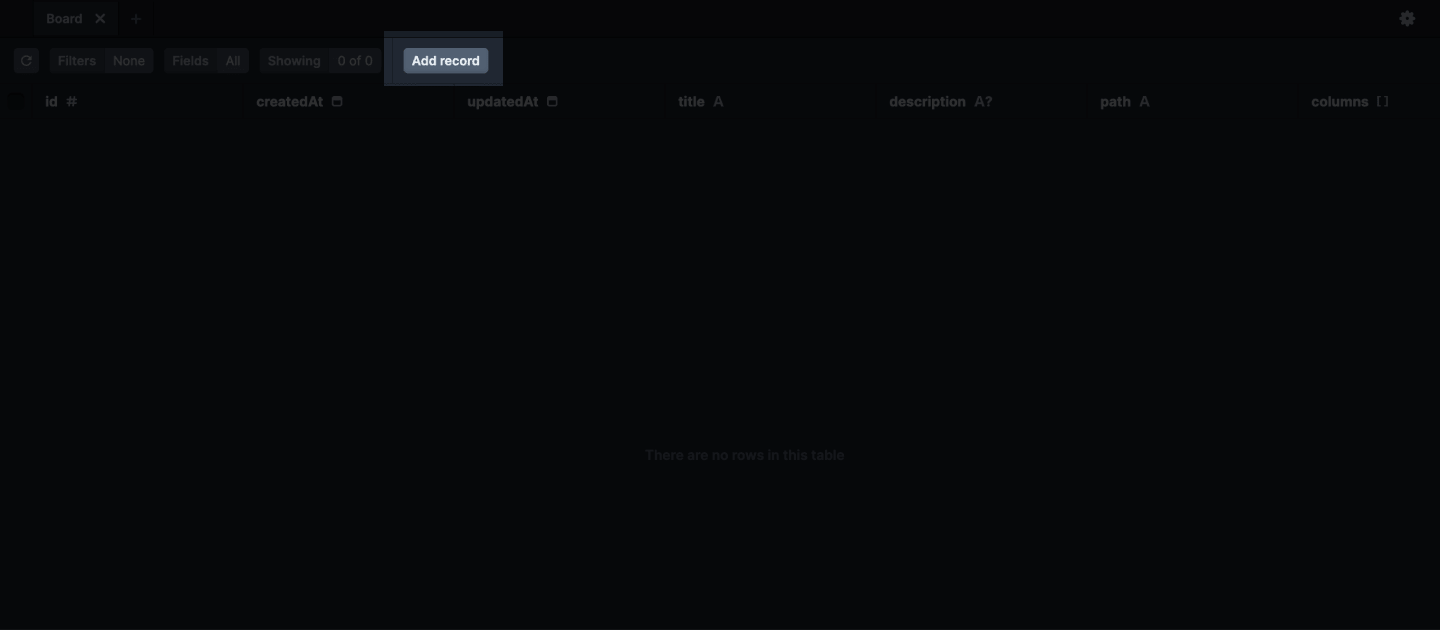
Navigate into the Board model and press the "Add record" button:

Now, back to writing some GraphQL.
We want to write a query that looks up all Boards in the database, and returns them in an array.
Let's hop back into our src/index.ts file and add a new typeDef:
...

const typeDefs = gql`
  type Query {
    boards: [Board]
  }

  type Board {
    id: ID!
    title: String!
    description: String
    path: String!
  }
`;

...
The purpose of typeDefs is to:
- Define the name of the query / mutation
- Define the structure of the response
So here, we are creating a query called boards. This is the name of the query.
And you can see that this query returns [Board]. This defines the structure of the response. We're basically saying here:
When a boards query is called to the server, return an array (that's what the square brackets are for) of items, and each item should have the structure defined by the Board type.
But we've still not hooked up that array to retrieve data from the database - that's where resolvers come in:
...

const resolvers = {
  Query: {
    boards: () => {
      return prisma.board.findMany()
    }
  },
};

...
Here we're using a Prisma Client query called findMany, which pulls in all of the records.
If you now start up your server with npm run dev and run the query in the left section:
query {
  boards {
    id
    title
    description
    path
  }
}
Assuming you added some records with Prisma studio, your API will return a response:

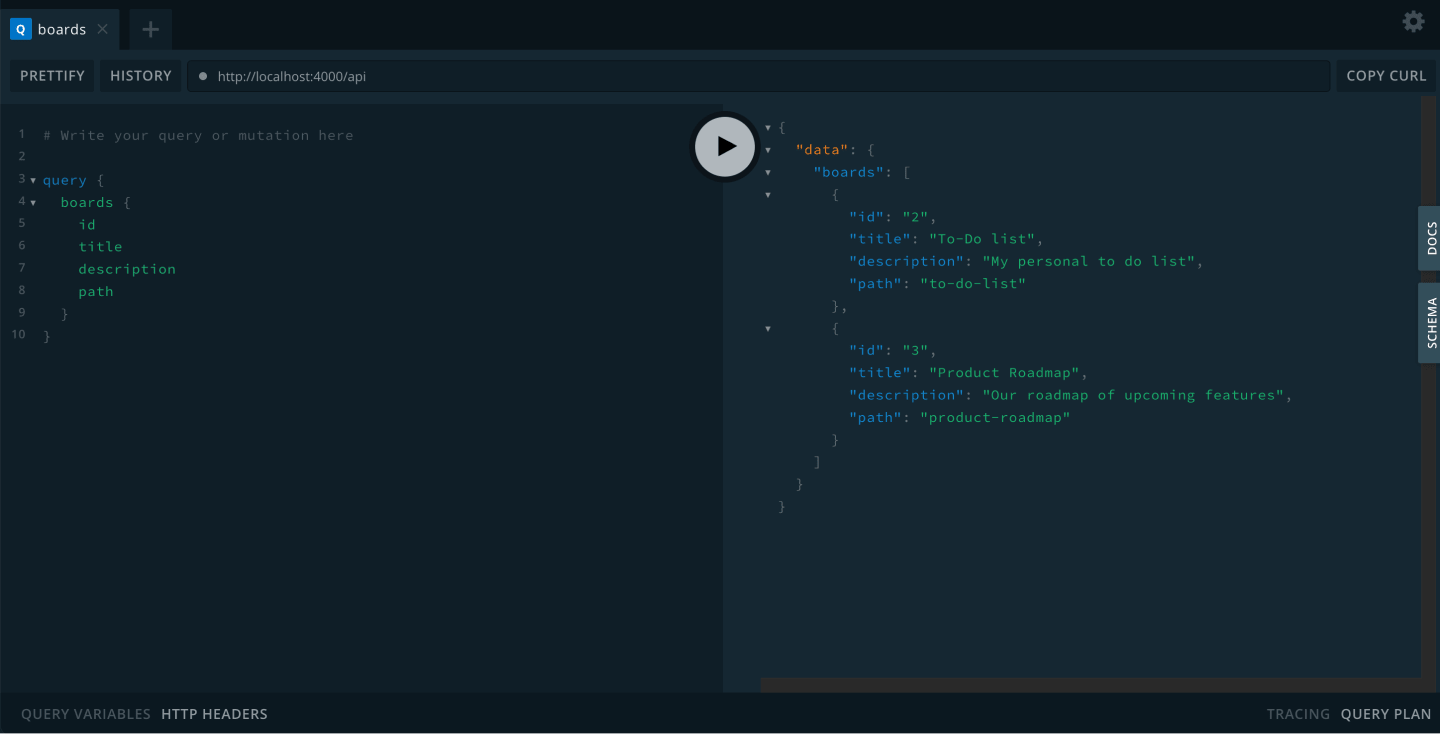
Great work! You now have an GraphQL API that fetches data from a database.
If you're following this tutorial, review the Prisma docs and try to build out some CRUD functionality for "Boards":
- Create a new board
- View a board
- Edit a board
- Delete a board
Adding Postgres to Heroku
Our API is working locally.
With our local Postgres server and running npm run dev, we can run queries and mutations on our GraphQL API to view and manipulate data in our local database.
However, this is currently limited to our local machine.
The final step in this tutorial is to add to our Heroku set up we started earlier on by adding a hosted Postrges server.
Inside your Heroku project, navigate to the Resources tab, search for "Heroku Postgres" and enable the "Hobby Dev" plan:

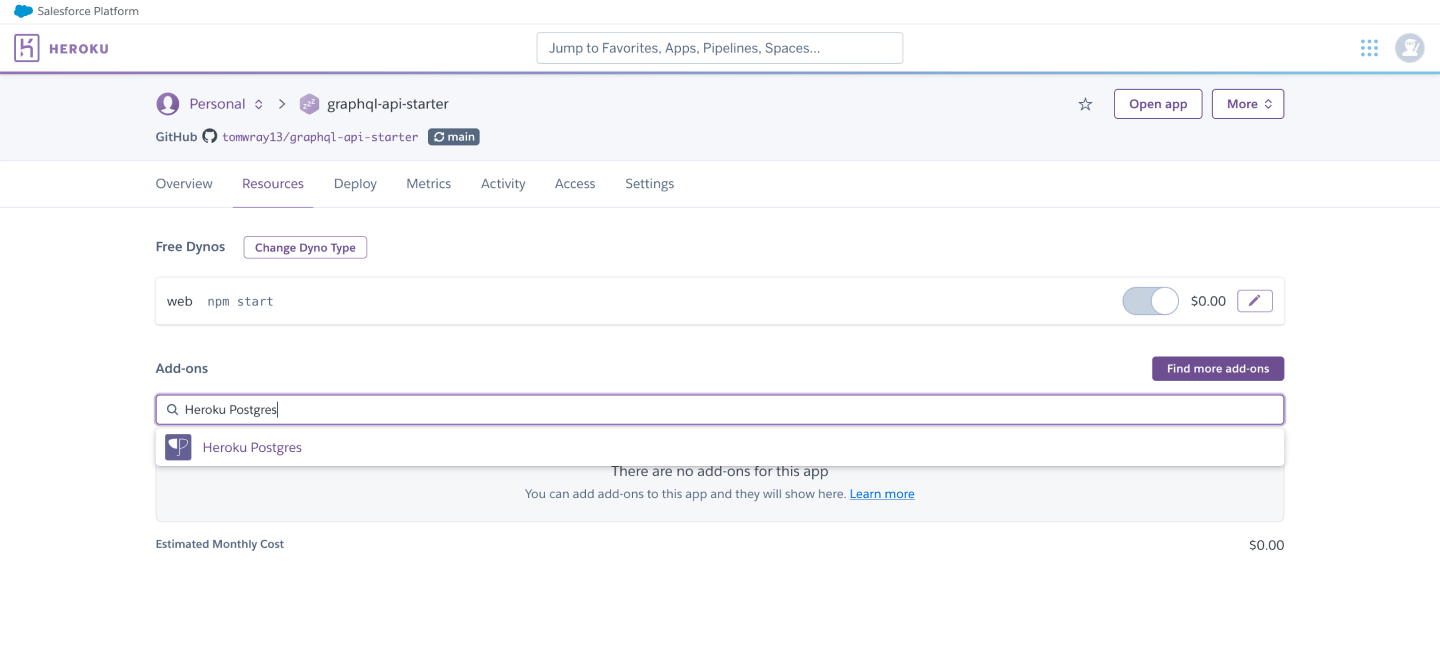
This is a free plan so you won't be charged for it.
Once you've added this, if you navigate to the Settings tab and look at the Config Vars, you'll see that the DATABASE_URL has been added automatically for you.
The Config Vars in Heroku is the env file equivalent.
If you navigate to your prisma.schema file, you'll see that the datasource is pointing towards the DATABASE_URL in the env file.
This means that in the deployed Heroku environment, it will use the DATABASE_URL defined in the Config Vars.
The final step is the considerations for the database changes.
If you make some changes to the Prisma Models in your local machine and then run the npm run migrate command, this will make the database changes to your local database server.
However, the hosted database in Heroku will not know about these changes.
Therefore, you need to add a command that tells Heroku to run a migration command whenever there is a new deployment.
You can achieve this by adding to your Procfile:
web: npm start
release: npx prisma migrate deploy
And you're done!
Here's the Github repository again if you'd like to review the code. The repository is available as a Template Repository, which means you can use it as a starter repo for your next project!
If you have any questions about this tutorial, open up an issue in the Github repository or send me a DM on Twitter!