
- Published on
- Last updated:
Uploading files to Google Cloud Storage with an Express GraphQL server
In this tutorial, we're going to walk through how to handle sending files to a Apollo GraphQL server and upload them to Google Cloud Storage.

Here's the Github repository if you want to check out the code! This tutorial is focused on the server side.
This tutorial won't go over getting your GraphQL server set up, however, the code I'm using is from this starter repo which you can clone / template.
Ready? Let's go ⚡️!
Table of Contents
Prerequisites
The following knowledge / set up is required for this tutorial:
- An existing GraphQL server project set up. This tutorial is based on this starter repo which you can clone / template.
- You might find it difficult to work through this tutorial if you have no experience with TypeScript. I have, however, tried to explain all the TypeScript related code at each step of the way so minimal experience is required.
Integrate graphql-upload into Apollo Server
By default, we can only send and receive JSON parsed data with GraphQL operations.
Because of this, we cannot use files as arguments in our GraphQL requests when sending them to our server.
To enable sending files to our server, we need to configure our server to handle multipart requests that contain file data.
This was available out the box with Apollo Server 2.0, however, with Apollo Server 3.0 we need to implement this configuration manually using the graphql-upload library.
Let's start by installing that package into our project:
npm install graphql-upload
You'll also want to install the types for this package (which we'll use later on in the tutorial):
npm install --save-dev @types/graphql-upload
Out the box, GraphQL handles some default types like Int and String, however, you'll need to use the graphql-upload package to define a custom type for uploads.
Let's add an uploadFile mutation which takes an Upload argument and returns back the file:
...
import { GraphQLUpload } from 'graphql-upload'
...

  const typeDefs = gql`
    scalar Upload

    type Mutation {
      uploadFile(file: Upload!): String!
    }
  `;

  const resolvers = {
    Upload: GraphQLUpload,

    Mutation: {
      uploadFile: (parent, args) => {
        // handle the upload to Google here
      }
    }
  };

...
Let's dig into what's happening here.
First of all, we're importing GraphQLUpload from the graphql-upload package. This is used to create an Upload scalar and mapping resolver.
This allows us to use Upload! as an argument in our uploadFile mutation so files can be sent to the server. The ! means that this mutation requires a file to be passed as an argument whenever this mutation is called.
The uploadFile mutation returns a String! - once the upload is finished, in the successful response we'll send back the url of the uploaded file.
The final step is to add some middleware to our Express instance to allow for multipart requests to be sent to the server. This middleware is available in the graphql-upload package:
...
import { GraphQLUpload, graphqlUploadExpress } from 'graphql-upload'

  const app = express();
  const httpServer = createServer(app);

  const typeDefs = gql`
    ...
  `;

  const resolvers = {
    ...
  };

  const apolloServer = new ApolloServer({ typeDefs, resolvers })

  await apolloServer.start()

  // This middleware should be added before calling `applyMiddleware`.
  app.use(graphqlUploadExpress());

  apolloServer.applyMiddleware({ app, path: `/api` })

  httpServer.listen({ port: process.env.PORT || 4000 }, () =>
    console.log(`Server listening on localhost:4000${apolloServer.graphqlPath}`)
  )

...
The middleware function graphqlUploadExpress() needs to be applied before applyMiddleware is called.
Throwing an error if the file is too big
Before handling the upload to Google, you'll want to put a limit on the file size that can be uploaded. Otherwise your cost with Google can get out of hand 💰.
To implement this, we'll check the file size of the uploaded file. If the file is too big we'll throw an error.
Our mutation takes one argument - the uploaded file. In our typeDefs, we're using the Upload scalar to define the type of this argument.
The Upload scalar returns a promise with some details on the file, so we'll need to await for the promise to resolve to get the details:
...

  const resolvers = {
    ...

    Mutation: {
      // add async to uploadFile resolver
      uploadFile: async (parent, args) => {
        // the file uploaded is a promise, so await to get the contents
        const { filename, mimetype, createReadStream } = await args.file;
      }
    }
  };

...
If you're working in TypeScript, you'll see some errors in your code editor as we've not considered types yet.
To keep things clean, let's add a directory which will contain functions, types and any configs we need to do with handling files. Let's first add a directory called libs:
mkdir libs
And then add a directory called files inside there:
cd libs
mkdir files
Inside the files directory you created, add a types.ts file:
touch libs/files/types.ts
As the Upload scalar is from the graphql-package we installed, in order to get the available types, we can use the @types/graphl-upload package we installed earlier.
Let's use the type from the package to create an interface:
import { FileUpload } from "graphql-upload"

export interface FileArgs {
  file: Promise<FileUpload>;
}
Now we can use this locally exported type in our resolver:
import { FileArgs } from './libs/files/types'
...

  const resolvers = {
    ...

    Mutation: {
      // add async to uploadFile resolver
      uploadFile: async (parent, args: FileArgs) => {
        // the file uploaded is a promise, so await to get the contents
        const { filename, mimetype, createReadStream } = await args.file;
      }
    }
  };

...
We'll use the filename and mimetype later on, it's the createReadStream we need to help us get the size of the uploaded file.
createReadStream is a function that opens up a stream and allows you to consume data from a source (in our case, the source being the uploaded file).
Streams are pretty complex - even Dan thinks so. Take a look at this article if you want a deeper dive into streams.
What we're going to do is create a function that passes createReadStream as an argument to get the file size - then the function will return this file size.
We'll be creating a few functions in this tutorial, so let's create a file inside our lib/files directory to put these functions
touch libs/files/index.ts
And then let's start writing our function to get the size of the file:
// function to check if the size of the file is permitted
export const checkFileSize = (createReadStream, maxSize) =>
  new Promise((resolves, rejects) => {
    let filesize = 0;
    let stream = createReadStream();
    stream.on('data', (chunk) => {
      filesize += chunk.length;
    });
    stream.on('end', () =>
      resolves(filesize)
    );
    stream.on('error', rejects);
  });
The function accepts two arguments:
createReadStreama function which is unique to a file that allows us to open up a stream and get the size of this filemaxSizethe maximum size of the file. We'll use this shortly to throw an error if the size is too big.
The function returns a Promise as it's seen as best practice to use asynchronous operations when working with streams.
The promise will call events data, end and error to handle the stream.
First we define the let filesize = 0, and then use the addition assignment operator (+=) to increment the file size.
This is because the data event sends the file through in chunks. So defining the filesize as a let variable and using the += operator allows us to increment the file size as the stream comes through.
Let's add types to this function, then we can test it and log the file size to see if it's working!
import { Buffer } from 'buffer';
import { FileUpload } from "graphql-upload"

// function to check if the size of the file is permitted
export const checkFileSize = (createReadStream: FileUpload["createReadStream"], maxSize: number) =>
  new Promise((resolves, rejects) => {
    let filesize = 0;
    let stream = createReadStream();
    stream.on('data', (chunk: Buffer) => {
      filesize += chunk.length;
    });
    stream.on('end', () =>
      resolves(filesize)
    );
    stream.on('error', rejects);
  });
Buffer is a built in type to node, so you just need to have the @types/node package installed to be able to access it. The starter repo I'm using in this tutorial already has this package installed.
Nice work.
Let's finish this part off and throw an error if the size of the file is too big.
We need to simply reject the Promise if the filesize is bigger than the maxSize argument you pass into the function:
import { Buffer } from 'buffer';
import { FileUpload } from "graphql-upload"

// function to check if the size of the file is permitted
export const checkFileSize = (createReadStream: FileUpload["createReadStream"], maxSize: number) =>
  new Promise((resolves, rejects) => {
    let filesize = 0;
    let stream = createReadStream();
    stream.on('data', (chunk: Buffer) => {
      filesize += chunk.length;
      if (filesize > maxSize) {
        rejects(filesize)
      }
    });
    stream.on('end', () =>
      resolves(filesize)
    );
    stream.on('error', rejects);
  });
Doing it this way also means that we don't need to wait to check the entire size of the file - as soon as it exceeds our max limit the Promise rejects.
As the rejects of a Promise can be handled in a try...catch, let's use our function to throw an error if the size of the uploaded file exceeds our defined limit:
import { ApolloServer, gql, UserInputError } from 'apollo-server-express';
import { checkFileSize } from './libs/files'
import { FileArgs } from './libs/files/types'
...

  const resolvers = {
    ...

    Mutation: {
      // add async to uploadFile resolver
      uploadFile: async (parent, args: FileArgs) => {
        // the file uploaded is a promise, so await to get the contents
        const { filename, mimetype, createReadStream } = await args.file;

        // first check file size before proceeding
        try {
          const oneGb: number = 1000000000
          await checkFileSize(createReadStream, oneGb)
        }
        catch (error) {
          if (typeof error === 'number') {
            throw new UserInputError('Maximum file size is 1GB');
          }
        }
      }
    }
  };

...
In the checkFileSize function, if the Promise rejects I'm passing through the filesize along with it. We know the filesize is a number, which is why I've used typeof to determine the error type and using Apollo's built in error throwing to throw an error stating the max file size.
I'd recommend testing your resolver with a front end in each step of the tutorial. For example you could log the size of the file and lower the maxSize variable to test the error. If you don't have a front end up and running, feel free to clone this React repository which has a simple file upload feature.
Defining a unique file name
For every file we upload to Google Cloud Storage, we want to give each file a unique filename.
Google treats the filename as the unique identifier, meaning that if a file gets uploaded that has the same filename as a file that already exists in the bucket, then the old file will be overwritten with the new one.
This is very problematic.
Imagine one of your users, Tim Cook, uploads a file named profile.png which is Tim's profile picture. Then an hour later, another one of your users, Steve Wozniak, uploads a file named profile.png which is Steve's profile picture. Tim's profile picture will have been overwritten by Steve's.
Let's add this to our resolver now:
import { ApolloServer, gql, UserInputError } from 'apollo-server-express';
import { checkFileSize, generateUniqueFilename } from './libs/files'
import { FileArgs } from './libs/files/types'
...

  const resolvers = {
    ...

    Mutation: {
      // add async to uploadFile resolver
      uploadFile: async (parent, args: FileArgs) => {
        // the file uploaded is a promise, so await to get the contents
        const { filename, mimetype, createReadStream } = await args.file;

        // first check file size before proceeding
        try {
          const oneGb: number = 1000000000
          await checkFileSize(createReadStream, oneGb)
        }
        catch (error) {
          if (typeof error === 'number') {
            throw new UserInputError('Maximum file size is 1GB');
          }
        }

        // generate a scrubbed unique filename
        const uniqueFilename = generateUniqueFilename(filename)
      }
    }
  };

...
Here I'm importing a function (which we'll get to in a second) called generateUniqueFilename which returns a unique filename that we assign to a variable.
Let's now go into our /libs/files/index.ts file to create this function:
...

export const generateUniqueFilename = (filename: string): string => {
  // step 1 - scrub filenname to remove spaces
  // step 2 - ensure filename is unique by appending a UUID
  // step 3 - return the unique filename
}
This function accepts 1 argument called filename which is a type of string. The function will return a string, which is why after the argument you'll see string again.
As indicated in the commented code, first we'll need to scrub the filename to get rid of any spaces. In the future when we need to find the filename in our bucket, removing the spaces makes it easier to do so.
...

export const generateUniqueFilename = (filename: string): string => {
  // step 1 - scrub filenname to remove spaces
  const trimmedFilename = filename.replace(/\s+/g, `-`);

  // step 2 - ensure filename is unique by appending a UUID
  // step 3 - return the unique filename
}
Next we need to ensure the file has a unique filename. I'm going to use the uuid package to handle this which will ensure our filenames are unique. Install the package:
npm install uuid
Also you'll need to install the types for this package:
npm install --save-dev @types/uuid
Then import the package (I'm renaming it as it feels a bit cleaner), create a uuid and then return the filename:
import { v4 as uuid } from 'uuid';
...

export const generateUniqueFilename = (filename: string): string => {
  // step 1 - scrub filenname to remove spaces
  const trimmedFilename = filename.replace(/\s+/g, `-`);

  // step 2 - ensure filename is unique by appending a UUID
  const unique = uuid()

  // step 3 - return the unique filename
  return `${unique}-${trimmedFilename}`
}
And that's it! For every file that's uploaded to the server, you're generating a unique filename.
Setting up Google Cloud Storage in your project
Let's now jump into setting up Google Cloud Storage in our server.
Developers turn to tools like Google Cloud Storage or AWS for storing files rather than storing files directly in the database. This article goes into some reasons why.
Typically, it's best practice to leverage these cloud based systems for storing the files and save metadata in your database which can then easily reference the file stored in the cloud.
Google Cloud Storage allows us to upload and retrieve files from buckets.
You'll need to have an existing Google Cloud project set up before proceeding. Here's the link to creating a new project if you need it.
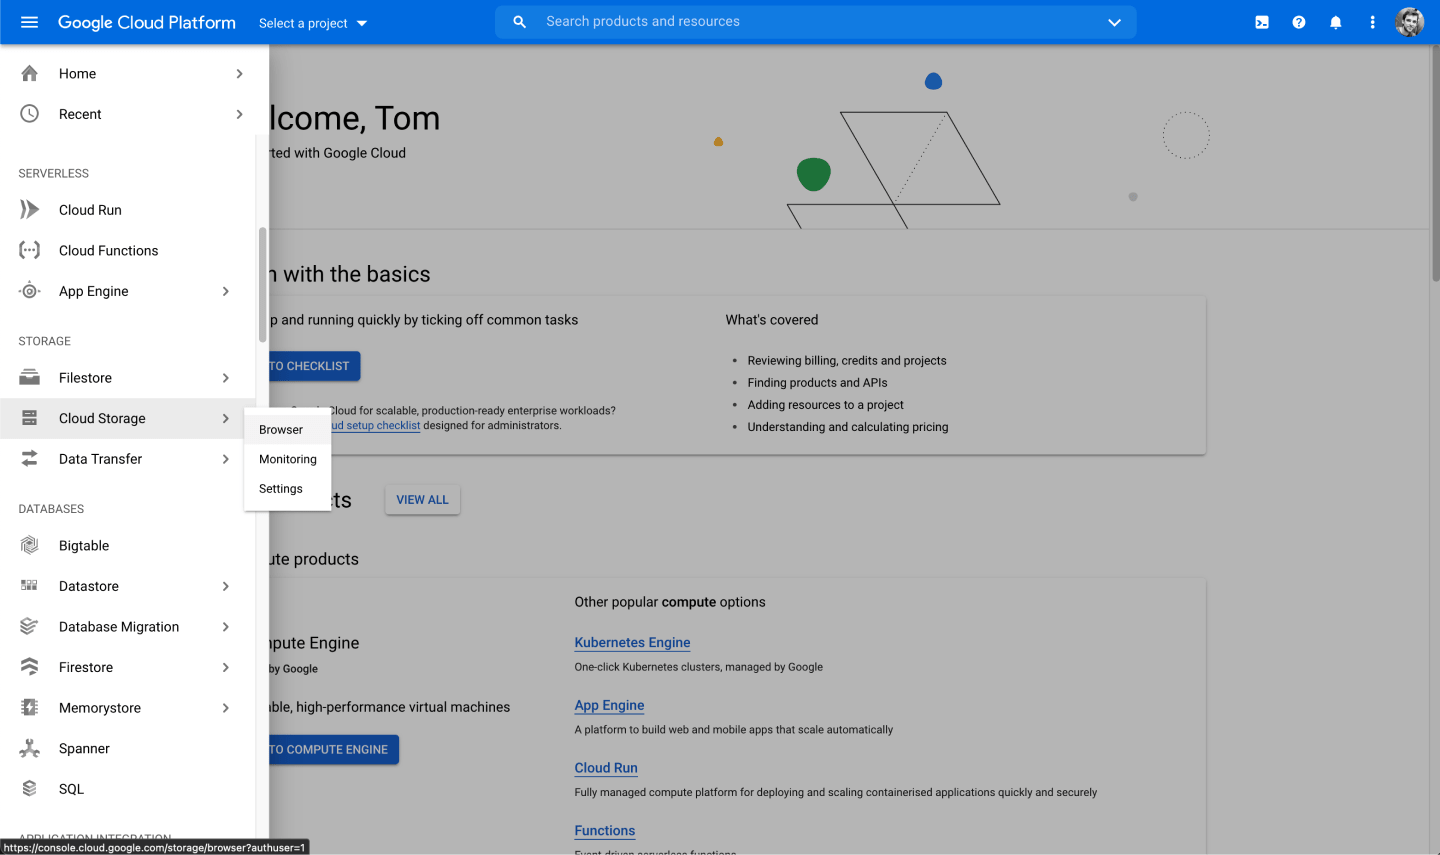
Inside the Google Cloud console, open up the navigation and head to Cloud Storage and then Browser:

You might be prompted to "Enable Billing", which is necessary if you'd like to use Google Cloud Buckets.
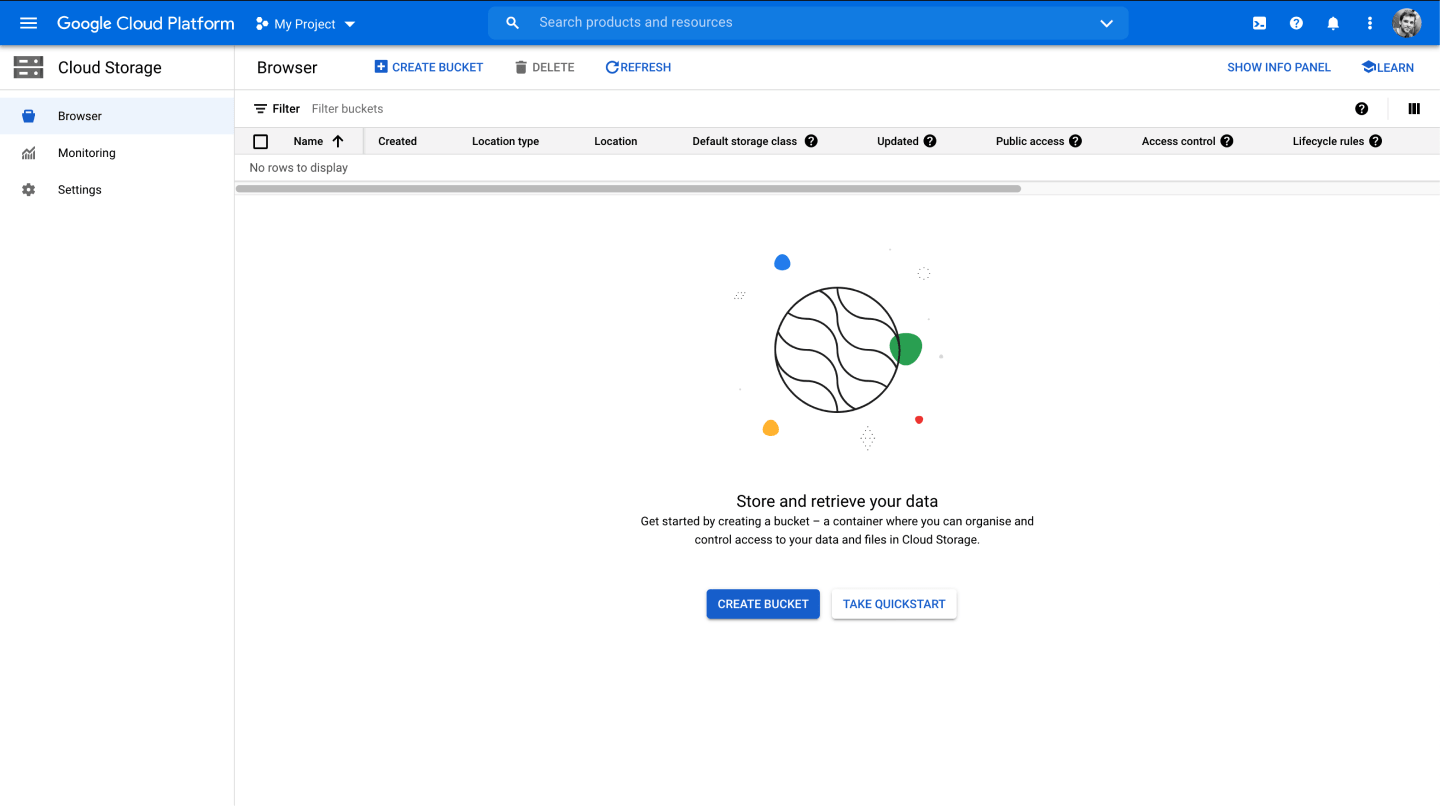
Next, press the Create Bucket button:

Go through the form and keep the default settings, except for when you reach the section on "Choose how to control access to objects" - you should uncheck the box "Enforce public access prevention on this bucket".
Once you're bucket is created, head to the Permissions tab and add a new permission:

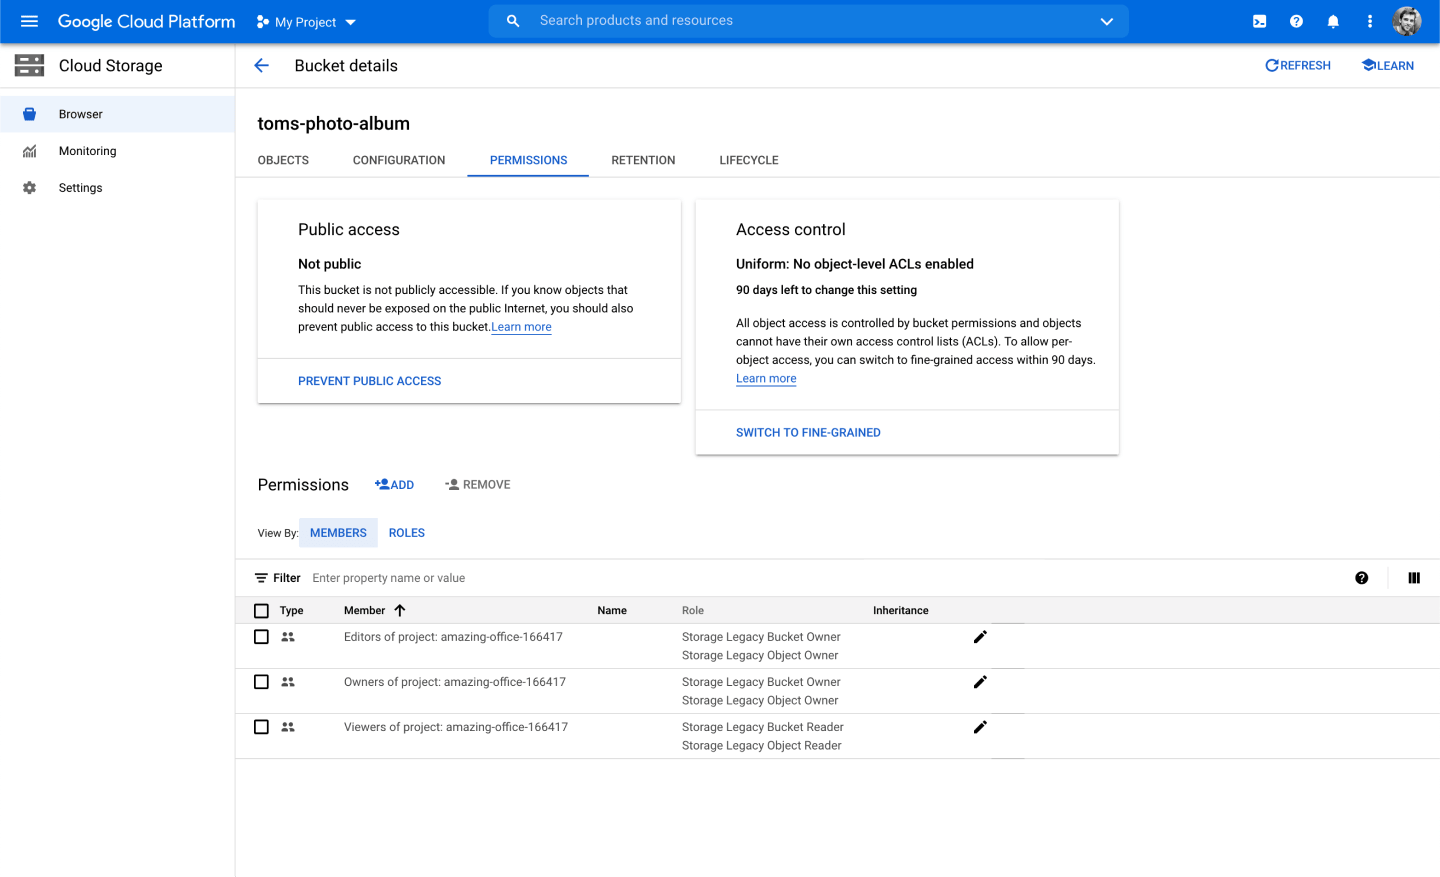
Search and select allUsers, then choose the role Storage Object Viewer:

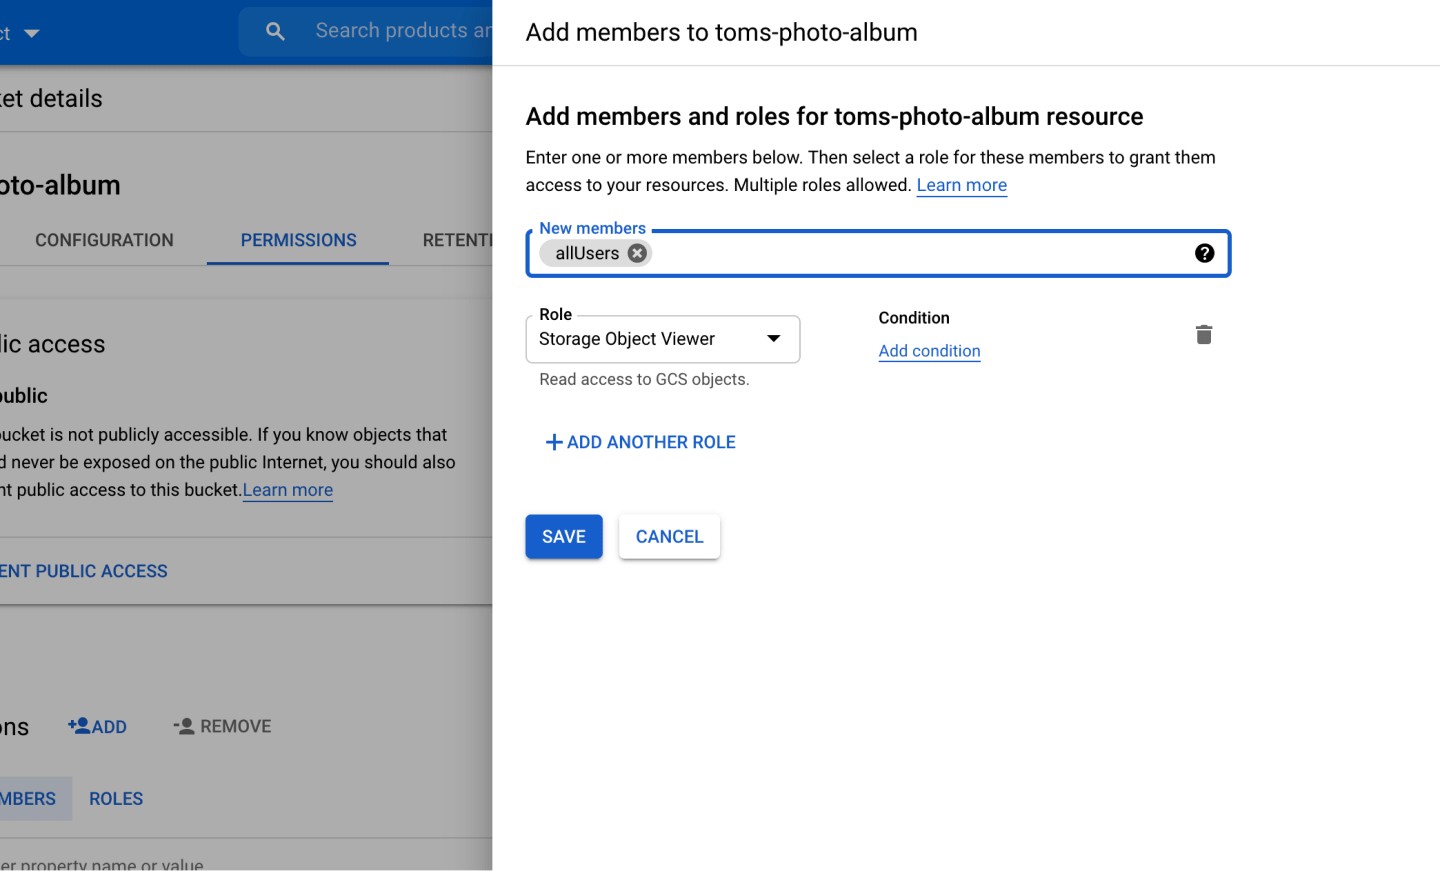
Setting these configurations means that all files uploaded are accessible via a unique hosted link that you can then use to show the image on the front end.
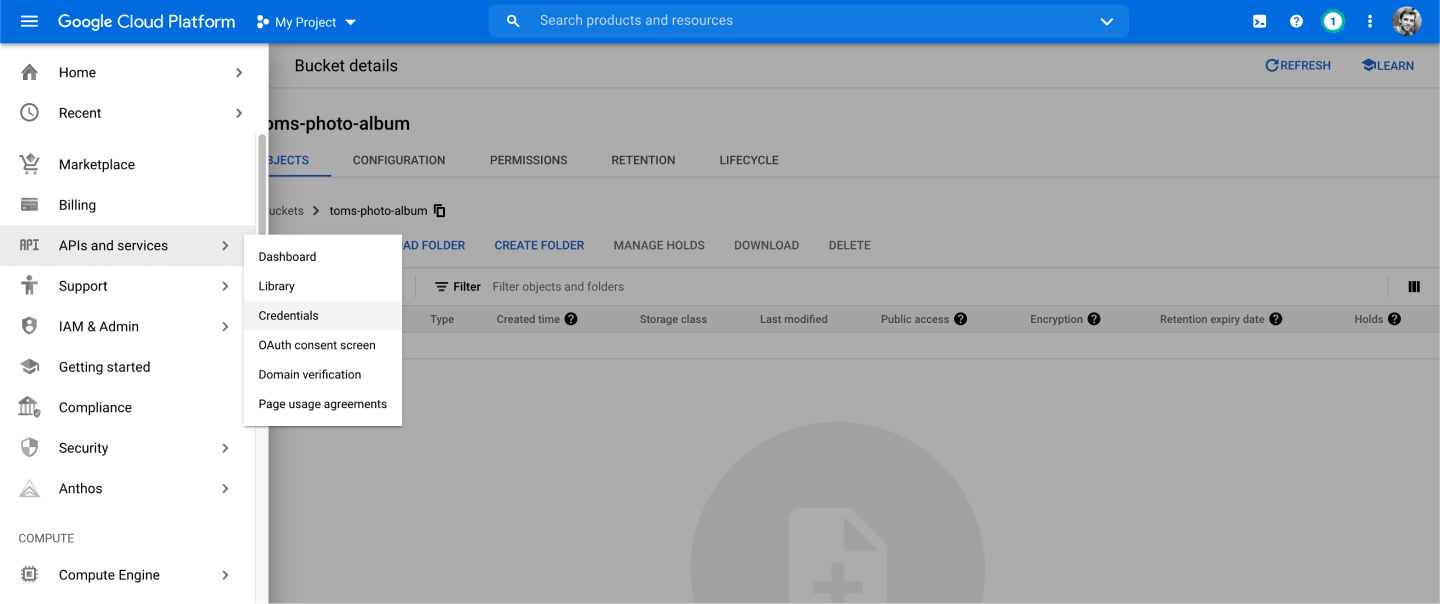
In order to start uploading files to the bucket, we need to set up some credentials (a service account key) with Google Cloud. Only the people who have access to these credentials will be able to access your bucket.
Head back into the navigation, go to APIs and services then select Credentials:

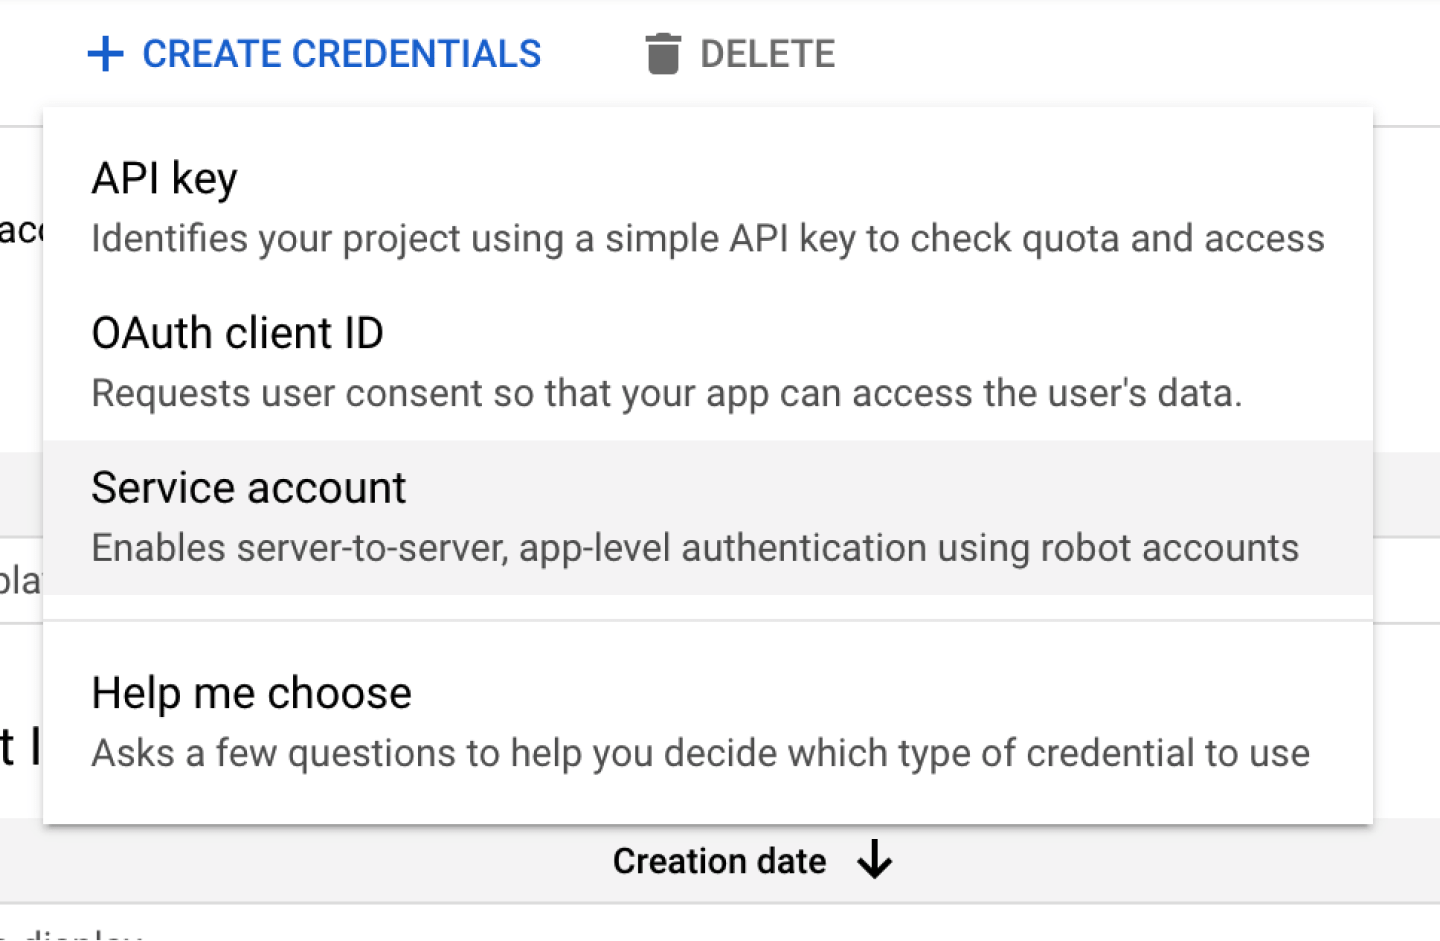
You'll then want to press the Create Credentials button and select Service account:

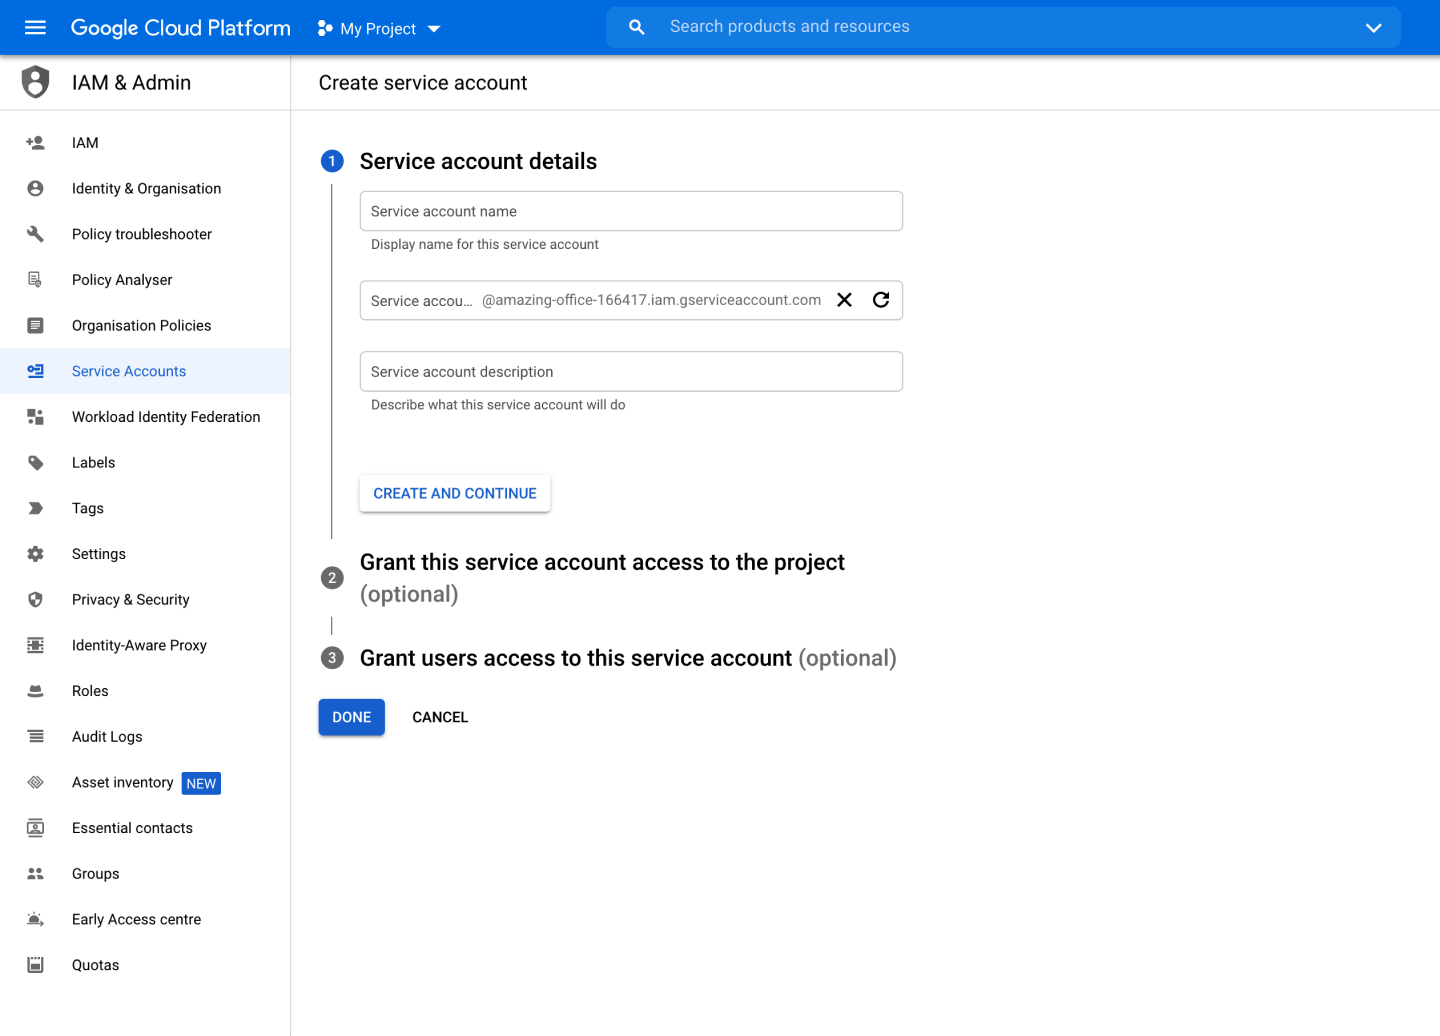
Give your service account a name and hit Create and continue:

In the next step, you'll need to apply a role to this service account to define the kind of access it has. You'll want to scroll to Cloud Storage and then choose Storage Admin, which gives you full read and write operations to Google Cloud Storage:

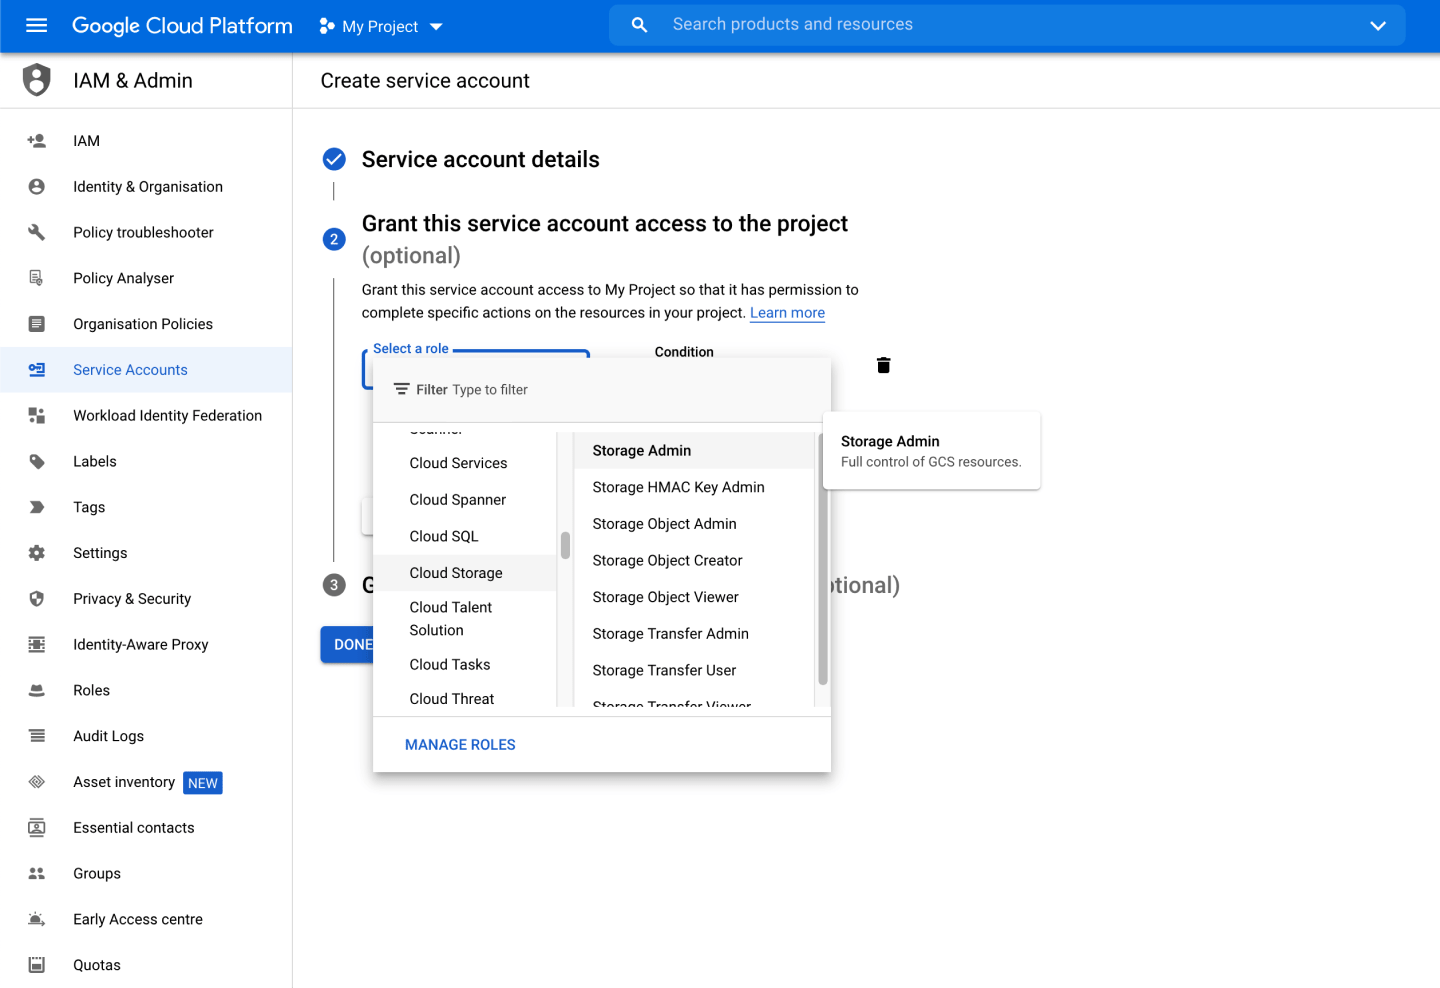
You can skip the final section.
Once your service account has been created, go into the service account and navigate to the Keys tab. You want to create a key for this service account which gives you the private, unique information you need to make read/write operations:

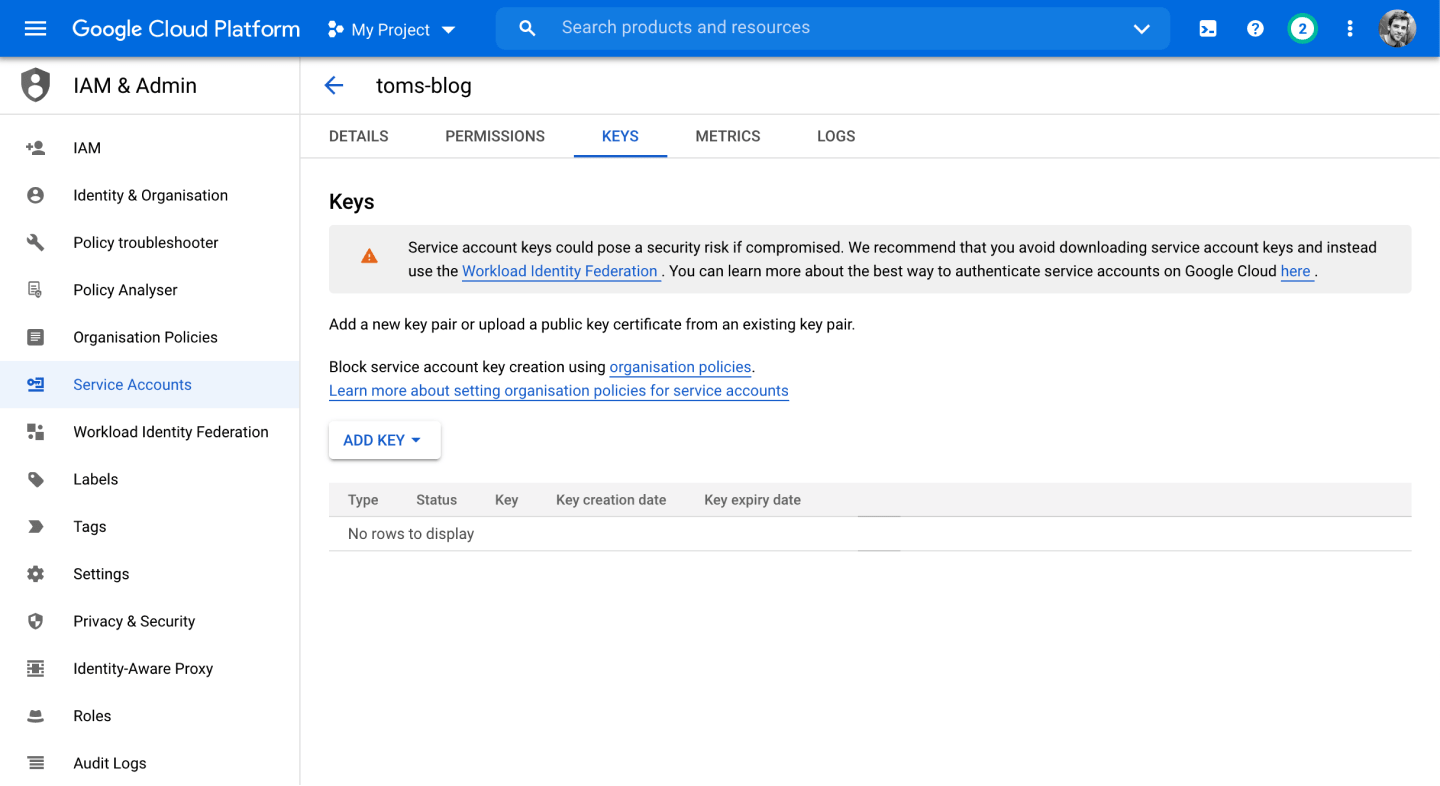
Then create a new key. When prompted, choose the JSON option, which will download the file to your local machine:

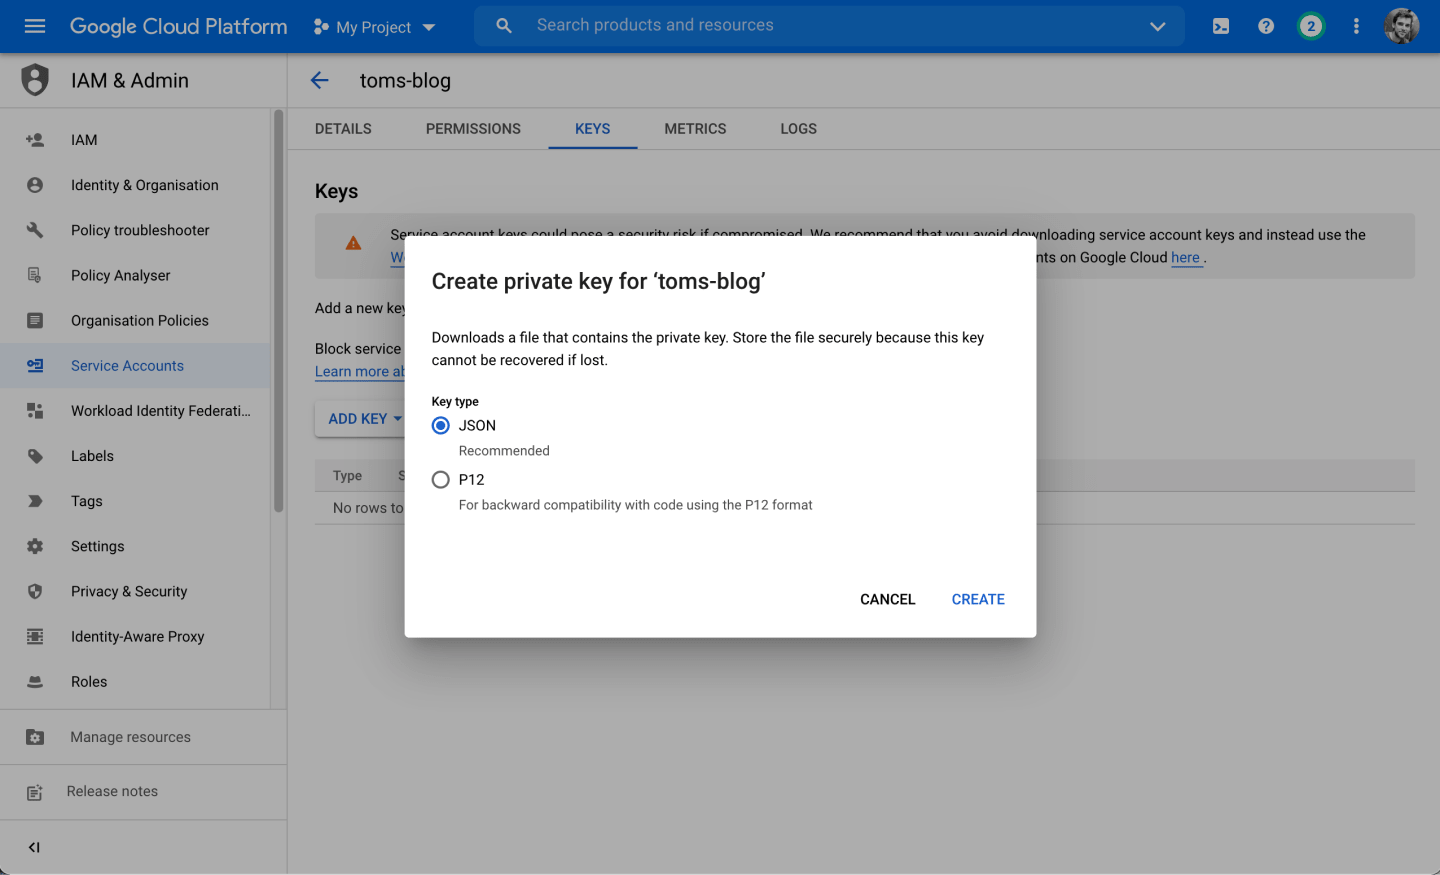
Most tutorials suggest adding this JSON file to the root of your project and adding it to your gitignore file (because this file contains sensitive keys to access your Google Cloud account).
However, I prefer to instead grab the relevant keys from the JSON file and leverage env variables. The main reason because it's much simpler for deployment - you just need to add the env variables in each environment. We'll get to this shortly.
Okay, with the admin out the way, we can now jump back into our code and start setting up the integration.
Let's first create a config file which will handle our Google Cloud configuration:
touch libs/files/config.ts
Next up, we need to download an official package from Google for interacting with Google Cloud Storage:
npm install @google-cloud/storage
And then add the following code to the config.ts file:
import { Storage } from '@google-cloud/storage'

const storage = new Storage({
  projectId: 'your-project-id',
  keyFilename: '/path/to/keyfile.json',
})
Creating a Storage instance allows us to declare our credentials using the service account key we set up above.
You'll need to swap out the projectId with your own one.
The keyFilename property allows us to access the JSON file I mentioned above, however, as we're going to use env variables instead, we need to update the code to:
import { Storage } from '@google-cloud/storage'

const storage = new Storage({
  projectId: process.env.GCP_PROJECT_ID,
  credentials: {
    client_email: process.env.GCP_CLIENT_EMAIL,
    private_key: process.env.GCP_PRIVATE_KEY ? process.env.GCP_PRIVATE_KEY.replace(/\\n/g, '\n') : ''
  }
});
We can use the credentials object instead of the keyFilename and pass in some env variables.
You'll need to open up the JSON file to grab the values you need, then add them to your env file so they're accessible via process.env.
Okay! Nice work so far.
The way we interact with Google Cloud will be centered around buckets - we'll be uploading files to a specific bucket.
Therefore, with our storage variable now defined we can access the bucket we made at the beginning of this section:
import { Storage } from '@google-cloud/storage'

const storage = new Storage({
  projectId: process.env.GCP_PROJECT_ID,
  credentials: {
    client_email: process.env.GCP_CLIENT_EMAIL,
    private_key: process.env.GCP_PRIVATE_KEY ? process.env.GCP_PRIVATE_KEY.replace(/\\n/g, '\n') : ''
  }
});

export const bucket = storage.bucket(process.env.GCP_BUCKET_ID || "")
You'll need to use your unique bucket id. I've put mine in an env variable too. I've also exported the bucket as we'll need to import it later on when we want to start uploading files to the bucket.
Upload the file to your Google Cloud Storage Bucket
Okay! With our configs set up for Google Cloud, we're now ready to upload the file to our bucket.
Here's how our code will look in the resolver:
import { ApolloServer, gql, UserInputError } from 'apollo-server-express';
import { checkFileSize, generateUniqueFilename, uploadToGoogleCloud } from './libs/files'
import { FileArgs } from './libs/files/types'
...

  const resolvers = {
    ...

    Mutation: {
      // add async to uploadFile resolver
      uploadFile: async (parent, args: FileArgs) => {
        // the file uploaded is a promise, so await to get the contents
        const { filename, mimetype, createReadStream } = await args.file;

        // first check file size before proceeding
        try {
          const oneGb: number = 1000000000
          await checkFileSize(createReadStream, oneGb)
        }
        catch (error) {
          if (typeof error === 'number') {
            throw new UserInputError('Maximum file size is 1GB');
          }
        }

        // generate a scrubbed unique filename
        const uniqueFilename = generateUniqueFilename(filename)

        // upload to Google Cloud Storage
        try {
          await uploadToGoogleCloud(createReadStream, uniqueFilename)
        } catch () {
          throw new UserInputError('Error with uploading to Google Cloud');
        }
      }
    }
  };

...
We're importing an asynchronous function (which we'll get to into a second) called uploadToGoogleCloud, passing in 2 arguments:
createReadStream- Just like we did in thecheckFileSizefunction, we'll pass increateReadStreamwhich allows us to open up a readable stream on the file, meaning we can read the data present in it.uniqueFilename- this is the string we returned from ourgenerateUniqueFilenamein the previous step.
This uploadToGoogleCloud is handled in a try...catch. If the upload fails, we're throwing an error.
Let's now go into our /libs/files/index.ts file to create this function:
import { FileUpload } from "graphql-upload"
...

export const uploadToGoogleCloud = (createReadStream: FileUpload["createReadStream"], filename: string): Promise<void> => {
  // step 1 - upload the file to Google Cloud Storage
  // step 2 - handle the resolves & rejects
}
The function takes the 2 arguments mentioned above. The type for the createReadStream is available through the graphl-upload types package (we did the same thing in the checkFileSize function).
Once the file uploads to Google, you might expect a response confirming the file uploaded, along with the filename, file size and other meta data.
However, because we're working with streams it won't work like that. Instead the function will return a Promise with no value (that's what Promise<void> means) - this means if the Promise resolves, then we know the file upload was successful. If the Promise rejects (and therefore throws an error in the try...catch), then we know the file did not upload.
Let's add some code to handle the upload:
import { FileUpload } from "graphql-upload"
import { bucket } from "./config"
...

export const uploadToGoogleCloud = (createReadStream: FileUpload["createReadStream"], filename: string): Promise<void> => {
  // step 1 - upload the file to Google Cloud Storage
  return new Promise((resolves, rejects) =>
    createReadStream()
      .pipe(bucket.file(filename).createWriteStream({
        resumable: false,
        gzip: true
      }))
  // step 2 - handle the resolves & rejects
}
We're going to first use the createReadStream to give us access to the data in the file. The pipe method allows us to consume this data, and where the upload to Google Cloud Storage happens.
The code createWriteStream({...}) is where the magic happens. We're importing bucket which we defined in our config file and then creating a writeable stream against a file in this bucket, passing in the filename (which defines the name of the file that's being uploaded).
There are a couple of options passed into the writeable stream: resumable: true, gzip: true. Take a look in the docs for what these mean, as well as more options you can pass in.
Now the file has been uploaded, we need to handle the resolves and rejects. Once the file finishes uploading, we can resolve the promise, if there's an error on upload, we can reject the promise:
import { FileUpload } from "graphql-upload"
import { bucket } from "./config"
...

export const uploadToGoogleCloud = (createReadStream: FileUpload["createReadStream"], filename: string): Promise<void> => {
  // step 1 - upload the file to Google Cloud Storage
  return new Promise((resolves, rejects) =>
    createReadStream()
      .pipe(bucket.file(filename).createWriteStream({
        resumable: false,
        gzip: true
      }))
      .on('error', (err: any) => rejects(err)) // reject on error
      .on('finish', resolves)) // resolve on finish
}
Okay, that's the upload to Google handled!
The final step is head back into the resolver and handle the response.
We're going to return back a Google Cloud url of the uploaded file:
import { ApolloServer, gql, UserInputError } from 'apollo-server-express';
import { checkFileSize, generateUniqueFilename, uploadToGoogleCloud } from './libs/files'
import { FileArgs } from './libs/files/types'
...

  const resolvers = {
    ...

    Mutation: {
      // add async to uploadFile resolver
      uploadFile: async (parent, args: FileArgs) => {
        // the file uploaded is a promise, so await to get the contents
        const { filename, mimetype, createReadStream } = await args.file;

        // first check file size before proceeding
        try {
          const oneGb: number = 1000000000
          await checkFileSize(createReadStream, oneGb)
        }
        catch (error) {
          if (typeof error === 'number') {
            throw new UserInputError('Maximum file size is 1GB');
          }
        }

        // generate a scrubbed unique filename
        const uniqueFilename = generateUniqueFilename(filename)

        // upload to Google Cloud Storage
        try {
          await uploadToGoogleCloud(createReadStream, uniqueFilename)
        } catch () {
          throw new UserInputError('Error with uploading to Google Cloud');
        }

        return `https://storage.googleapis.com/${process.env.GCP_BUCKET_ID}/${uniqueFilename}`
      }
    }
  };

...
The structure of the url is always the same - it uses the bucket id and the filename.
Here's some extra bonus steps you could take:
- Instead of returning the url of the hosted file, return back some data about the file like the compressed file size. You'll need to look at the docs to see how you can get the file size of the compressed file
- After the upload is successful, save some metadata to your database on the file so it can be easily referenced
Here's the Github repo again if you'd like to take a look at all the code together.
Nice work for making it all the way to the end 😎.