
- Published on
- Last updated:
Building a full-stack, fully type-safe pnpm monorepo with NestJS, NextJS & tRPC
In this tutorial, we're going to start from scratch and build a full-stack, end-to-end type-safe pnpm monorepo with NestJS, NextJS 13 (using the new /app directory) & tRPC. We'll also cover deployment with Railway 🚝.
I have fallen in love with this tech stack as the developer experience is SO good! I'm pretty sure you will too if you keep reading 😉.
In particular, I love that:
- It's fully end-to-end type safe
- The tRPC server is fully integrated into NestJS, so you have access to all of NestJS's wonderful functionality like dependency injection
- Fits really well with the NextJS 13 transition to server-side rendering
- It keeps the frontend(s) and backend project separate, but seamlessly working together in the monorepo
I also wrote this tutorial as many people in the NestJS community are curious about how to use tRPC with NestJS!
The only pre-requisites for this tutorial are that you'll need pnpm and the NestJS CLI installed on your machine.
As always, check out the Github repo if you want to check out the code for this tutorial.
Ready? Let's dive in 🤿.
Table of Contents
Monorepo setup with pnpm workspaces
So, let's begin by setting up a brand new project:
mkdir nextjs-nestjs-trpc
cd nextjs-nestjs-trpc
pnpm init
This will generate a package.json in the root of your directory.
Let's also initialize git and add a .gitignore file to intentionally not track certain files and directories.
git init
touch .gitignore
In the .gitignore, add the following:
node_modules
dist
build
.env
To build our monorepo, we're going to use a pnpm workspace. This will allow us to have different apps (frontend and backend) in the same repository and make use of pnpm's speedy package management.
To set up a pnpm workspace, add a pnpm-workspace.yaml file at the root of the project:
touch pnpm-workspace.yaml
And inside, add the following:
packages:
  # all apps in direct subdirs of apps/
  - 'apps/*'
This tells pnpm that any directories inside apps/ are included in the pnpm workspace.
Finally, add an apps/ directory at the root of the project:
mkdir apps
Nice! Let's now add the frontend and backend applications into the apps/ directory.
Add a NestJS application
Let's add a NestJS application called server. You can call this whatever you like!
You'll need NestJS CLI installed on your machine before running the following:
cd apps/
nest new server --strict --skip-git --package-manager=pnpm
The options used are important here, so let me explain each one:
--strictEnsures the NestJS TypeScript compiler config uses strict mode. Because if you're not using strict mode, why bother with TypeScript 🤷♂️?--skip-gitBy default when creating a new NestJS application it initializes git for you. We don't want this to happen as we've also initialized git at the root of the project.--package-manager=pnpmMakes sure the NestJS app uses pnpm as the package manager.
To double check the NestJS server works before proceeding, spin up a local server:
cd /server
pnpm start:dev
Nice! You've just added a NestJS application to the monorepo.
Before proceeding, you'll need to make a small tweak to the port that the NestJS server is listening on. By default, NestJS uses port 3000, which is the same as NextJS (which we'll be adding in the next step).
So to prevent a port conflict in your local servers, simply change this to 4000 for now to listen to this port instead.
I would also recommend using an environment variable to get the port and then use 4000 as a backup. This is worth doing as when you deploy, your hosting provider will automatically swap out the port:
import { NestFactory } from '@nestjs/core';
import { AppModule } from './app.module';

async function bootstrap() {
  const app = await NestFactory.create(AppModule);
  await app.listen(process.env.PORT || 4000);
}
bootstrap();
It's worth noting that in order to use environment variables in NestJS apps, you need to use the config module. Check out my tutorial on how to use the config module in NestJS if you need help with that!
So your NestJS local server should now be running on localhost:4000.
Great! Let's now go to the NextJS 13 setup.
Add a NextJS 13 application
Let's add a NextJS 13 application called web. You can call this whatever you like!
Head back into the apps/ directory and run:
pnpx create-next-app@latest
On installation, you'll get some prompts. Answer them as shown here:
What is your project named? # web (change to whatever you want)
Would you like to use TypeScript with this project? # Yes
Would you like to use ESLint with this project? # Yes
Would you like to use Tailwind CSS with this project? Yes # Yes
Would you like to use `src/` directory with this project? # No
Use App Router (recommended)? # Yes
Would you like to customize the default import alias? # No
Inside your apps/ directory, you'll now have a new NextJS project (mines called web/)!
Let's double check the NextJS project is all working fine and spin up a local server:
cd /web
pnpm dev
That should all be working well.
So we now have 2 apps in our monorepo, both running locally.
Monorepo config updates and DX tips
So, in the next step, we'll be adding tRPC. The tRPC server will live inside the NestJS application, and the tRPC client will live inside the NextJS application.
The tRPC client will need access to a type called AppRouter (we'll get to this in the next section) which is defined inside of the NestJS app.
In our current setup, this won't be possible - you can only import files from the respective app you're in.
So let's make some TypeScript compiler config changes to fix this! We're going to create a new tsconfig.json file at the root of the project that the applications can extend.
Go to the root of your project and add a tsconfig.json
touch tsconfig.json
Add the following. If you've used different names for your application directories, make sure they're used in the paths object:
{
  "compilerOptions": {
    "baseUrl": ".",
    "experimentalDecorators": true,
    "emitDecoratorMetadata": true,
    "incremental": true,
    "skipLibCheck": true,
    "strictNullChecks": true,
    "noImplicitAny": true,
    "strictBindCallApply": true,
    "forceConsistentCasingInFileNames": true,
    "noFallthroughCasesInSwitch": true,
    "paths": {
      "@server/*": ["./apps/server/src/*"],
      "@web/*": ["./apps/web/*"]
    }
  }
}
Next, we need to update the tsconfig.json file in both applications to extend the tsconfig.json at the root of the project.
First, update the NestJS tsconfig:
{
  "extends": "../../tsconfig.json", // Extend the config options from the root
  "compilerOptions": {
    // The following options are not required as they've been moved to the root tsconfig
    // "baseUrl": "./",
    // "emitDecoratorMetadata": true,
    // "experimentalDecorators": true,
    // "incremental": true,
    // "skipLibCheck": true,
    // "strictNullChecks": true,
    // "noImplicitAny": true,
    // "strictBindCallApply": true,
    // "forceConsistentCasingInFileNames": true,
    // "noFallthroughCasesInSwitch": true
    "module": "commonjs",
    "declaration": true,
    "removeComments": true,
    "allowSyntheticDefaultImports": true,
    "target": "es2017",
    "sourceMap": true,
    "outDir": "./dist",
  }
}
And then update the NextJS tsconfig:
{
  "extends": "../../tsconfig.json", // Extend the config options from the root,
  "compilerOptions": {
    // The following options are not required as they've been moved to the root tsconfig
    // "paths": {
    //   "@/*": ["./*"]
    // }
    // "incremental": true,
    // "forceConsistentCasingInFileNames": true,
    // "skipLibCheck": true,
    "target": "es5",
    "lib": ["dom", "dom.iterable", "esnext"],
    "allowJs": true,
    "strict": true,
    "noEmit": true,
    "esModuleInterop": true,
    "module": "esnext",
    "moduleResolution": "node",
    "resolveJsonModule": true,
    "isolatedModules": true,
    "jsx": "preserve",
    "plugins": [
      {
        "name": "next"
      }
    ],
  },
  "include": ["next-env.d.ts", "**/*.ts", "**/*.tsx", ".next/types/**/*.ts"],
  "exclude": ["node_modules"]
}
Okay! As we've changed the TypeScript compiler options for both applications, let's just spin up our local servers to ensure everything is working.
Instead of changing the directory and having a new terminal tab for each application, we can define a single command at the root of the directory to spin up both applications at the same time. Here's how you do this:
In the project root, open up the package.json file and add a new script called "dev":
{
  "name": "nextjs-nestjs-trpc",
  "version": "1.0.0",
  "description": "",
  "main": "index.js",
  "scripts": {
    "dev": "pnpm run --parallel dev",
  },
  "keywords": [],
  "author": "",
  "license": "ISC"
}
This looks inside the app/ directory for any scripts called dev and runs them in parallel.
The NextJS project local dev server script is already dev, so we just need to update the NestJS local dev server script from start:dev to dev:
{
  "name": "server",
  "version": "0.0.1",
  "description": "",
  "author": "",
  "private": true,
  "license": "UNLICENSED",
  "scripts": {
    "build": "nest build",
    "format": "prettier --write \"src/**/*.ts\" \"test/**/*.ts\"",
    "start": "nest start",
    "dev": "nest start --watch", // updated from start:dev to dev
    // ...
  },
  // ...
}
Now in the root of your directory, run the command:
pnpm dev
Both local servers should now spin up in parallel, confirming that the new script works and the TSconfig changes we made are also working 👍.
Two final things before getting onto tRPC.
The first is a quick tip 💡.
When installing npm packages, you'll want to install them in the respective application rather than the root of the project.
This means you'll need to change the directory into the respective application each time you want to install a new package.
This gets a little frustrating - but fear not - there's a better way!
With pnpm you can make use of the --filter option.
Imagine in the NestJS app you want to install the @nestjs/config package. In the root of your directory, you can run:
pnpm add @nestjs/config --filter=server
This is much simpler - no more switching between directories to install new packages.
This leads me to the second thing.
If you actually install that package in the NestJS app from the root, you'll get a missing peer dependency error:
apps/server
└─┬ ts-loader 9.4.3
  └── ✕ missing peer webpack@^5.0.0
Peer dependencies that should be installed:
  webpack@^5.0.0
This error wouldn't normally happen in a standalone NestJS application, so why is it happening for us?
The reason is that in a monorepo setup, the package manager doesn't automatically handle the peer dependencies for individual applications within the workspace, so we'll need to manually install that dependency in the NestJS app:
pnpm add -D webpack@^5.0.0 --filter=server
Nice work! You won't get that peer dependency error when installing new packages into the NestJS app anymore.
Let's now get to the fun part...
Using tRPC with NestJS & NextJS
We'll first add the tRPC server in the NestJS app, then add the tRPC client in the NextJS app. Let's go!
Adding the tRPC server to NestJS
Begin by installing the tRPC server and zod packages in the NestJS application:
pnpm add @trpc/server zod --filter=server
Next, let's add a tRPC module in the NestJS application which will encapsulate all the code related the tRPC server.
First, inside the /src directory, add a new directory called /trpc:
mkdir apps/server/src/trpc
Then create the 3 files, we'll need: the module, the service and the router:
touch apps/server/src/trpc/trpc.module.ts
touch apps/server/src/trpc/trpc.service.ts
touch apps/server/src/trpc/trpc.router.ts
Let's first set up the module:
import { Module } from '@nestjs/common';

@Module({
  imports: [],
  controllers: [],
  providers: [],
})
export class TrpcModule {}
Then make sure the module is imported into the main AppModule:
import { Module } from '@nestjs/common';
import { AppController } from './app.controller';
import { AppService } from './app.service';
import { TrpcModule } from '@server/trpc/trpc.module';

@Module({
  imports: [TrpcModule],
  controllers: [AppController],
  providers: [AppService],
})
export class AppModule {}
Let's now add a class inside to trpc.service.ts to expose some tRPC properties we'll need:
import { Injectable } from '@nestjs/common';
import { initTRPC } from '@trpc/server';

@Injectable()
export class TrpcService {
  trpc = initTRPC.create();
  procedure = this.trpc.procedure;
  router = this.trpc.router;
  mergeRouters = this.trpc.mergeRouters;
}
Make sure you include this service in the TrpcModule as a provider:
import { Module } from '@nestjs/common';
import { TrpcService } from '@server/trpc/trpc.service';

@Module({
  imports: [],
  controllers: [],
  providers: [TrpcService],
})
export class TrpcModule {}
Let's now add a class inside to trpc.router.ts. This is where we'll:
- Define the tRPC routers (i.e. the methods that the tRPC client will be able to call)
- Add a middleware method to expose the tRPC api in our NestJS server
- Export the
AppRoutertype (used in the next step when we set up the tRPC client)
It should look like this:
import { INestApplication, Injectable } from '@nestjs/common';
import { z } from 'zod';
import { TrpcService } from '@server/trpc/trpc.service';
import * as trpcExpress from '@trpc/server/adapters/express';

@Injectable()
export class TrpcRouter {
  constructor(private readonly trpc: TrpcService) {}

  appRouter = this.trpc.router({
    hello: this.trpc.procedure
      .input(
        z.object({
          name: z.string().optional(),
        }),
      )
      .query(({ input }) => {
        const { name } = input;
        return {
          greeting: `Hello ${name ? name : `Bilbo`}`,
        };
      }),
  });

  async applyMiddleware(app: INestApplication) {
    app.use(
      `/trpc`,
      trpcExpress.createExpressMiddleware({
        router: this.appRouter,
      }),
    );
  }
}

export type AppRouter = TrpcRouter[`appRouter`];
The beautiful thing (yes I genuinely do find it beautiful) is now I can use dependency injection inside the routers. This means I can inject other services into the tRPC routers, keeping the routers clean, minimal and not full of business logic. Here's an example of what I mean:
It should look like this:
import { INestApplication, Injectable } from '@nestjs/common';
import { z } from 'zod';
import { TrpcService } from '@server/trpc/trpc.service';
import * as trpcExpress from '@trpc/server/adapters/express';

@Injectable()
export class TrpcRouter {
  constructor(
    private readonly trpc: TrpcService,
    private readonly userService: UserService // injected service
  ) {}

  appRouter = this.trpc.router({
    getUsers: this.trpc.procedure
      .input(
        z.object({
          name: z.string(),
        }),
      )
      .query(async ({ input }) => {
        const { name } = input;
        return await this.userService.getUsers(name); // random example showing you how you can now use dependency injection
      }),
  });

  async applyMiddleware(app: INestApplication) {
    app.use(
      `/trpc`,
      trpcExpress.createExpressMiddleware({
        router: this.appRouter,
      }),
    );
  }
}

export type AppRouter = TrpcRouter[`appRouter`];
Note in the above example, I've added an example router which is deliberately simple to show you how it can be used in the tRPC client in the next step.
As you add more routers this could end up being quite long and messy, so you will likely want to make use of merging routers.
Make sure you include the router in the TrpcModule as a provider:
import { Module } from '@nestjs/common';
import { TrpcService } from '@server/trpc/trpc.service';
import { TrpcRouter } from '@server/trpc/trpc.router';

@Module({
  imports: [],
  controllers: [],
  providers: [TrpcService, TrpcRouter],
})
export class TrpcModule {}
The final thing to do before the tRPC server is ready is update the main.ts file to apply the middleware we defined in the router above and enable CORS:
import { NestFactory } from '@nestjs/core';
import { AppModule } from './app.module';
import { TrpcRouter } from '@server/trpc/trpc.router';

async function bootstrap() {
  const app = await NestFactory.create(AppModule);
  app.enableCors();
  const trpc = app.get(TrpcRouter);
  trpc.applyMiddleware(app);
  await app.listen(4000);
}
bootstrap();
Enabling CORS is important, otherwise, you'll get those inevitable CORS errors on the client side.
Okay. So we've built out the tRPC server. Let's finish this off and create a tRPC client!
Adding the tRPC client to NextJS
Before diving in, it's worth quickly discussing NextJS 13, the new App Router and how it impacts using the tRPC client.
Before NextJS 13, all network requests were always made from the client side (i.e. from the browser). Developers got used to this and it worked. We built crazy state management systems and used the useEffects hook everywhere!
But now, NextJS have introduced a bit of a paradigm shift (ironically a bit of a U-turn as this is how older frameworks like Ruby-on-rails & Laravel have always worked) by moving more to the server side.
So by server side, I'm not talking about the NestJS server-side application we've been working on above. I'm talking about the server side of the NextJS application.
For example, when someone is navigating between routes in a NextJS 13 app, each time they change route a request will hit the NextJS server which will then return UI to the browser. So now we have an opportunity to do network calls on the server side of the NextJS app before the UI is rendered. This is enabled by the introduction of Server Components.
There are lots of benefits to taking this approach, but it does require quite a big mindset shift to how frontend apps have been built the last few years.
With that said, let's jump into adding the tRPC client!
Begin by installing the tRPC client package in the NextJS application:
pnpm add @trpc/client @trpc/server --filter=web
The @trpc/server package is required, otherwise, you'll get another peer dependency error.
Inside the app/ directory, add a new file called trpc.ts
touch apps/web/app/trpc.ts
In this file, we're going to define the tRPC client. In order to create the tRPC client, we need to use the AppRouter type which we exported when creating the tRPC server in the previous step. This is what will give us the end-to-end type safety from the front of the stack to the back!
import { createTRPCProxyClient, httpBatchLink } from "@trpc/client";
import { AppRouter } from '@server/trpc/trpc.router'

export const trpc = createTRPCProxyClient<AppRouter>({
  links: [
    httpBatchLink({
      url: "http://localhost:4000/trpc", // you should update this to use env variables
    }),
  ],
});
Because we centralized the TSconfig and set the paths, we can import the AppRouter into the NextJS application (even though that type comes from another application).
The url property should point to the tRPC server, which in our case is localhost:4000/trpc. You'll need to update this to use environment variables if you're deploying!
Let's now make a server-side tRPC call inside NextJS.
Inside the NextJS /app directory you'll see a file called page.tsx.
Update the function to an async function, then use the trpc client to call the hello procedure we defined in the tRPC server:
import { trpc } from "@web/app/trpc";

export default async function Home() {
  const { greeting } = await trpc.hello.query({ name: `Tom` });
  return <div>{greeting}</div>;
}
So that's how you make a server-side call using the tRPC client. How about a client-side call?
Let's give that a spin.
Add a new component called ClientSide.tsx and add the following:
"use client";

import { trpc } from "@web/app/trpc";
import { useEffect, useState } from "react";

export default function ClientSide() {
  const [greeting, setGreeting] = useState("");
  useEffect(() => {
    trpc.hello
      .query({ name: `Tom` })
      .then(({ greeting }) => setGreeting(greeting));
  }, []);
  return <p>I am client side: {greeting}</p>;
}
And that's it! You'll see everything is fully typed in your IDE, giving you errors if you try to access a property that doesn't exist from the returned query.
Deploying to Railway
This kind of tutorial is not complete without discussing deployment!
We're now going to deploy both the NestJS and NextJS apps to Railway (who have a free plan!).
Before diving into that, we'll first need to make a small tweak to the tRPC client in the NextJS app.
Right now, the url points to the local NestJS server:
import { createTRPCProxyClient, httpBatchLink } from "@trpc/client";
import { AppRouter } from '@server/trpc/trpc.router'

export const trpc = createTRPCProxyClient<AppRouter>({
  links: [
    httpBatchLink({
      url: "http://localhost:4000/trpc", // you should update this to use env variables
    }),
  ],
});
This won't work when deployed - we want to point to the respective NestJS deployed server instead.
Let's use an environment to configure this:
import { createTRPCProxyClient, httpBatchLink } from "@trpc/client";
import { AppRouter } from "@server/trpc/trpc.router";

export const trpc = createTRPCProxyClient<AppRouter>({
  links: [
    httpBatchLink({
      url: `${process.env.NEXT_PUBLIC_NESTJS_SERVER}/trpc`,
    }),
  ],
});
And then add an env.local file to the root of your NextJS app (inside the /web directory) and add the environment variable there:
NEXT_PUBLIC_NESTJS_SERVER=http://localhost:4000
Next, we need to define some scripts at the root of the monorepo that Railway can use for building and spinning up the servers.
In the root of your monorepo, open up the package.json and add the following 4 new scripts:
{
  "name": "nextjs-nestjs-trpc",
  "version": "1.0.0",
  "description": "",
  "main": "index.js",
  "scripts": {
    "dev": "pnpm run --parallel dev",
    "build:server": "pnpm --filter server build",
    "build:web": "pnpm --filter web build",
    "start:server": "pnpm --filter server start:prod",
    "start:web": "pnpm --filter web start",
  },
  "keywords": [],
  "author": "",
  "license": "ISC"
}
Okay nice! We've now got everything set up to deploy to Railway.
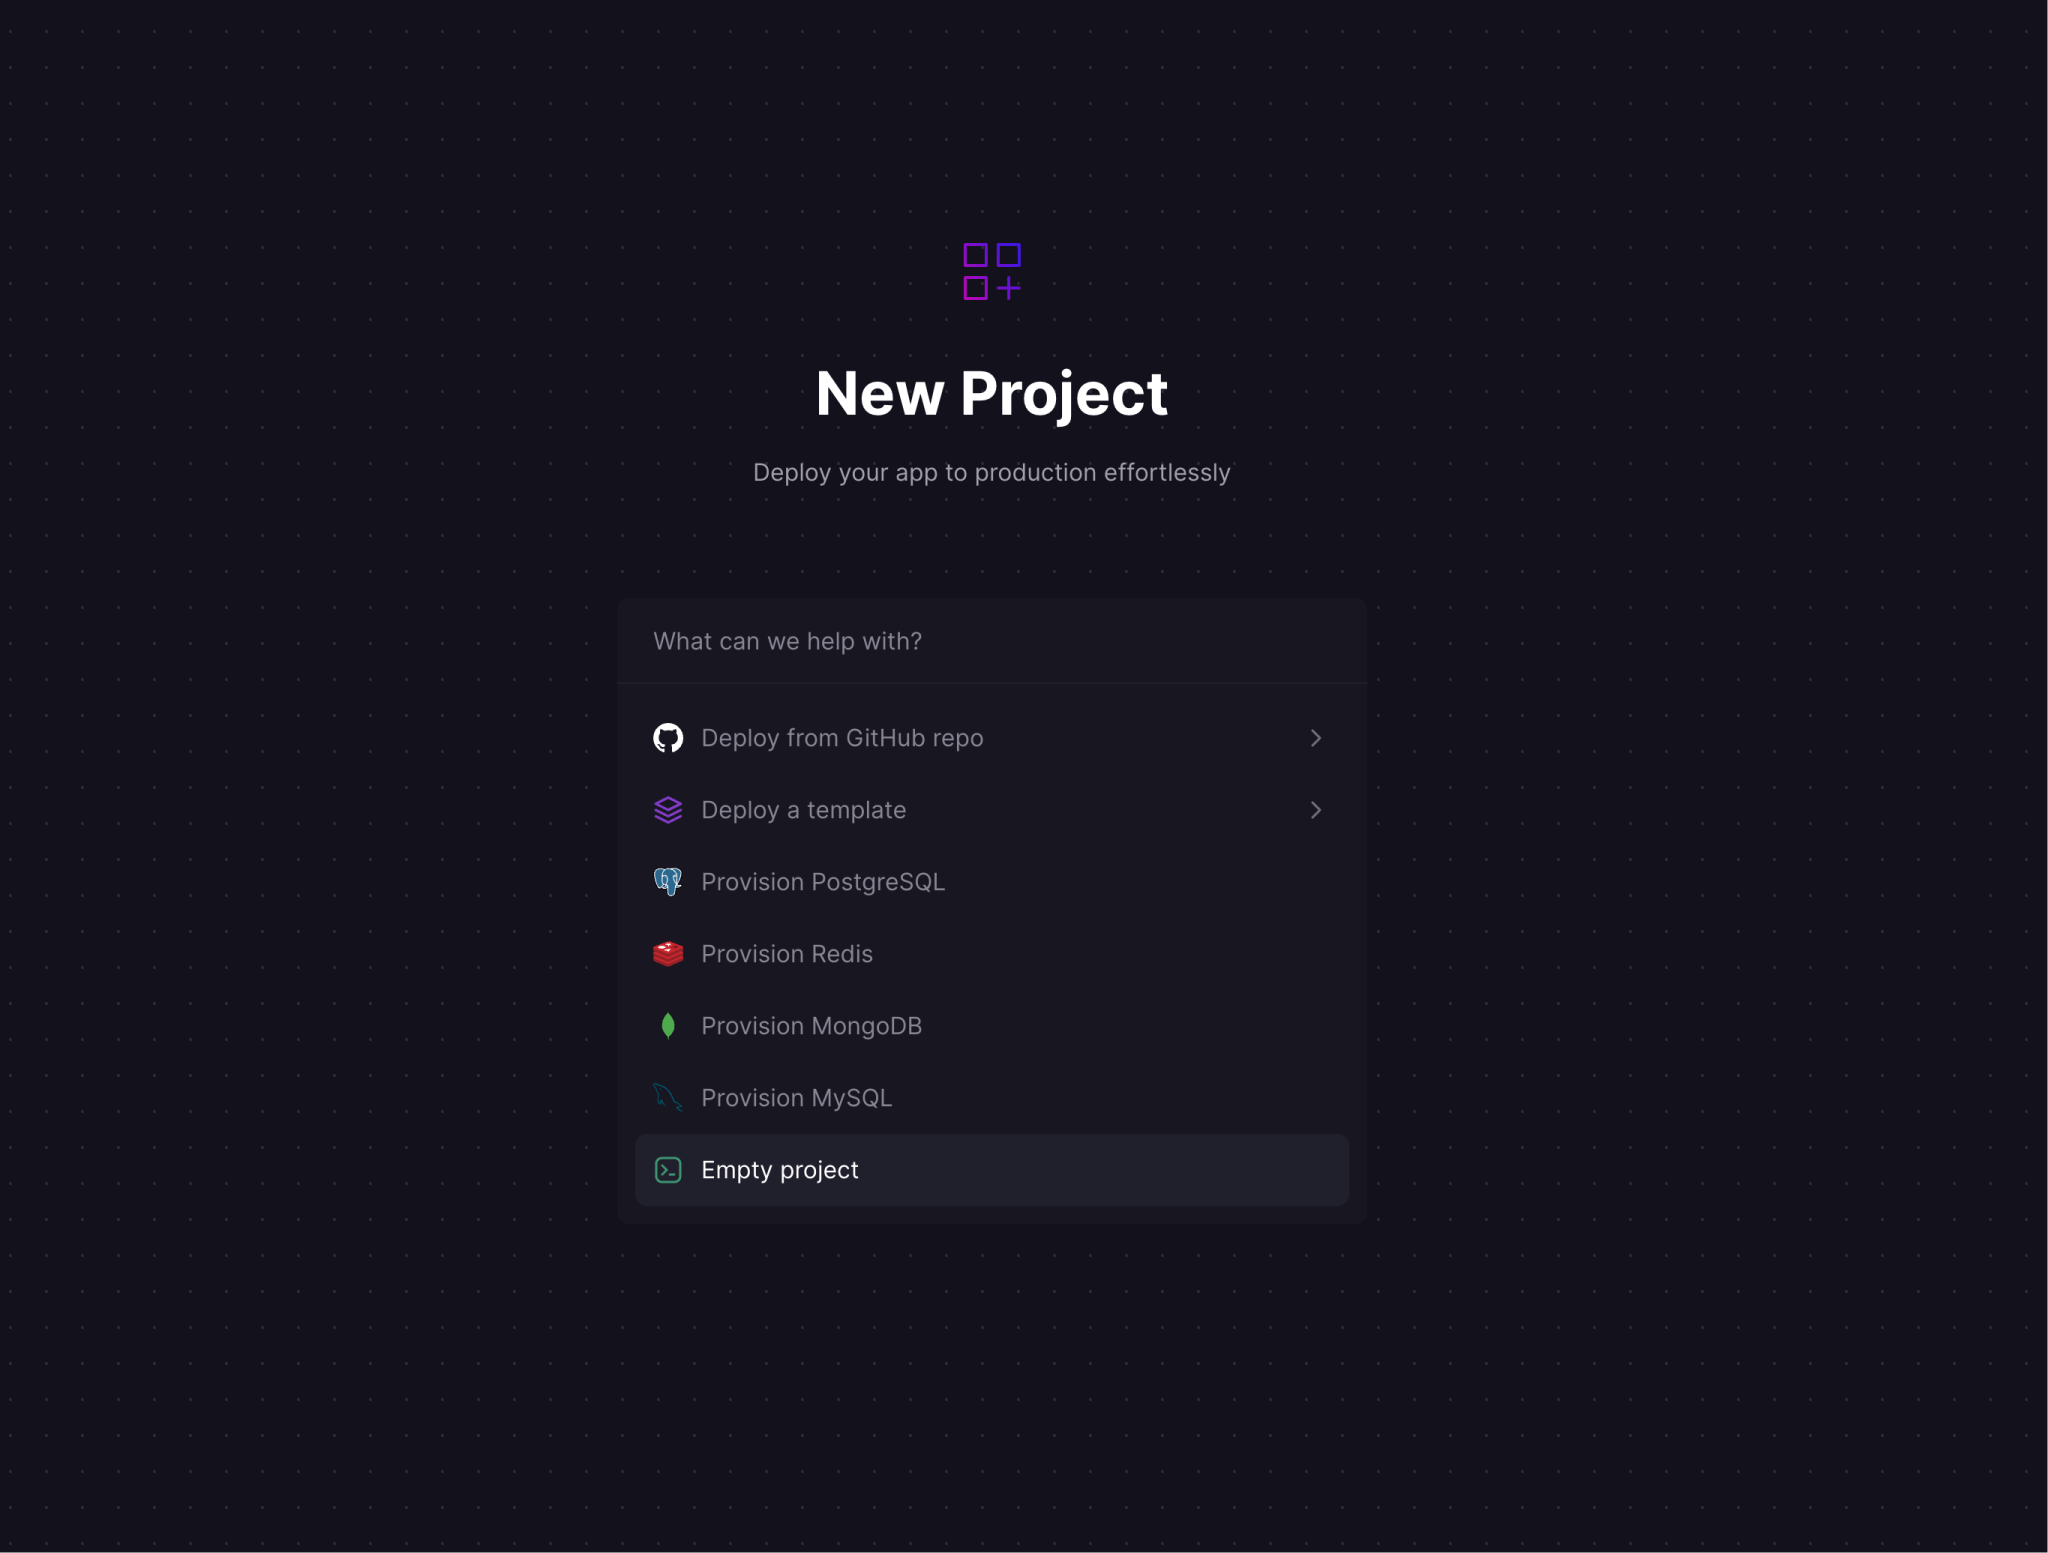
In Railway, add a new project and select "Empty project":

Then add a service, choosing Github repo (make sure you choose the monorepo Github project that you've built in this tutorial):

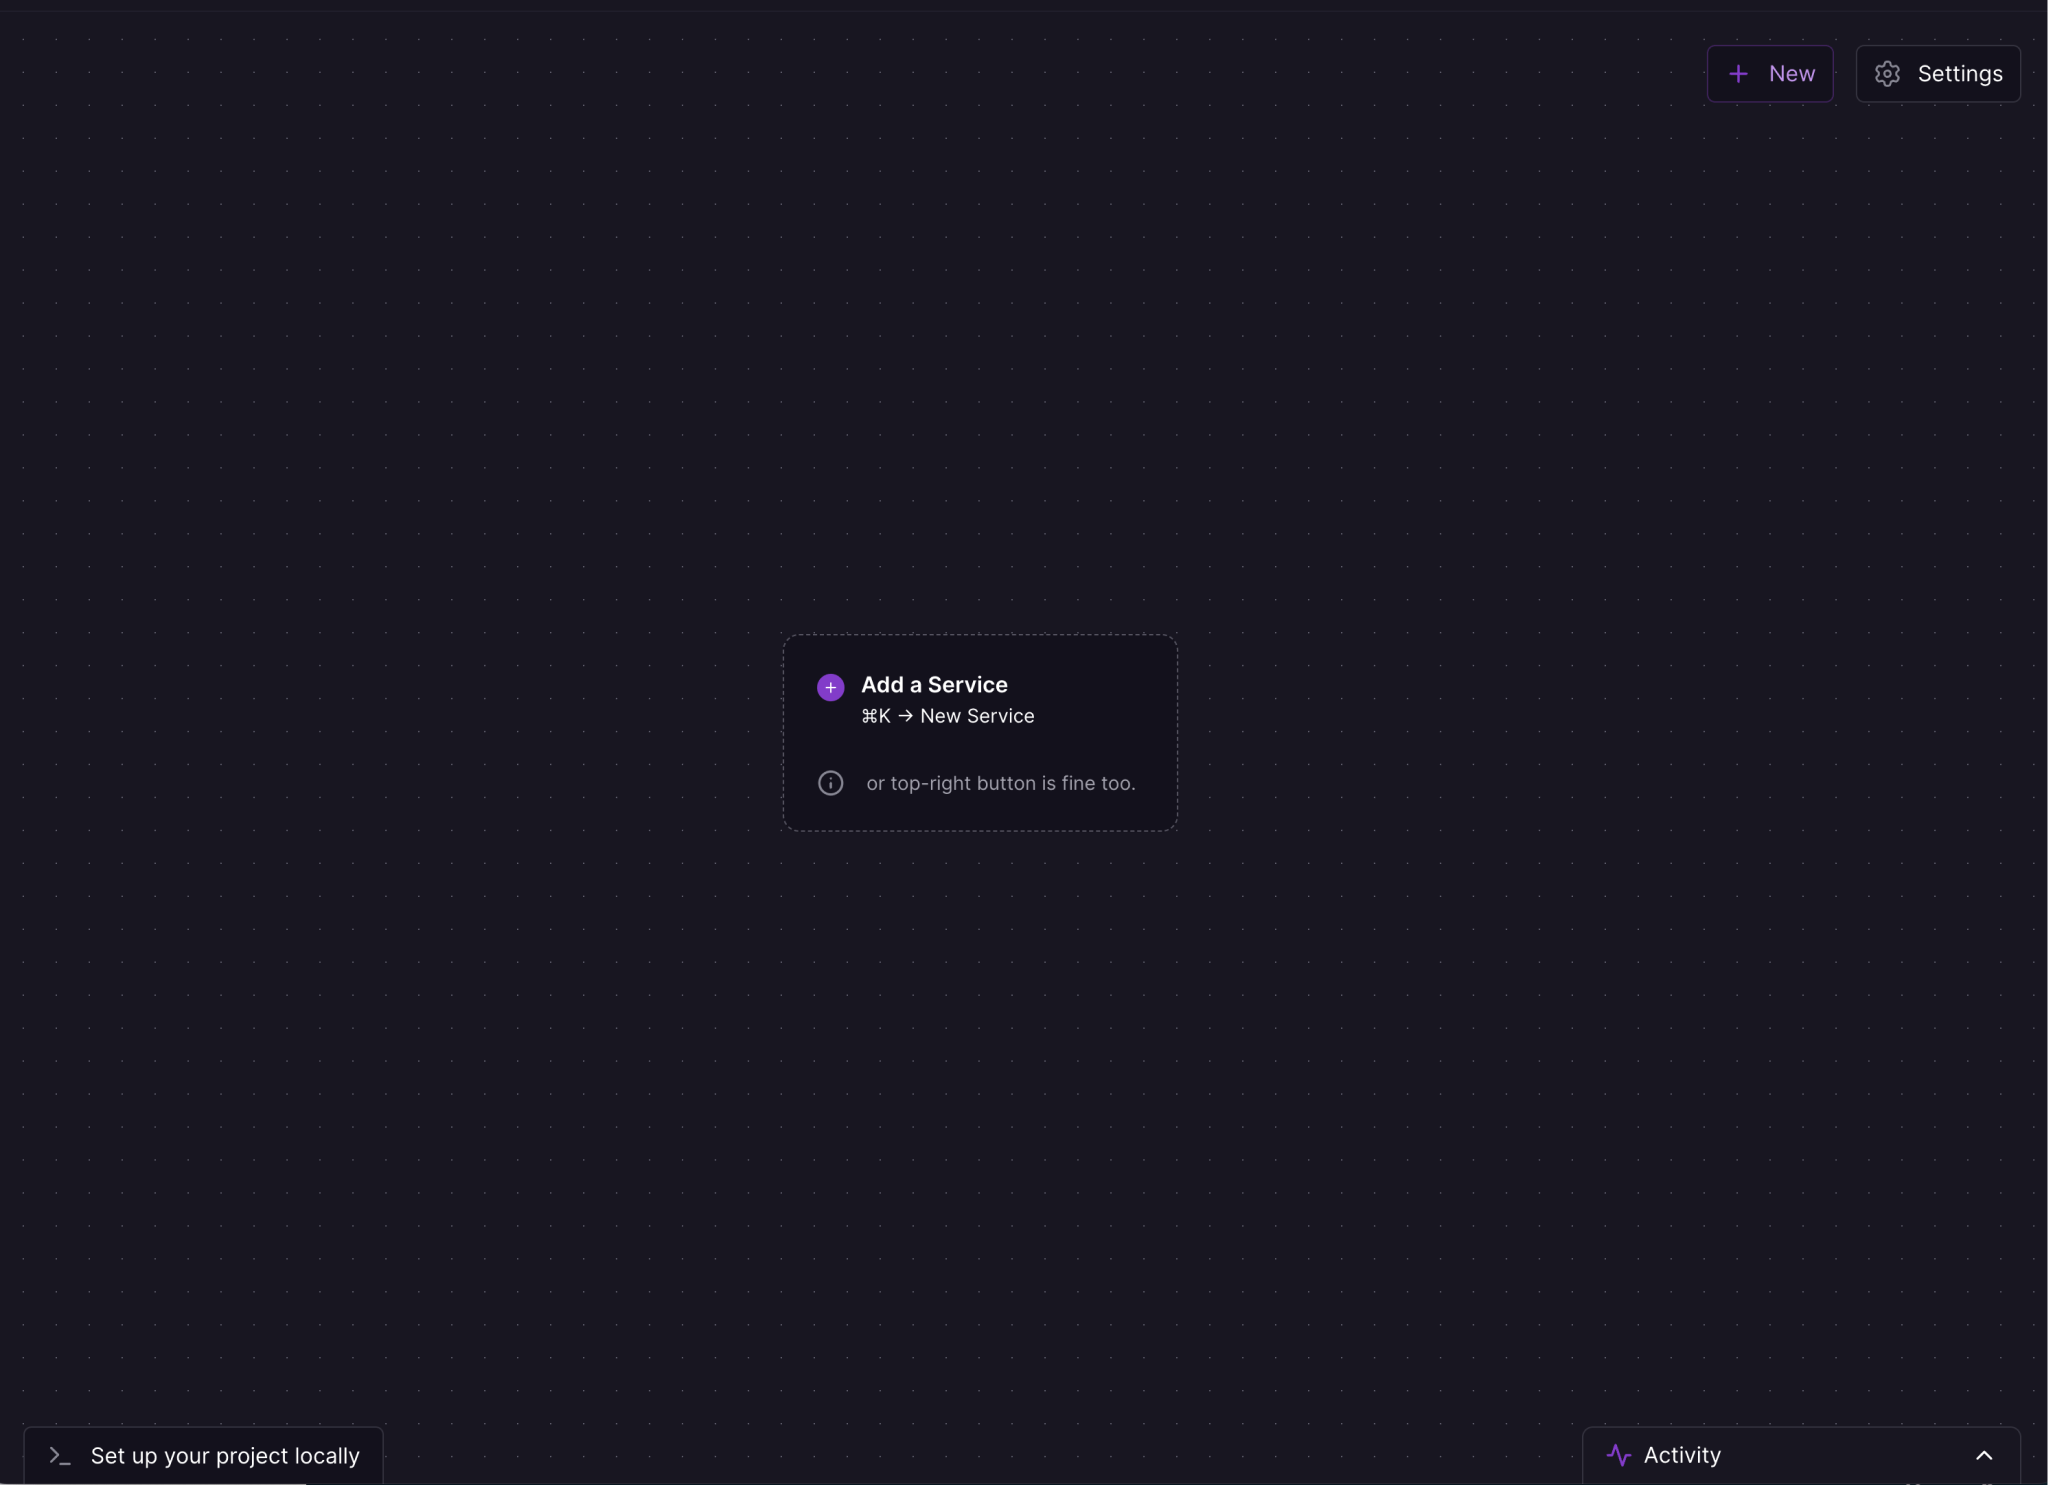
This will create a new service and try to deploy it. The deployment will fail as we need to add some extra config to get it to work!
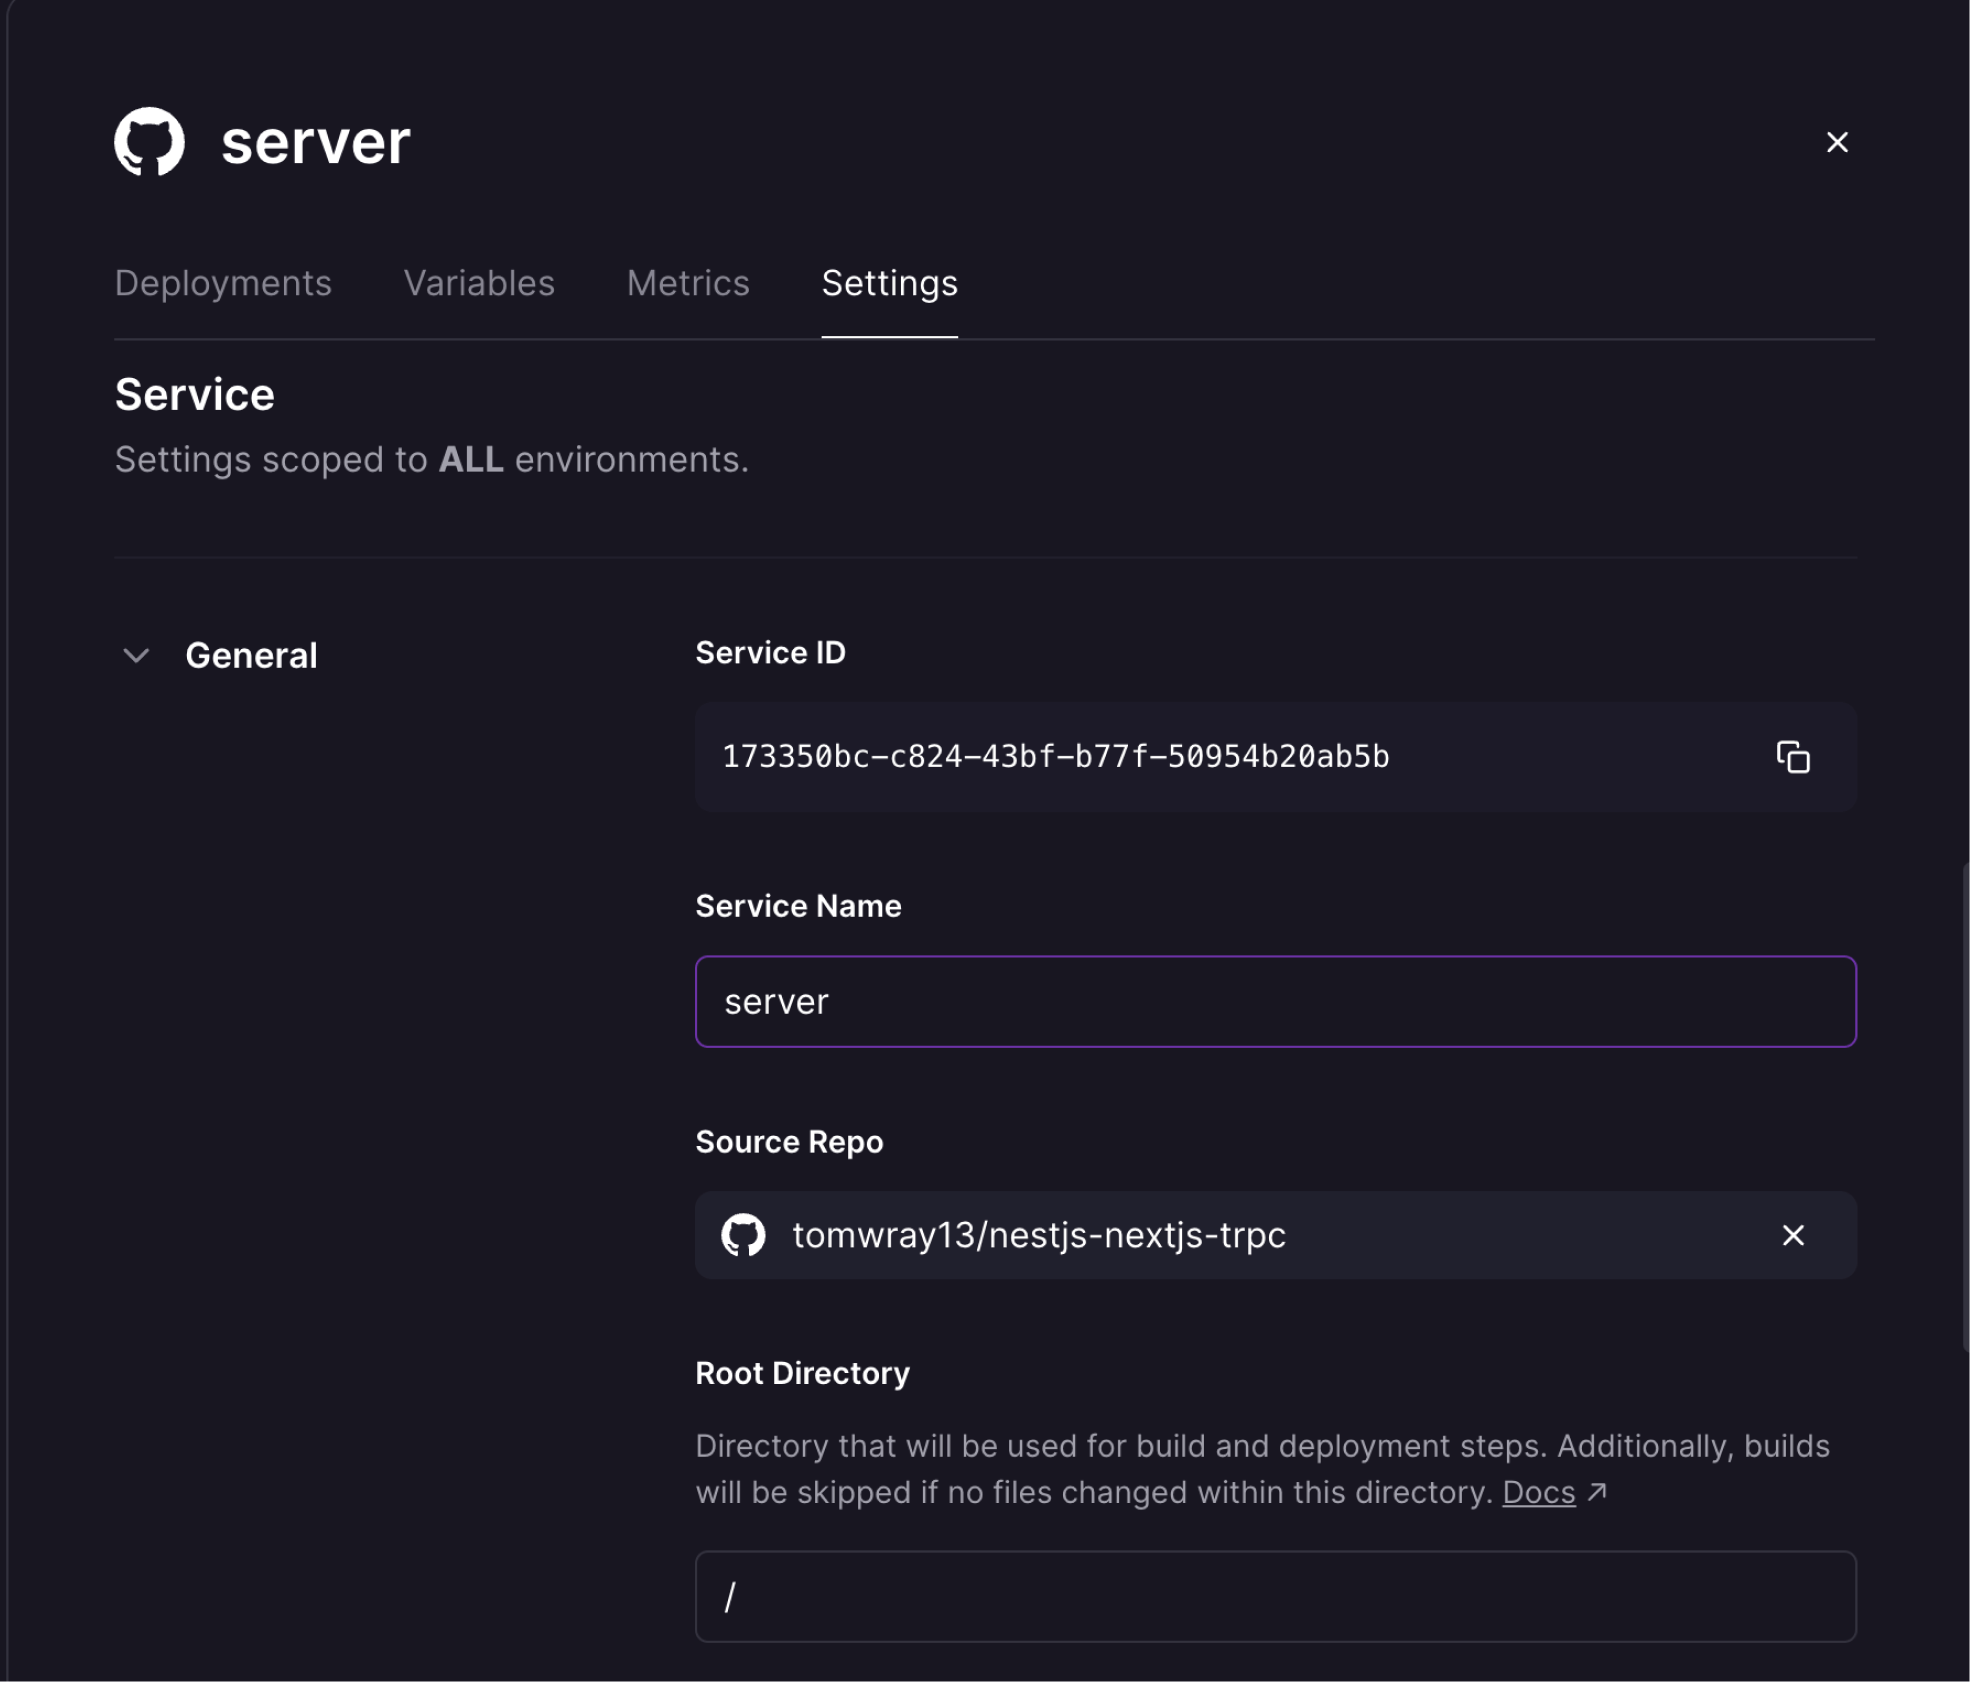
This first service will be the NestJS server. Let's add the respective config options for that.
Open up the service you just created and navigate to the settings. Here you should update the service name to "server":

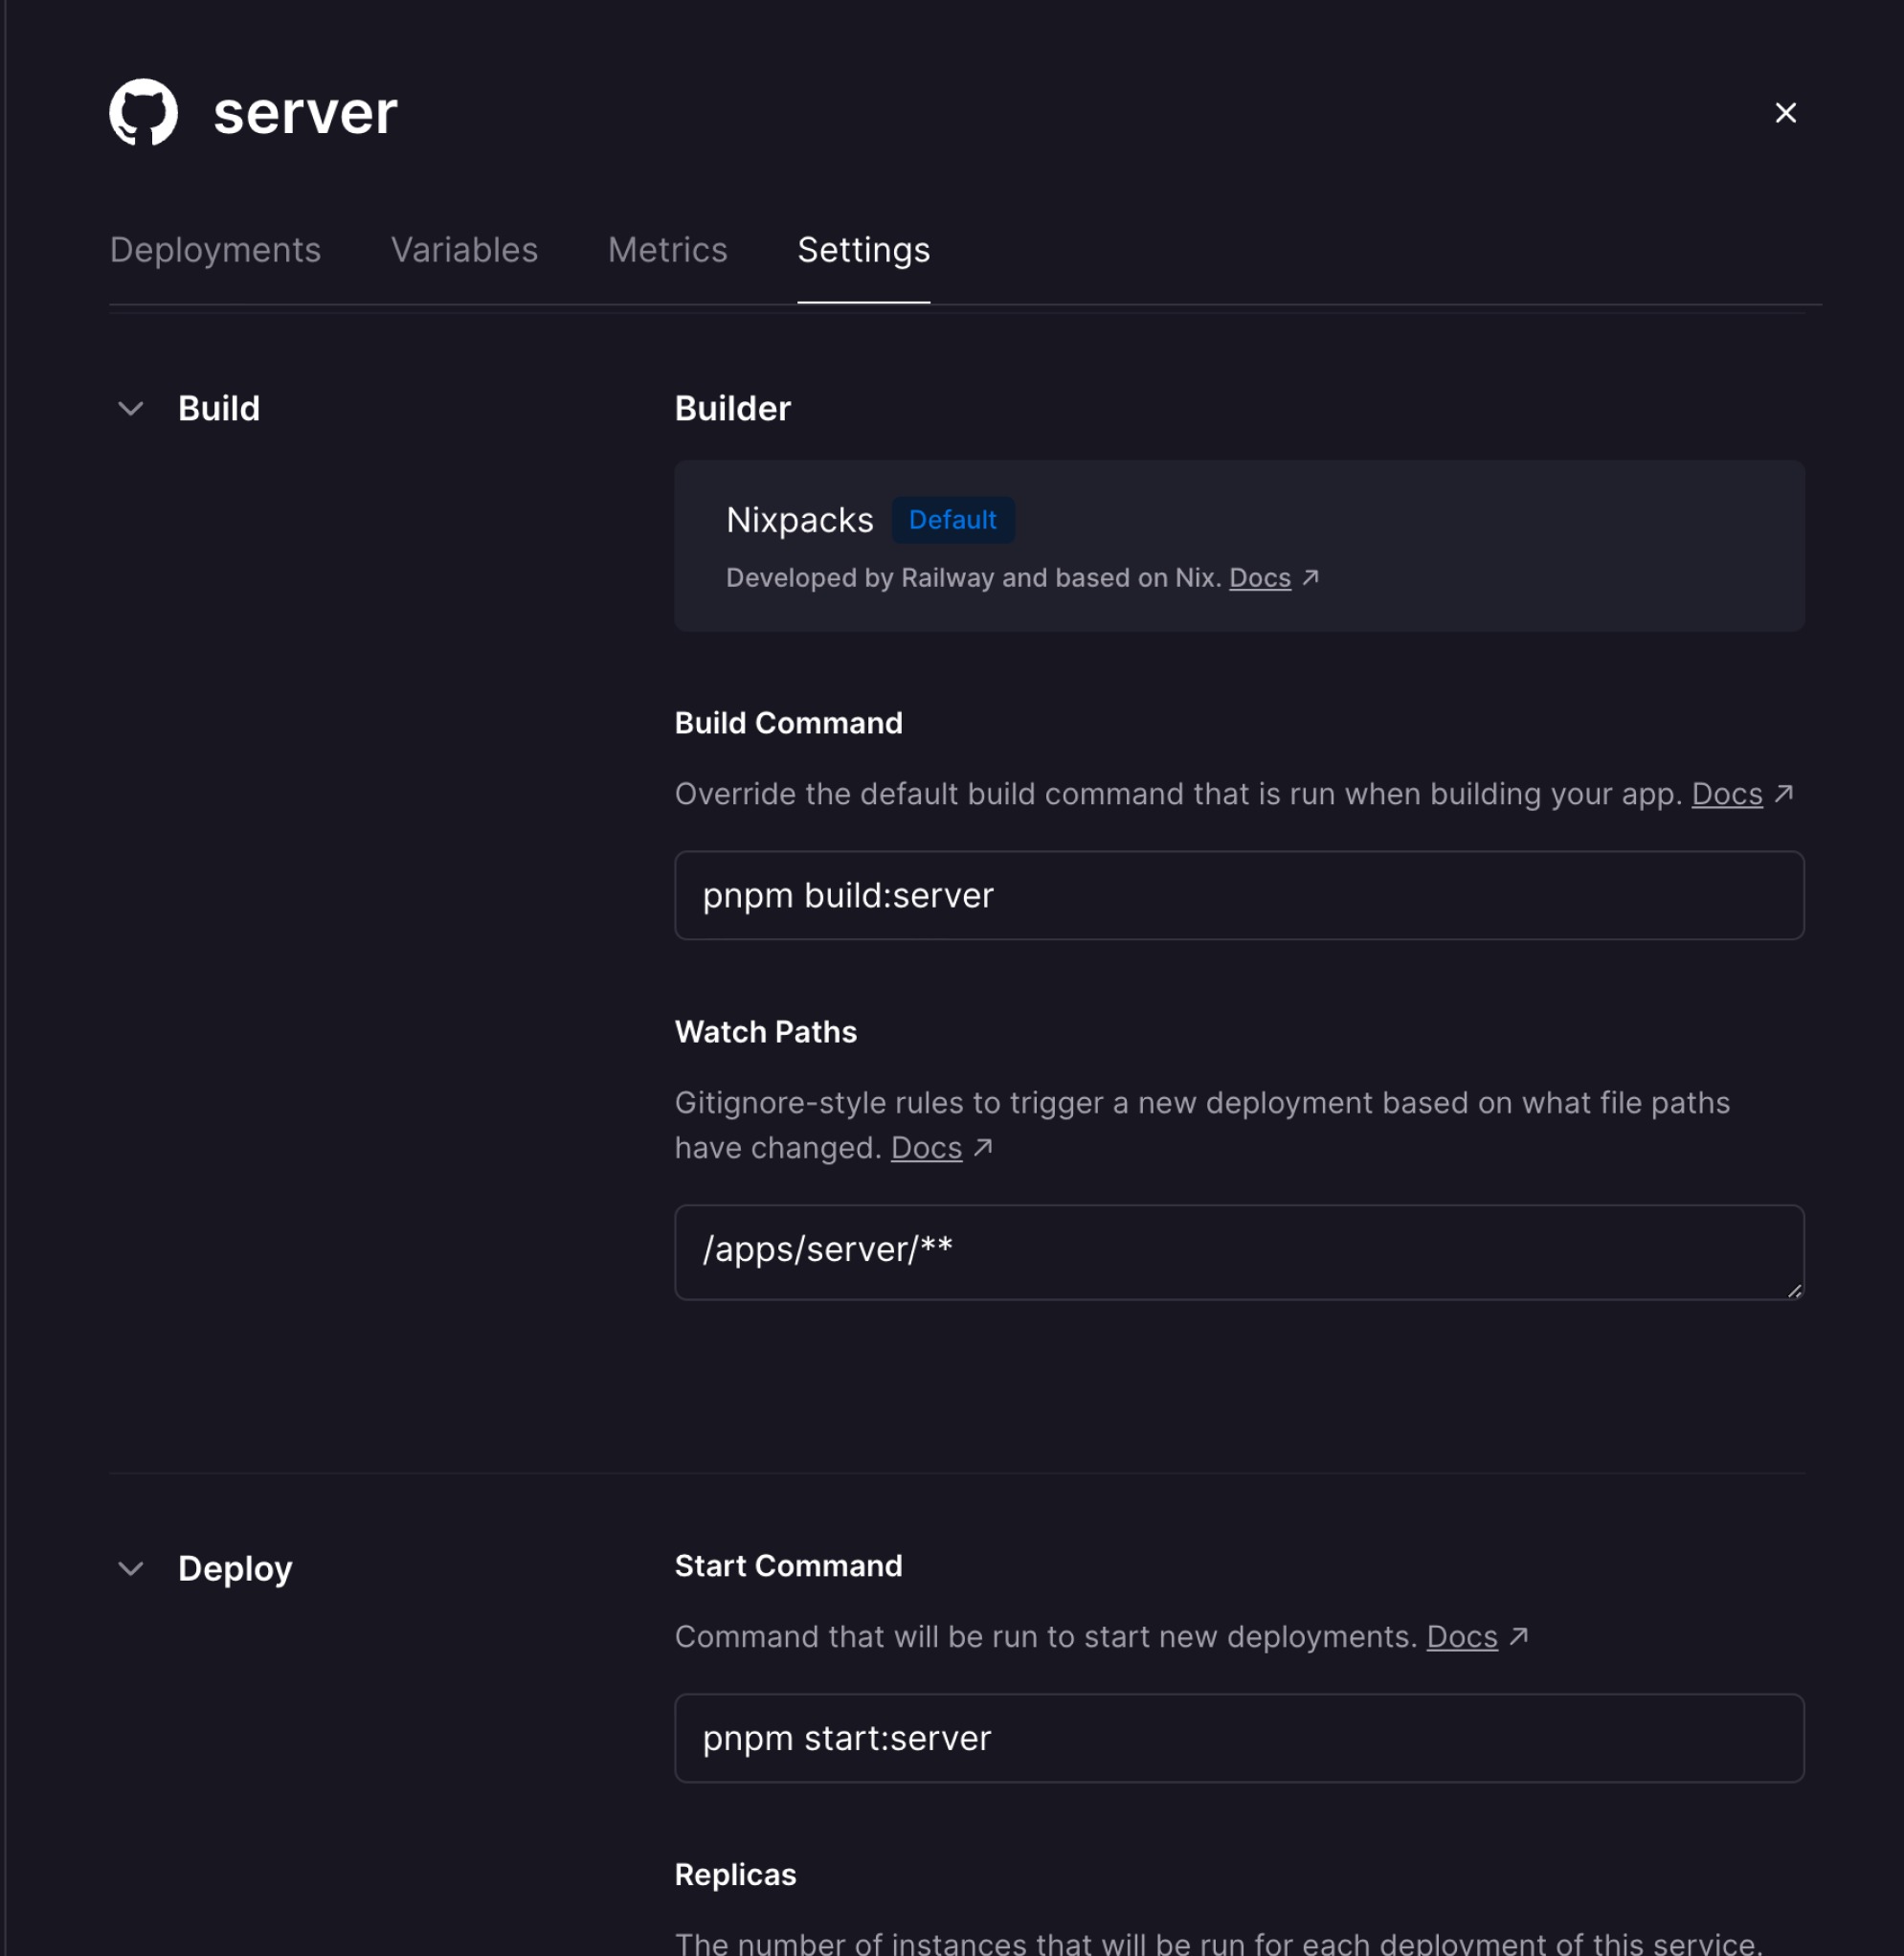
Then scroll down to the build and deploy sections. Add the respective build and start commands for the NestJS app:
- Build command:
pnpm build:server - Start command:
pnpm start:server
Also, set the Watch paths to /apps/server/**. This will mean the NestJS server is only re-deployed if the respective directory has any file changes in it.
It should look like this:

If you have any environment variables in your NestJS app, now's the time to define them! Go to the Variables tab and add them there.
If you now go to the deployment tab, you should see the app has now deployed 🎉:

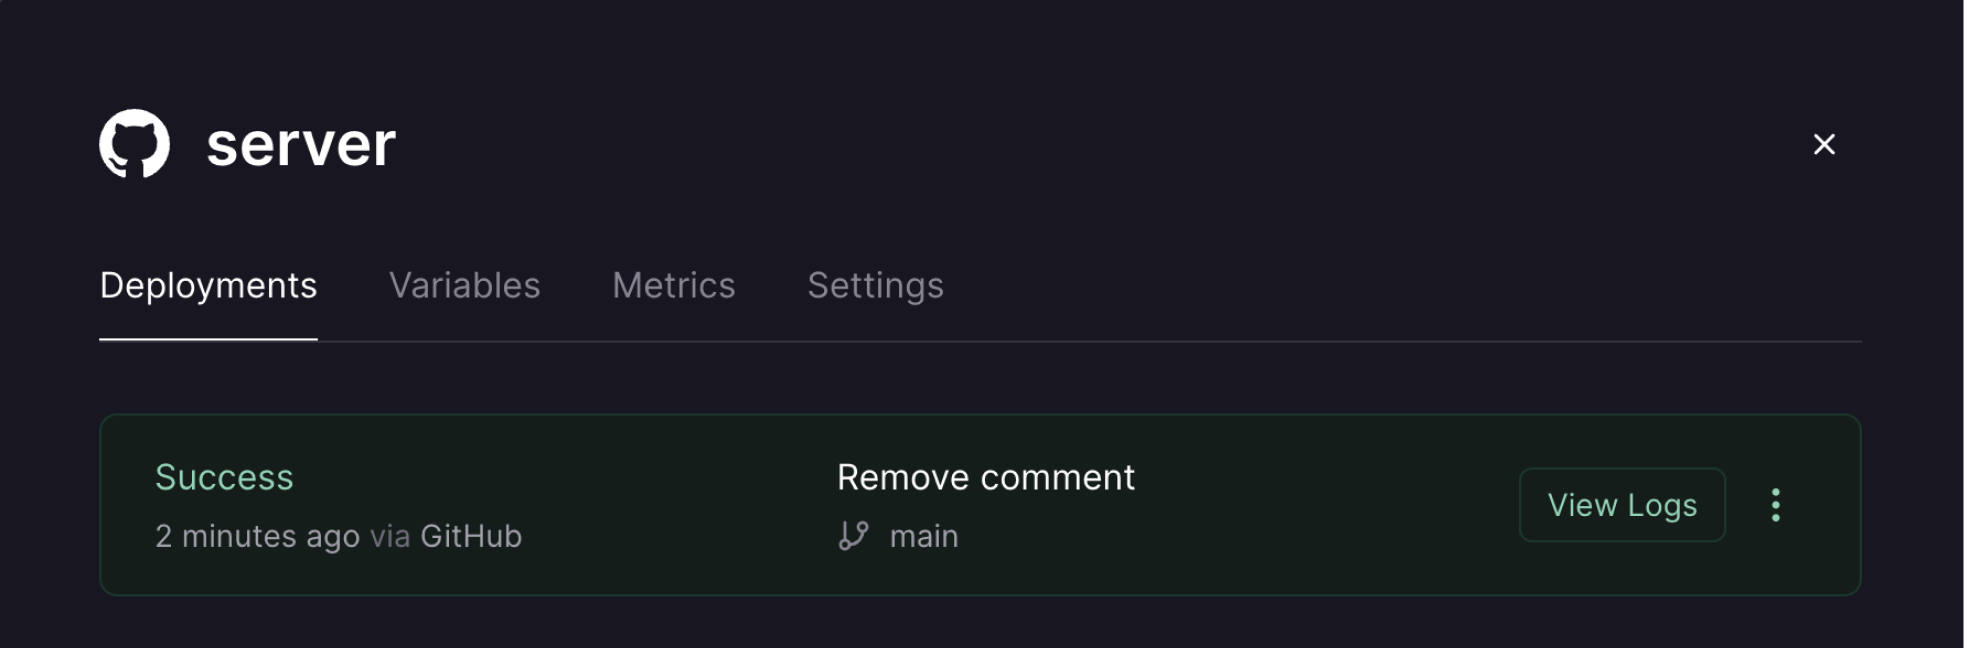
The deployment, however, is not exposed to the public internet yet. So go back to the Settings tab and press the Generate Domain button. Railway will create a random URL for you.
Give it a few seconds, then open up the generated URL in the browser to see your NestJS server deployed!

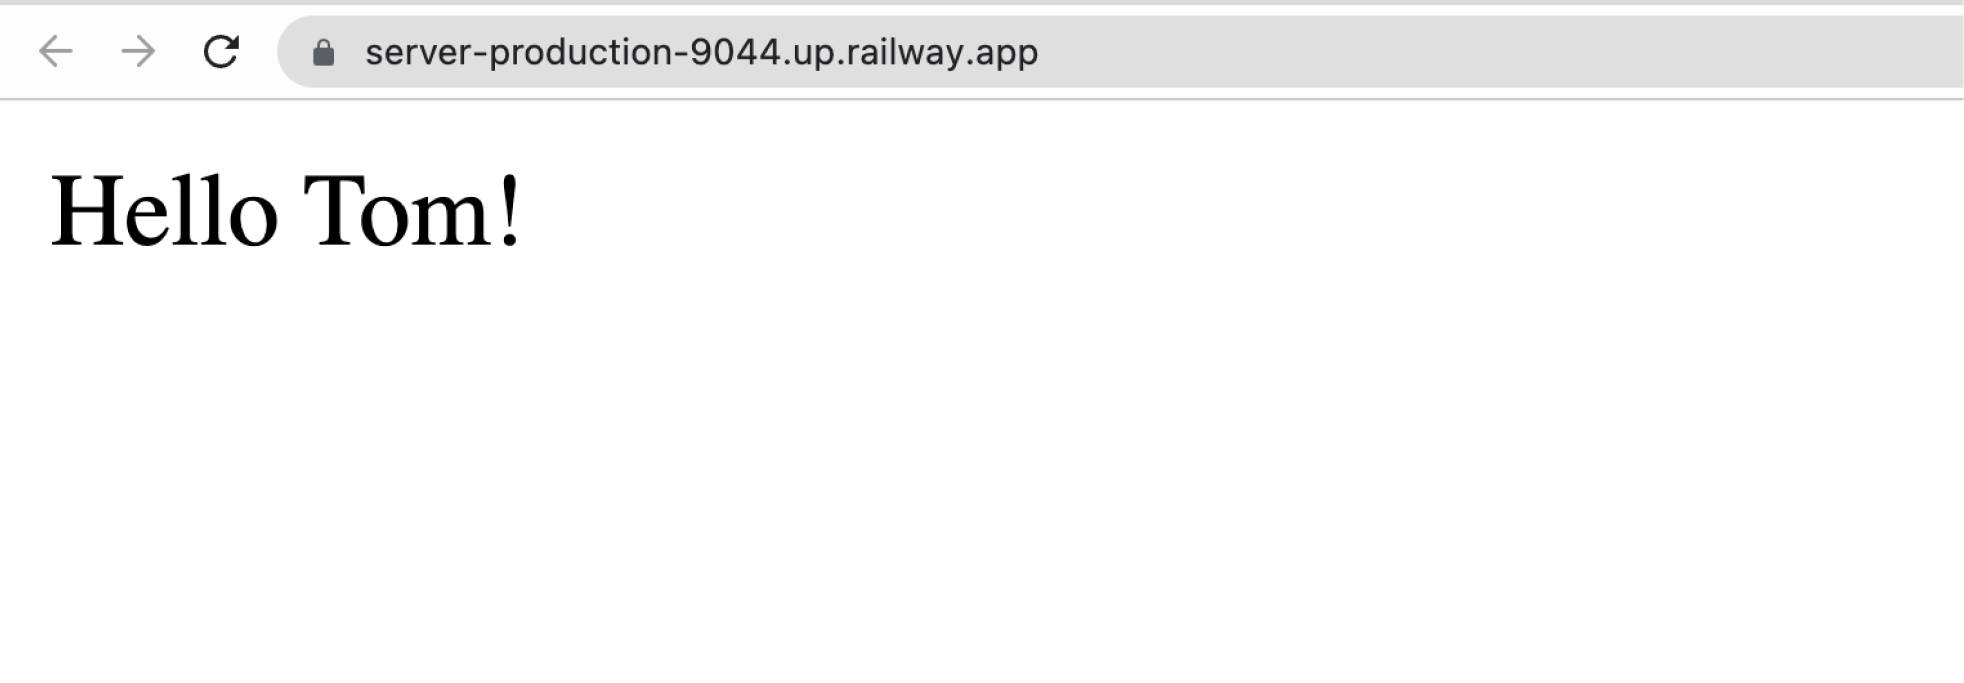
Make a note of the deployed url (for me, it's https://server-production-9044.up.railway.app/) as we'll need to add it as an environment variable to the NextJS deployed app.
Let's now deploy the NextJS app.
To do this, you can repeat the same steps as above:
- Add a new service, choosing the same Github repo
- Rename the service (I renamed mine to
web) - Add the build command:
pnpm build:web - Add the start command:
pnpm start:web - Set the Watch paths to:
/apps/web/**
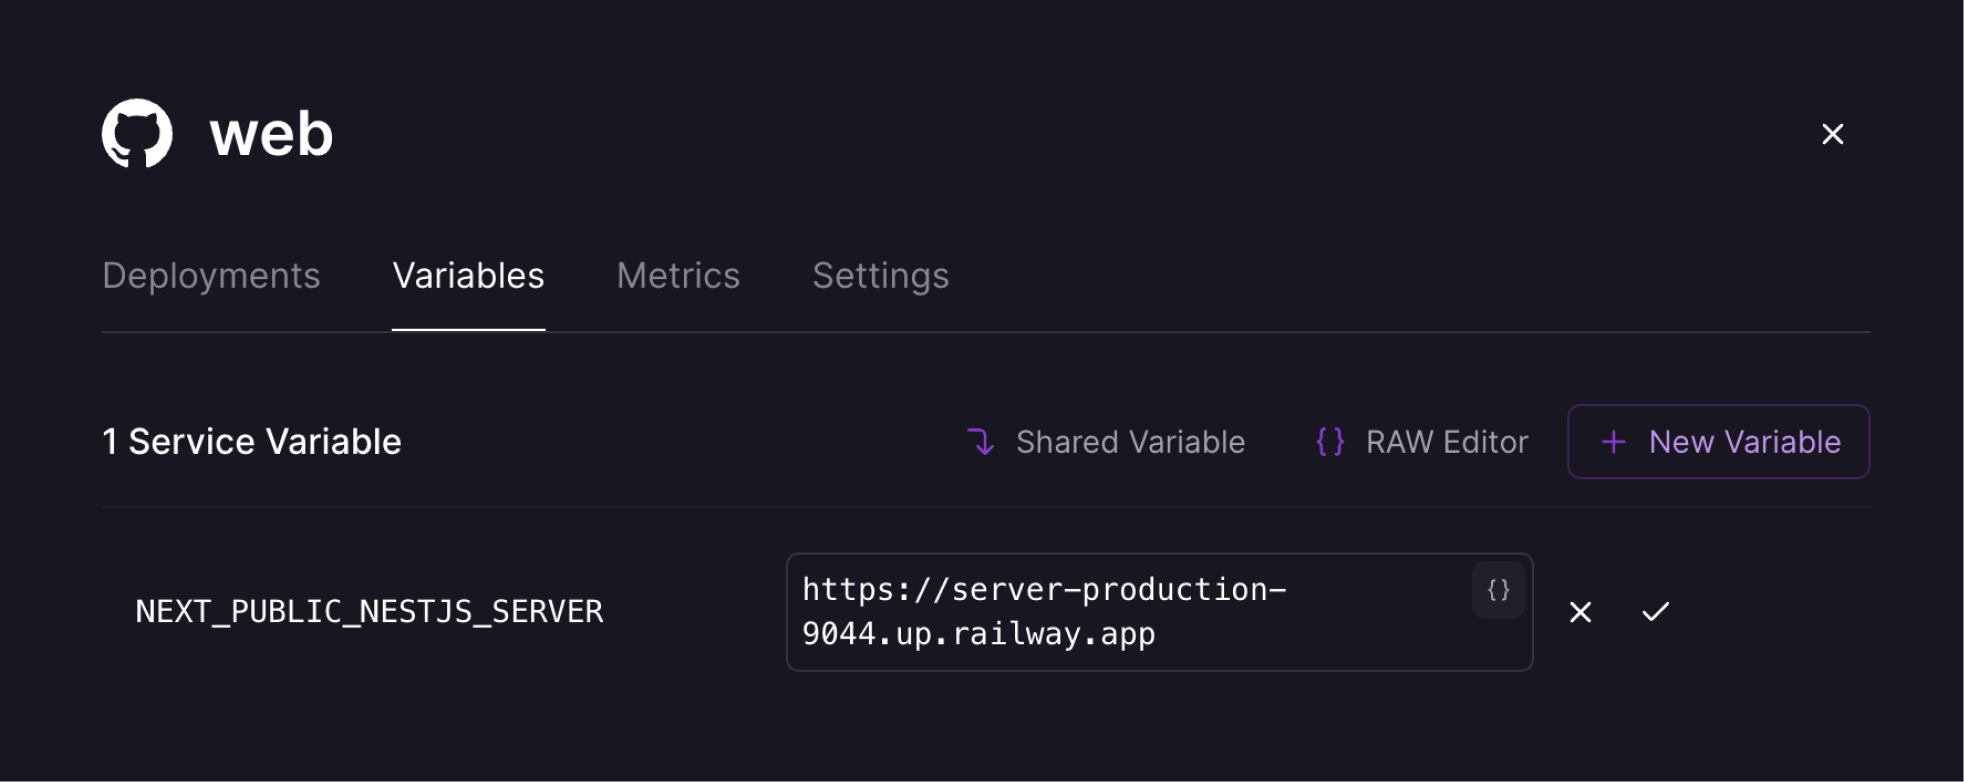
The only extra thing we need to do in the NextJS service is add the NEXT_PUBLIC_NESTJS_SERVER environment variable.
Go into the Variables tab and add the environment variable, using your deployed server URL as the value (make sure you don't include the / at the end of the url):

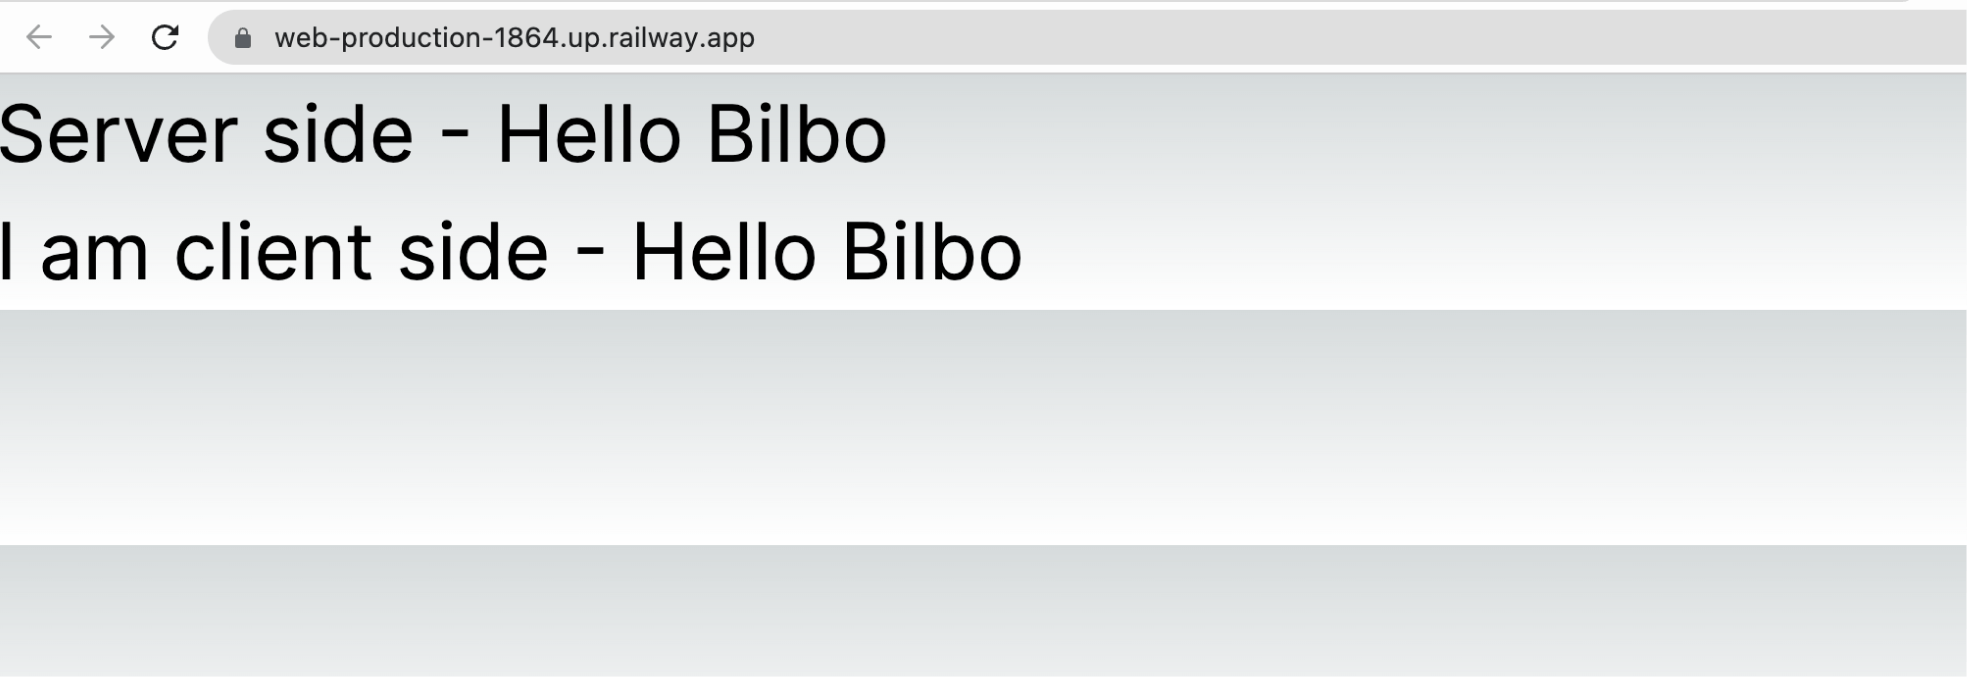
After the successful deployment, go back to the Settings tab and generate a public domain as you did for the server app.
After a few seconds, press the link and check out your deployed NextJS app!

Nice work - both apps are now deployed!
Conclusion
👏 Well done for reaching the end! We covered a lot in this tutorial.
You'll now have a really strong foundation for building out your full-stack app!
I recommend checking out my Prisma tutorial to see how you could add a database later to the code we've set up in this tutorial.