
- Published on
- Last updated:
Ultimate Guide: How to use Prisma with NestJS

This is a step-by-step tutorial on how to work with Prisma in a NestJS project.
In this tutorial, we're going to build a simple Twitter backend clone to illustrate the ideas.
This article assumes you have Docker installed on your machine and are familiar with some basic NestJS concepts.
If you'd prefer to check out the code directly, take a look at the repo on Github.
Kudos to Tasin Ishmam (a developer advocate from the Prisma team) who reviewed and provided feedback for this article. Thanks Tasin ✌️!
Ready? Let's dive in 🤿.

Table of Contents
Set up the NestJS project
Let's start by creating a new NestJS project.
If you don't already have the Nest CLI installed on your machine, you can install it:
npm i -g @nestjs/cli
Using the Nest CLI, you can now create a new project:
nest new nestjs-prisma --strict
Note the --strict flag. This is required for this tutorial. I recommend doing this on all NestJS project you create so that Typescript's strict mode is enabled.
In the CLI, you'll be prompted to choose a package manager. For this tutorial we're going to use npm.
Once the Nest project is created, you can remove some of the default files created as we won't be needing those:
src / app.controller.spec.ts // REMOVE
app.controller.ts // REMOVE
app.module.ts
app.service.ts // REMOVE
main.ts
You'll also need to remove the respective imports from the app.module.ts file. Once you've done this your app.module.ts file will look like:
import { Module } from '@nestjs/common';

@Module({
  imports: [],
  controllers: [],
  providers: [],
})
export class AppModule {}
With the initial set up out the way, let's move on to setting up the local Postgres server.
Set up Postgres locally with Docker
Before diving into all of the NestJS and Prisma fun, we need to set up our local development environment so the NestJS app can persist and fetch data from a local Postgres database.
We'll set this up using environment variables and Docker Compose to simulate a deployed app.
First of all, add an env file to the root of your project:
touch .env
Then add the following environment variables:
POSTGRES_USER="username"
POSTGRES_PASSWORD="password"
Next, add a Docker Compose file to the root of your project:
touch docker-compose.yml
Then navigate to this file and add the following code:
services:
  postgres:
    image: postgres
    restart: always
    env_file:
        - .env
    environment:
      - POSTGRES_USER=${POSTGRES_USER}
      - POSTGRES_PASSWORD=${POSTGRES_PASSWORD}
    volumes:
      - postgres:/var/lib/postgresql/data
    ports:
      - '5432:5432'
volumes:
  postgres:
This Docker Compose file instructs Docker what local services you want to run. In our case, it's just a local Postgres database (we'll run the NestJS app on your local machine).
The environment variables point to the .env file we just set up.
Now go ahead and launch this local Postgres server by running:
docker-compose up -d
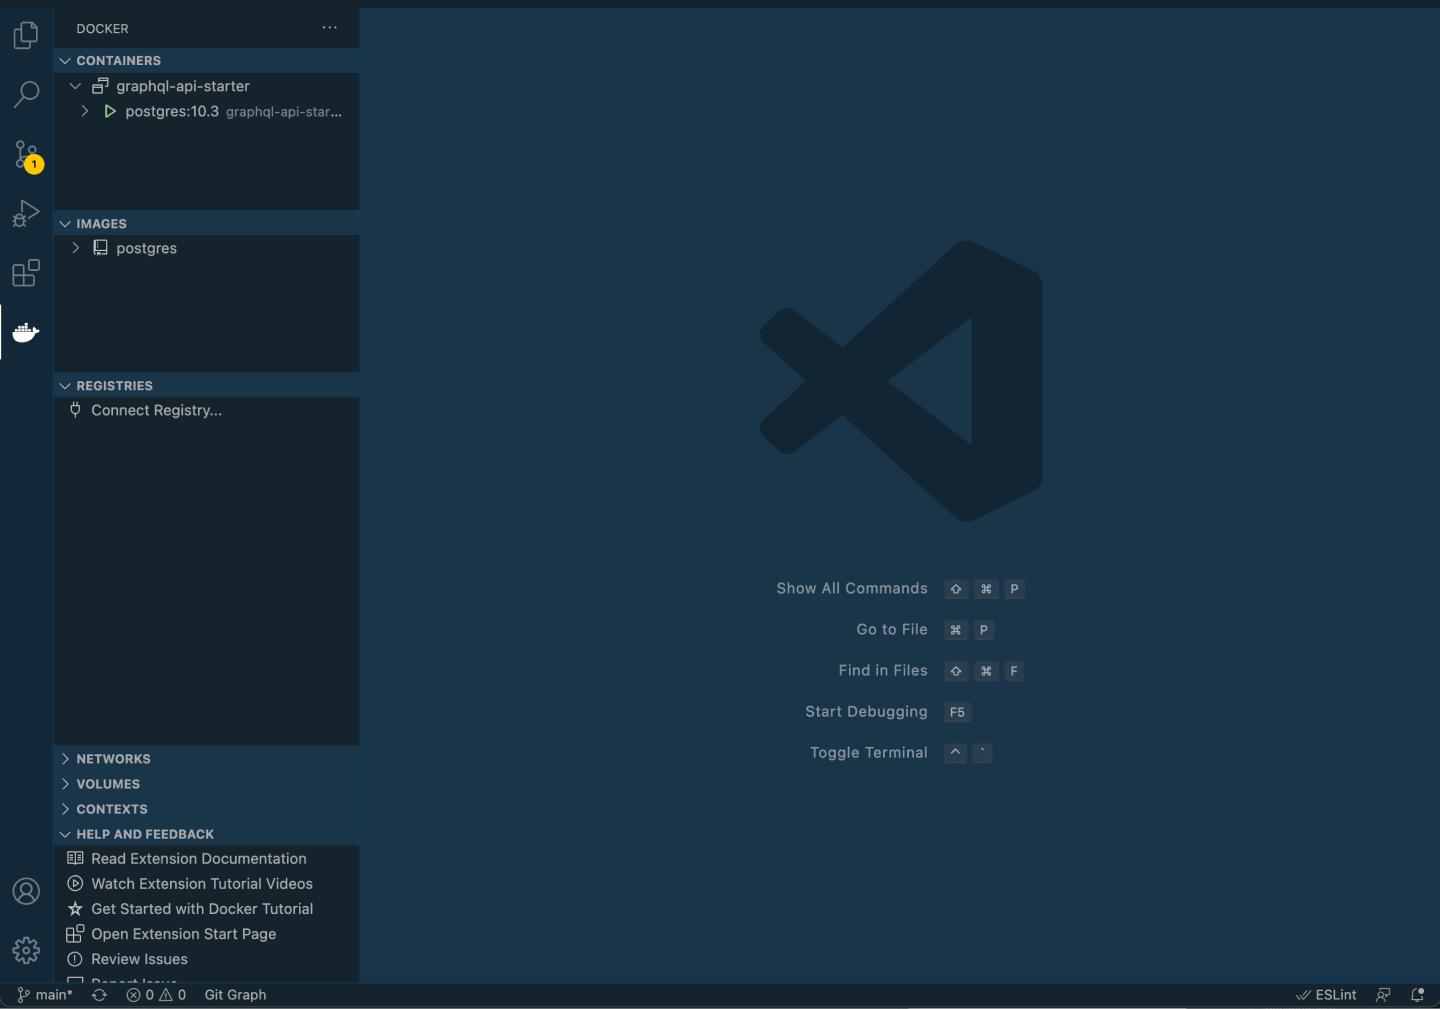
If you're using VSCode, I recommend installing the official Docker extension.
Once installed, it will appear in your left menu and show you which containers (i.e. local servers) you have running:

Now you can spin up your NestJS app with the command:
npm run start:dev
They're not yet connected in anyway, but you now have your local Postgres server running (via Docker Compose) as well as your NestJS app server running locally on your machine.
Add database tables with Prisma


You can think of Prisma as a bridge between your database and your backend services - they provide a set of tools that make working with databases much easier.
First of all, add the Prisma CLI as a development dependency:
npm install prisma --save-dev
This allows you to use the Prisma CLI moving forward (the Prisma CLI is always prefixed with npx).
Next, you need to set up Prisma in your project by running this command at the root of your project:
npx prisma init
This does two things:
- Creates a directory called
prismawith a file inside calledschema.prisma - Adds an
.envfile to the root of the project
I like to move the schema.prisma file into a database directory inside src to keep things tidy.
This is of course opinionated and optional, skip a couple of paragraphs if you'd like to leave this as default in the prisma folder.
After moving the schema.prisma file, my directory structure inside the NestJS app looks like this:
src
  database
    schema.prisma
  app.module.ts
  main.ts
Because we've moved removed the Prisma directory and moved the schema.prisma file, we just need to add this to our package.json file so Prisma knows where to find it:
{
  ...

  "prisma": {
    "schema": "src/database/schema.prisma"
  }

  ...
}
As the schema.prisma file has now been moved, you can now delete the empty prisma directory at the root of your project.
So, what is this schema.prisma file?
The schema.prisma file is the main configuration file for Prisma. If you open up the file, you'll see the following:
// This is your Prisma schema file,
// learn more about it in the docs: https://pris.ly/d/prisma-schema

generator client {
  provider = "prisma-client-js"
}

datasource db {
  provider = "postgresql"
  url      = env("DATABASE_URL")
}
The datasource provides the connection to your Postgres database by looking up a URL in the ENV file.
This is important - using the env file allows us to have a different Postgres database for our various environments (local, staging, production, etc).
Your local Postgres server already exists (as we set this up in the previous step) - so we just need to grab these credentials and update our env file.
Before changing anything, your env file should look something like this as Prisma auto-generated the DATABASE_URL for you:
POSTGRES_USER="username"
POSTGRES_PASSWORD="password"

# This was inserted by `prisma init`:
# Environment variables declared in this file are automatically made available to Prisma.
# See the documentation for more detail: https://pris.ly/d/prisma-schema#accessing-environment-variables-from-the-schema

# Prisma supports the native connection string format for PostgreSQL, MySQL, SQLite, SQL Server, MongoDB and CockroachDB.
# See the documentation for all the connection string options: https://pris.ly/d/connection-strings

DATABASE_URL="postgresql://johndoe:randompassword@localhost:5432/mydb?schema=public"
We can remove the auto-generated comments from Prisma and update the DATABASE_URL to use our existing environment variables, like so:
POSTGRES_USER="username"
POSTGRES_PASSWORD="password"

DATABASE_URL="postgresql://${POSTGRES_USER}:${POSTGRES_PASSWORD}@localhost:5432/mydb?schema=public"
In fact, I would take this one step further by abstracting out the other relevant variables:
POSTGRES_HOST="localhost"
POSTGRES_PORT="5432"
POSTGRES_NAME="mydb"
POSTGRES_USER="username"
POSTGRES_PASSWORD="password"

DATABASE_URL="postgresql://${POSTGRES_USER}:${POSTGRES_PASSWORD}@${POSTGRES_HOST}:${POSTGRES_PORT}/${POSTGRES_NAME}?schema=public"
The above tweaks are not necessary to run locally but will help when you deploy your app to a production environment.
Now your Prisma configuration is using your local Postgres server as the data source.
It's now time to get to the fun stuff - creating tables in your database and running the migrations.
This is done inside the Prisma configuration file (schema.prisma) by adding models and then running a special Prisma command.
At mentioned at the start of this tutorial, we're going to build a simple Twitter backend clone.
Let's add a couple of relational tables to kick off.
Add the following to your schema file:
datasource db {
  provider = "postgresql"
  url      = env("DATABASE_URL")
}

generator client {
  provider = "prisma-client-js"
}

model User {
  id          Int       @id @default(autoincrement())
  createdAt   DateTime  @default(now())
  updatedAt   DateTime  @updatedAt
  username    String
  tweets      Tweet[]
}

model Tweet {
  id          Int       @id @default(autoincrement())
  createdAt   DateTime  @default(now())
  updatedAt   DateTime  @updatedAt
  content     String
  user        User     @relation(fields: [userId], references: [id])
  userId      Int
}
The code is fairly self-explanatory (which is a testament to Prisma in itself!). Either way, here's a quick explainer of what's happening:
- 2 models (i.e. database tables) have been defined:
UserandTweet - I've used a one-to-many relation to define the relation between users and tweets (users can have many tweets)
- The tables are defined with a field name, a field type, and optional attributes:
- The field name (e.g.
createdAt) maps to the column in that table. Typically is camelCase. - The field type (e.g.
DateTime) defines the native database type - Attributes are handy modifiers Prisma provides you. E.g.
@default(now())sets a timestamp to the current date and time when the record is created.
- The field name (e.g.
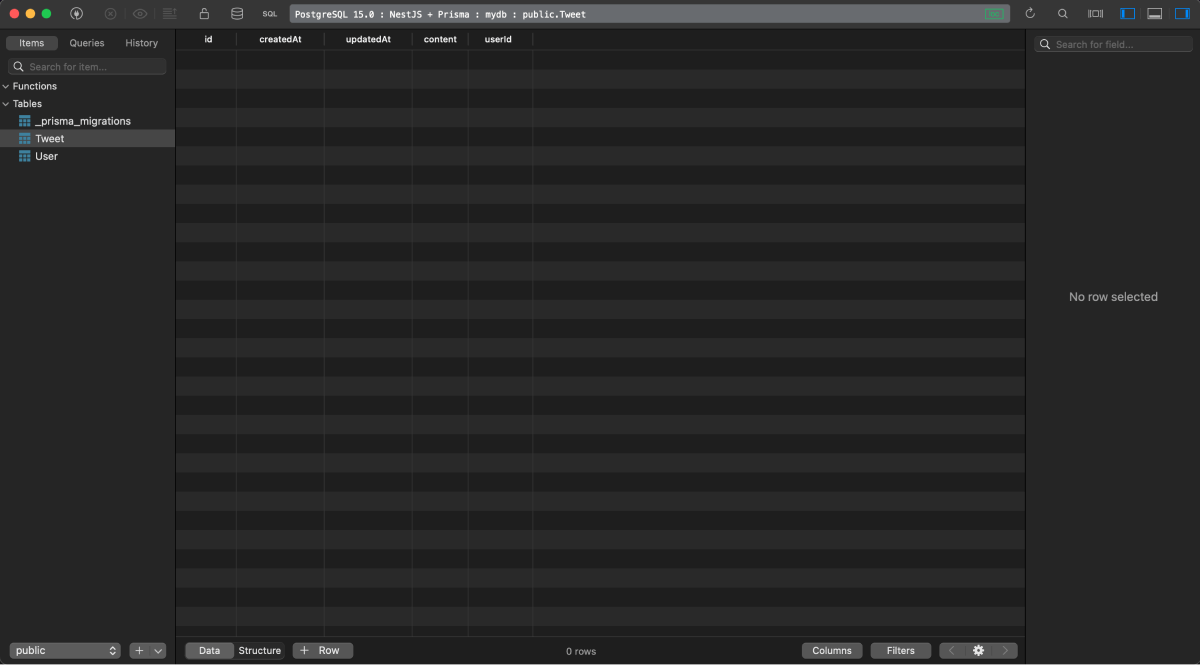
If you open a GUI tool like TablePlus and open up your local Postgres server to view the tables, you'll see nothing.
That's because we need to run a Prisma command to map the model you've defined into your database (i.e. run "migrations").
Here's the command to run migrations:
npx prisma migrate dev --name init
Every time you add a new model (or tweak any existing model structure), you'll need to run this command. So I find it helpful to add a new script for this:
{
  ...

  "scripts": {
    // for running database migrations
    "migrate": "npx prisma migrate dev",
  },

  ...
}
Now anytime you need to run migrations you can run npm run migrate instead.
Great work, you just created your first table in a database with Prisma Migrate 🎉.
Now open up your GUI again and your table will be there (I'm using TablePlus):

Whenever you run npm run migrate, you'll be prompted to add a name for the migration. This is optional, but a good idea to give the migration a name so you can easily look at your migration history.
Seeding data with Prisma Studio
Let's add some mock data to our local database.
I like to use Prisma Studio for this. It's super quick and easy (and free).
Run this command at the root of your project:
npx prisma studio
This will spin up a local instance of Prisma Studio (for me it opens on localhost:5555).
Open this up in your browser and you'll see something like this:


Go into the users and add a few mock users, then do the same with tweets!
Adding Prisma Client to NestJS
So if you've followed along, you should have:
- A NestJS app running locally
- A Postgres server running locally (via Docker)
- Defined some Prisma models and run database migrations
- Added some mock data to the database using Prisma Studio
In order for the NestJS app to get and mutate data from the database we need to use Prisma Client.
npm install @prisma/client
Prisma client is a type-safe database client directly tailored to the models you define in the schema.prisma file.
As per the NestJS docs, it's best to abstract the Prisma Client into its own service.
Let's create a new file inside the database directory we defined in a previous step called prisma.service.ts:
touch src/database/prisma.service.ts
And then inside the file, add the following code:
import { Injectable, OnModuleInit } from '@nestjs/common';
import { PrismaClient } from '@prisma/client';

@Injectable()
export class PrismaService extends PrismaClient implements OnModuleInit {
  async onModuleInit() {
    await this.$connect();
  }
}
To share the Prisma service, we need to create a module that exports the Prisma service.
touch src/database/prisma.module.ts
In this Prisma module, add the Prisma service as a provider and an export:
import { Module } from '@nestjs/common';
import { PrismaService } from './prisma.service';

@Module({
  providers: [PrismaService],
  exports: [PrismaService],
})
export class PrismaModule {}
With an injectable Prisma service now available to use across our NestJS app, let's start using it!
Add a Repository Layer in NestJS
It's time to finally start working with Prisma in the NestJS app.
We're going to use the Repository design pattern - we'll create a layer to encapsulate the logic required to access the database. It's also called a DAL (data access layer).
Start by adding a new module called tweets. I like to add all modules inside a modules directory:
nest g module modules/tweets
Inside the new tweets directory, add a new file called tweets.repository.ts:
touch src/modules/tweets/tweets.repository.ts
Kick-off this file by first just defining the injectable class:
import { Injectable } from '@nestjs/common';

@Injectable()
export class TweetsRepository {}
And then ensure this new repository service is included in the providers array of the tweets module:
import { Module } from '@nestjs/common';
import { TweetsRepository } from './tweets.repository';

@Module({
  providers: [TweetsRepository],
})
export class TweetsModule {}
We will also need access to the Prisma service (what we created in the previous section) in the Tweets module, so ensure the Prisma module we defined in the previous step is included in the imports:
import { Module } from '@nestjs/common';
import { PrismaModule } from 'src/database/prisma.module';
import { TweetsRepository } from './tweets.repository';

@Module({
  imports: [PrismaModule],
  providers: [TweetsRepository],
})
export class TweetsModule {}
With that admin out the way, jump back into the tweets.repository.ts file and first inject the Prisma service we defined in the previous step:
import { Injectable } from '@nestjs/common';
import { PrismaService } from 'src/database/prisma.service';

@Injectable()
export class TweetsRepository {
  constructor(private prisma: PrismaService) {}
}
The class now has access to the Prisma service.
Let's now define some CRUD methods that use the Prisma service to access/mutate the database!
import { Injectable } from '@nestjs/common';
import { Prisma, Tweet } from '@prisma/client';
import { PrismaService } from 'src/database/prisma.service';

@Injectable()
export class TweetsRepository {
  constructor(private prisma: PrismaService) {}

  async createTweet(params: { data: Prisma.TweetCreateInput }): Promise<Tweet> {
    const { data } = params;
    return this.prisma.tweet.create({ data });
  }

  async getTweets(params: {
    skip?: number;
    take?: number;
    cursor?: Prisma.TweetWhereUniqueInput;
    where?: Prisma.TweetWhereInput;
    orderBy?: Prisma.TweetOrderByWithRelationInput;
  }): Promise<Tweet[]> {
    const { skip, take, cursor, where, orderBy } = params;
    return this.prisma.tweet.findMany({ skip, take, cursor, where, orderBy });
  }

  async updateTweet(params: {
    where: Prisma.TweetWhereUniqueInput;
    data: Prisma.TweetUpdateInput;
  }): Promise<Tweet> {
    const { where, data } = params;
    return this.prisma.tweet.update({ where, data });
  }

  async deleteTweet(params: {
    where: Prisma.TweetWhereUniqueInput;
  }): Promise<Tweet> {
    const { where } = params;
    return this.prisma.tweet.delete({ where });
  }
}
There's quite a lot going on here - let's break it down:
- We have a method for each of our CRUD operations (create, get, update and delete)
- Each method takes 1 argument - an object called
params - We can leverage some generated types from Prisma for the params object so we can pass exactly what's required to the Prisma service call
- For the return type of each method, we can also use Prisma built-in types (e.g.
createTweet()has a return type ofPromise<Tweet>) - Each method returns the returned value from the respective Prisma service call
Add a Service Layer
Right now, the repository layer we created in the previous step is not accessible to the outside world.
Later on in this tutorial, we'll add an API layer (we'll do examples in both REST & GraphQL) so the outside world can interact with our server.
Instead of calling the repository layer directly from the API layer, we're going to add a service layer.
So the flow of incoming requests to our server will be:
- API layer (e.g. controller)
- Service layer
- Repository layer (done in the previous step)
You might be wondering - why the need for the service layer? Can't we just call the repository layer directly from the API layer?
Well, you could of course.
But I prefer to keep the repository layer minimal and strictly focused on CRUD operations to the database.
This way, in the service layer you can leverage the repository layer but also do other things (like sending an email or add a CPU-heavy task to a queue).
Let's add a service layer now to our tweets module.
Inside the new tweets directory, add a new file called tweets.service.ts:
touch src/modules/tweets/tweets.service.ts
Kick-off this file by first just defining the injectable class:
import { Injectable } from '@nestjs/common';

@Injectable()
export class TweetsService {}
And then ensure this new service is included in the providers and exports array of the tweets module:
import { Module } from '@nestjs/common';
import { PrismaModule } from 'src/database/prisma.module';
import { TweetsRepository } from './tweets.repository';
import { TweetsService } from './tweets.service';

@Module({
  imports: [PrismaModule],
  providers: [TweetsRepository, TweetsService],
  exports: [TweetsService],
})
export class TweetsModule {}
The reason we've added the TweetsService in the exports is so that we can use it in the API layer in the next step.
With that admin out the way, jump back into the tweets.service.ts file and first inject the repository layer we defined in the previous step:
import { Injectable } from '@nestjs/common';
import { TweetsRepository } from './tweets.repository';

@Injectable()
export class TweetsService {
  constructor(private repository: TweetsRepository) {}
}
Okay, so now the service layer has access to the repository layer, let's add a couple of methods to this service layer that the API layer can use for the upcoming sections in the tutorial!
import { Injectable } from '@nestjs/common';
import { Tweet, User } from '@prisma/client';
import { TweetsRepository } from './tweets.repository';

@Injectable()
export class TweetsService {
  constructor(private repository: TweetsRepository) {}

  async createTweet(params: { content: Tweet[`content`]; userId: User[`id`] }) {
    const { content, userId } = params;

    // call repository layer
    const tweet = await this.repository.createTweet({
      data: {
        content,
        user: {
          connect: {
            id: userId,
          },
        },
      },
    });

    // do other things in the service layer... e.g. send email of tweet

    return tweet;
  }

  async getTweets() {
    const tweets = await this.repository.getTweets({});
    return tweets;
  }
}
Note in the params of the createTweet method we've leveraged some Prisma types again.
This is to ensure when we call the repository layer, the respective params have the correct type, so using these generated types from Prisma Client is super useful!
You can create other methods for updating and deleting tweets if you like 😎.
REST in NestJS with Prisma
Let's add a couple of API endpoints!
First, let's create a new module called API:
nest g module api
Then let's add a controller:
touch src/api/api.controller.ts
Kick off the controller by first just defining the injectable class:
import { Controller } from '@nestjs/common';

@Controller('api')
export class ApiController {}
Note that I've defined a path prefix api.
Ensure this new controller is included in the controllers array of the api module, as well as importing the TweetsModule:
import { Module } from '@nestjs/common';
import { TweetsModule } from 'src/modules/tweets/tweets.module';
import { ApiController } from './api.controller';

@Module({
  imports: [TweetsModule],
  controllers: [ApiController],
})
export class ApiModule {}
Let's add a couple of endpoints:
- Creating a tweet
- Getting a list of all tweets
Add these to the controller:
import { Body, Controller, Get, Post } from '@nestjs/common';
import { TweetsService } from 'src/modules/tweets/tweets.service';

@Controller('api')
export class ApiController {
  constructor(private readonly tweetsService: TweetsService) {}

  @Post(`tweet`)
  async createTweet(@Body() data: { content: string; userId: string }) {
    const { content, userId } = data;
    return this.tweetsService.createTweet({
      content,
      userId: Number(userId),
    });
  }

  @Get('tweets')
  getTweets() {
    return this.tweetsService.getTweets();
  }
}
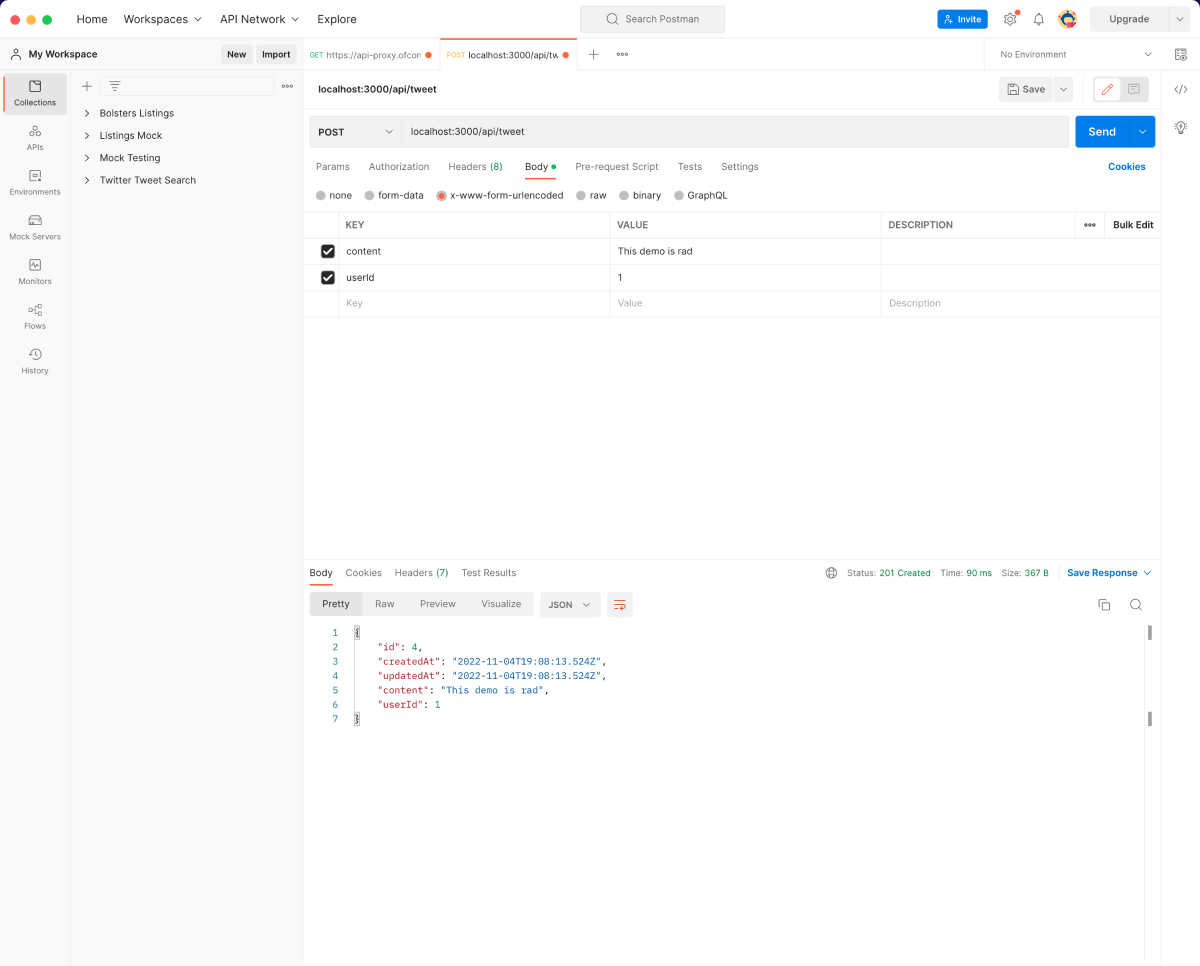
If you haven't done so already, boot up your local NestJS app with npm run start:dev and ping off a few test requests!
For example, here's how the POST /api/tweet looks like in Postman:

Now, the above example is super simple, but hopefully, you get the idea.
Here are a few ideas on how you can take this further:
- Add a DTO for the
POSTrequest - Tweak the getTweets service and controller to handle pagination
- [Advanced] Add an auth layer so the userId can be passed in automatically instead of passed into the body of the request
GraphQL in NestJS with Prisma
Let's now see how we can work with GraphQL in a NestJS app with Prisma!
We're going to focus on a code-first GraphQL approach.
We'll start by spinning up our GraphQL API. Then we'll add some Queries and Mutations.
Install the required dependencies:
npm install @nestjs/graphql @nestjs/apollo graphql apollo-server-express
As noted in the NestJS docs, we then need to add the GraphQL module to the app.module.ts file:
import { Module } from '@nestjs/common';
import { TweetsModule } from './modules/tweets/tweets.module';
import { ApiModule } from './api/api.module';
import { PrismaModule } from './database/prisma.module';
import { GraphQLModule } from '@nestjs/graphql';
import { ApolloDriver, ApolloDriverConfig } from '@nestjs/apollo';

@Module({
  imports: [
    GraphQLModule.forRoot<ApolloDriverConfig>({
      driver: ApolloDriver,
      autoSchemaFile: true,
    }),
    ApiModule,
    TweetsModule,
    PrismaModule,
  ],
  controllers: [],
  providers: [],
})
export class AppModule {}
If your NestJS app is running locally, you'll see an error like GraphQLError: Query root type must be provided..
In order for the GraphQL API to work, we need to add at least 1 resolver.
Let's add a quick resolver now.
Add a resolver file inside the api directory:
touch src/api/api.resolver.ts
And then in this resolver, add the following code:
import { Query, Resolver } from '@nestjs/graphql';

@Resolver()
export class ApiResolver {
  @Query(() => String)
  async getTweets() {
    return `All tweets`;
  }
}
We've defined a GraphQL Query called getTweets which for now just returns a string.
Now make sure you include this resolver in the API module as a provider:
import { Module } from '@nestjs/common';
import { TweetsModule } from 'src/modules/tweets/tweets.module';
import { ApiController } from './api.controller';
import { ApiResolver } from './api.resolver';

@Module({
  imports: [TweetsModule],
  controllers: [ApiController],
  providers: [ApiResolver],
})
export class ApiModule {}
The NestJS error mentioned above should no longer be showing.
In fact, if you're server is up and running you can now go to localhost:3000/graphql to see your GraphQL playground:

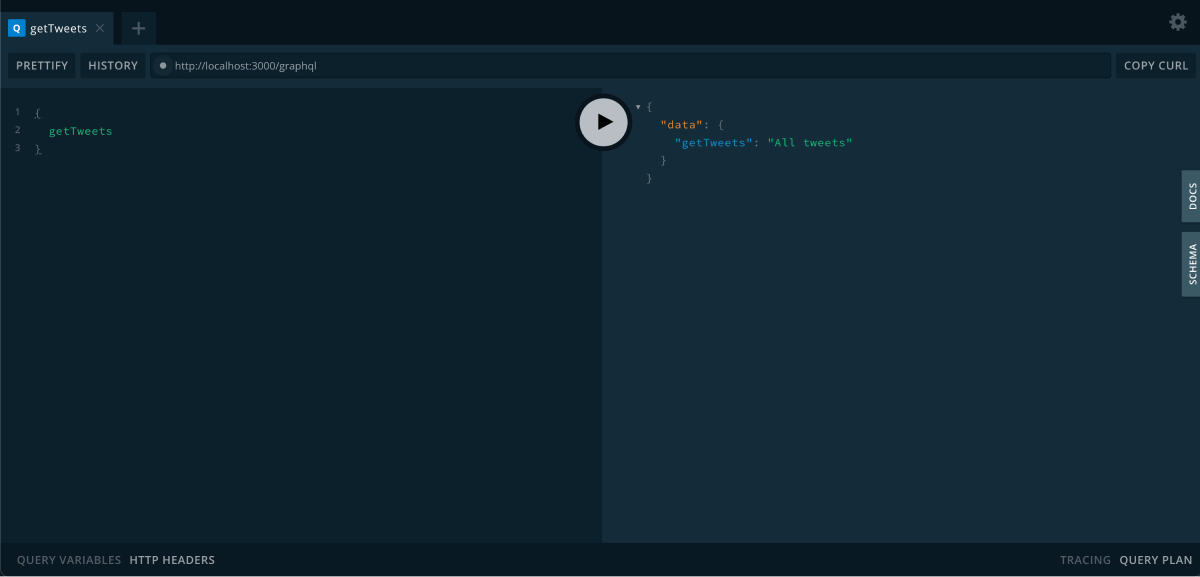
As shown in the screenshot, if you run the getTweets query, you'll see the string returned on the right!
Okay, so let's update this to get Tweets from the database with Prisma.
To create our GraphQL schema using a code-first approach, we will use Typescript classes and decorators from the @nestjs/graphql package.
Create a new file in the tweets module called tweets.model.ts:
touch src/modules/tweets/tweets.model.ts
Inside this file, add the following code:
import { Field, GraphQLISODateTime, Int, ObjectType } from '@nestjs/graphql';
import { Tweet as TweetDB } from '@prisma/client';

@ObjectType()
export class Tweet {
  @Field(() => Int)
  id: TweetDB[`id`];

  @Field(() => GraphQLISODateTime)
  createdAt: TweetDB[`createdAt`];

  @Field(() => GraphQLISODateTime)
  updatedAt: TweetDB[`updatedAt`];

  @Field(() => String)
  content: TweetDB[`content`];

  @Field(() => Int)
  userId: TweetDB[`userId`];
}
Using the @ObjectType() decorator is the Nest way to define your GraphQL schema in a code-first approach.
In the above code, we have defined the GraphQL object type for a Tweet, using the same fields we defined in the Tweet database table with Prisma.
Note how I've also leveraged the auto-generated Prisma types too (I had to rename the import to prevent the conflict)!
Now let's update the resolver to use this object type and also use our TweetsService:
import { Query, Resolver } from '@nestjs/graphql';
import { Tweet } from 'src/modules/tweets/tweets.model';
import { TweetsService } from 'src/modules/tweets/tweets.service';

@Resolver()
export class ApiResolver {
  constructor(private readonly tweetsService: TweetsService) {}

  @Query(() => [Tweet])
  async getTweets() {
    return this.tweetsService.getTweets();
  }
}
Note how the [Tweet] is in square brackets - this tells the GraphQL schema to expect an array of tweets as the response for this query.
Let's also add a GraphQL Mutation (creating a tweet):
import { Args, Int, Mutation, Query, Resolver } from '@nestjs/graphql';
import { Tweet } from 'src/modules/tweets/tweets.model';
import { TweetsService } from 'src/modules/tweets/tweets.service';

@Resolver()
export class ApiResolver {
  constructor(private readonly tweetsService: TweetsService) {}

  @Query(() => [Tweet])
  async getTweets() {
    return this.tweetsService.getTweets();
  }

  @Mutation(() => Tweet)
  async createTweet(
    @Args({ name: `content`, type: () => String }) content: string,
    @Args({ name: `userId`, type: () => Int }) userId: number,
  ) {
    return this.tweetsService.createTweet({ content, userId });
  }
}
Open up your GraphQL playground and test out the query and mutation!
Unit testing Prisma in NestJS
Let's add some unit tests against the repository layer (where the Prisma Client is used).
What's the value in writing unit tests for Prisma?
Well, as your project grows in size, we want to ensure that Prisma behaves in the way we expect.
The main reason for unit testing any 3rd party package used as a dependency in your project is to protect against any unexpected/breaking changes as the package goes through upgrades.
For example, imagine in your project if you upgrade the Prisma dependency after Prisma rolls out a shiny new release, but don't realise that the response from a createMany call has been updated to a new response. Without tests for this scenario, you may be exposed to runtime errors.
It's also worth adding testing to functions that use Prisma Client which can throw exceptions based on conditional paths.
For example, to make this testing example a bit more fun, let's throw an exception to the createTweet method in the repository layer if the user tries to create a tweet that exceeds 80 characters in length:
import { Injectable } from '@nestjs/common';
import { Prisma, Tweet } from '@prisma/client';
import { PrismaService } from '../../database/prisma.service';

@Injectable()
export class TweetsRepository {
  constructor(private prisma: PrismaService) {}

  async createTweet(params: { data: Prisma.TweetCreateInput }): Promise<Tweet> {
    const { data } = params;
    if (data.content.length > 80) {
      throw new Error(`Tweet too long`);
    }
    return this.prisma.tweet.create({ data });
  }

  // ... plus other methods
}
So, for the createTweet method, we should test:
- That creating a tweet returns the respective tweet that's just been created
- If a tweet exceeds 80 characters, an error is thrown
As you can see in the constructor of the repository layer above, we have 1 dependency required: PrismaService.
In our unit tests, we don't want to make actual calls to the database via Prisma Client - we want to 'mock' this behaviour.
We'll need an extra package to mock the Prisma Client:
npm install jest-mock-extended@2.0.4 --save-dev
With that package installed, let's now start writing the tests.
Add a new file called tweets.repository.spec.ts:
touch src/modules/tweets/tweets.repository.spec.ts
In this file, using Nest's built-in Test class, let's first create the testing module.
As we are testing the methods in the tweets.repository file, the TweetsRepository should not be mocked.
The PrismaService, however, should be mocked (as mentioned above) as we don't want to make actual calls to the database, we just want to test that Prisma Client behaves as we expect:
import { Test } from '@nestjs/testing';
import { PrismaClient } from '@prisma/client';
import { PrismaService } from '../../database/prisma.service';
import { TweetsRepository } from './tweets.repository';
import { mockDeep, DeepMockProxy } from 'jest-mock-extended';

describe(`TweetsRepository`, () => {
  let tweetsRepository: TweetsRepository;
  let prismaService: DeepMockProxy<PrismaClient>;

  beforeEach(async () => {
    const moduleRef = await Test.createTestingModule({
      providers: [TweetsRepository, PrismaService],
    })
      .overrideProvider(PrismaService)
      .useValue(mockDeep<PrismaClient>())
      .compile();

    tweetsRepository = moduleRef.get(TweetsRepository);
    prismaService = moduleRef.get(PrismaService);
  });
})
In the above code, our testing module now has access to the tweetsRepository class with all of it's respective functions, as well as a mocked prismaService class.
This means that in our tests, whenever we call one of the methods in the repository layer (e.g. createTweet), anytime the prismaService is used in the method, it will use the mocked instance instead of the real instance.
As noted above, for the createTweet method let's add tests for the following scenarios:
- Scenario 1: That creating a tweet returns the respective tweet that's just been created
- Scenario 2: If a tweet exceeds 80 characters, an error is thrown
Starting with Scenario 1:
import { Test } from '@nestjs/testing';
import { PrismaClient } from '@prisma/client';
import { PrismaService } from '../../database/prisma.service';
import { TweetsRepository } from './tweets.repository';
import { mockDeep, DeepMockProxy } from 'jest-mock-extended';

describe(`TweetsRepository`, () => {
  let tweetsRepository: TweetsRepository;
  let prismaService: DeepMockProxy<PrismaClient>;

  beforeEach(async () => {
    const moduleRef = await Test.createTestingModule({
      providers: [TweetsRepository, PrismaService],
    })
      .overrideProvider(PrismaService)
      .useValue(mockDeep<PrismaClient>())
      .compile();

    tweetsRepository = moduleRef.get(TweetsRepository);
    prismaService = moduleRef.get(PrismaService);
  });

  describe(`createTweet`, () => {
    it(`should create a new tweet`, async () => {
      // Arrange
      const mockedTweet = {
        id: 1,
        createdAt: new Date(),
        updatedAt: new Date(),
        content: `Hello world, this is a tweet.`,
        userId: 1234,
      };
      prismaService.tweet.create.mockResolvedValue(mockedTweet);

      // Act
      const createTweet = () =>
        tweetsRepository.createTweet({
          data: {
            content: mockedTweet.content,
            user: {
              connect: {
                id: mockedTweet.userId,
              },
            },
          },
        });

      // Assert
      await expect(createTweet()).resolves.toBe(mockedTweet);
    });
  });
})
The purpose of this test is to ensure that the createTweet method in the repository layer returns the respective tweet that's been created.
In the arrange part of the test, we mocked the prismaService so when createTweet method is called in the test, it knows how to handle the dependency:
prismaService.tweet.create.mockResolvedValue(mockedTweet)
In the act part of the test, we wrapped the createTweet method call into a function. This step isn't necessary (we could just call the function directly in the assert layer), but the test is a bit cleaner this way.
And finally, in the assert part of the test, we can define how we expect the method to behave - in this example for the createTweet method to return the tweet that was created.
Now let's add a test for Scenario 2 when the character length of the tweet exceeds 80 characters:
import { Test } from '@nestjs/testing';
import { PrismaClient } from '@prisma/client';
import { PrismaService } from '../../database/prisma.service';
import { TweetsRepository } from './tweets.repository';
import { mockDeep, DeepMockProxy } from 'jest-mock-extended';

describe(`TweetsRepository`, () => {
  let tweetsRepository: TweetsRepository;
  let prismaService: DeepMockProxy<PrismaClient>;

  beforeEach(async () => {
    const moduleRef = await Test.createTestingModule({
      providers: [TweetsRepository, PrismaService],
    })
      .overrideProvider(PrismaService)
      .useValue(mockDeep<PrismaClient>())
      .compile();

    tweetsRepository = moduleRef.get(TweetsRepository);
    prismaService = moduleRef.get(PrismaService);
  });

  describe(`createTweet`, () => {
    it(`should create a new tweet`, async () => {
      // see previous example...
    });

    it(`should not be over 80 characters`, async () => {
      // Arrange
      const payload = {
        content: `This is a super long tweet over 80 characters This is a super long tweet over 80 characters`,
        userId: 1234,
      };

      // Act
      const createTweet = () =>
        tweetsRepository.createTweet({
          data: {
            content: payload.content,
            user: {
              connect: {
                id: payload.userId,
              },
            },
          },
        });

      // Assert
      await expect(createTweet()).rejects.toBeInstanceOf(Error);
    });
  });
})
The purpose of this test is to ensure that the createTweet method in the repository layer throws an error if a tweet has more than 80 characters.
Unlike the 1st scenario, we don't need to mock the prismaService here because the createTweet method throws an error before the prismaService is even used. Here's a reminder of the createTweet method to illustrate what I mean:
import { Injectable } from '@nestjs/common';
import { Prisma, Tweet } from '@prisma/client';
import { PrismaService } from 'src/database/prisma.service';

@Injectable()
export class TweetsRepository {
  constructor(private prisma: PrismaService) {}

  async createTweet(params: { data: Prisma.TweetCreateInput }): Promise<Tweet> {
    const { data } = params;
    if (data.content.length > 80) {
      throw new Error(`Tweet too long`);
    }
    // test will not reach this point as the error has already been thrown!
    return this.prisma.tweet.create({ data });
  }
}
In the act part of the test, we wrapped the createTweet method call into a function. Similar to the 1st scenario, this step isn't necessary (we could just call the function directly in the assert layer), but the test is a bit cleaner this way.
And finally, in the assert part of the test, we can define how we expect the method to behave - in this example, the createTweet method throws an error as the characters exceed 80 characters.
And that's it!
If you'd like more practice, go and add some tests for the remaining methods in the repository layer.
This was a long tutorial! Nice work if you made it to the end.
Let me know if you have any questions in the comments below or if you'd like me to expand the article any further ✌️!