
- Published on
- Last updated:
NestJS unit testing: A how-to guide with examples


This tutorial is a deep dive into unit testing in NestJS (including mocking with test doubles).
To get the most out of this tutorial, I recommend coding along with npm run test:watch running locally to see the tests we write in action!
If you want to check out the code for this tutorial, here's the Github repo.
Ready? Let's go!

Table of Contents
What is unit testing?
A unit test is an automation you have in your code that verifies a small piece of behavior.
Implemented correctly, unit testing can have an excellent return on investment.
By adding unit tests, you're investing in your project so that the future version of yourself (or other colleagues working on the project) can operate with speed and confidence as you add new features or refactor existing code.
The unit test should also be isolated - meaning the test doesn't rely on other dependencies to work.
In my opinion, handling this isolation challenge is the most difficult part of writing unit tests in NestJS, so we'll cover plenty of examples in this tutorial.
What makes a good unit test in NestJS?
Once you understand what unit testing is, I think it's fair to say the majority of developers think they're an excellent idea.
However, unit testing implemented poorly can become more of a liability than an asset.
Here are a few rules I follow which will be implemented in the examples throughout this tutorial:
- Keep each test small, following the Arrange-Act-Assert paradigm
- Focus on the end result/behavior
- Avoid brittleness by not testing implementation details
Entire books have been written on this subject (I recommend Vladimir's book on unit testing), so further reading is required to form your own opinions on what makes a good unit test.
A simple CRUD example (no mocking)
If you're an absolute beginner with unit testing as a practice as well as unit testing in NestJS, this section is for you! Jump to the next section if you're interested to learn about test doubles and mocking.
We're going to build a service with some basic CRUD functionality for handling Tweets and then write some unit tests for them.
Let's start by adding a module called tweets:
nest g module tweets
And then add a tweets service:
nest g service tweets
Running these 2 commands will create a directory called tweets with 3 files inside:
src / tweets / tweets.module.ts
tweets.service.spec.ts
tweets.service.ts
Open up the test file that NestJS created for us called tweets.service.spec.ts, which will look like this:
import { Test, TestingModule } from '@nestjs/testing';
import { TweetsService } from './tweets.service';

describe('TweetsService', () => {
  let service: TweetsService;

  beforeEach(async () => {
    const module: TestingModule = await Test.createTestingModule({
      providers: [TweetsService],
    }).compile();

    service = module.get<TweetsService>(TweetsService);
  });

  it('should be defined', () => {
    expect(service).toBeDefined();
  });
});
If you haven't done so already, make sure you're running your tests locally with this command:
npm run test:watch
Your terminal should output the following:

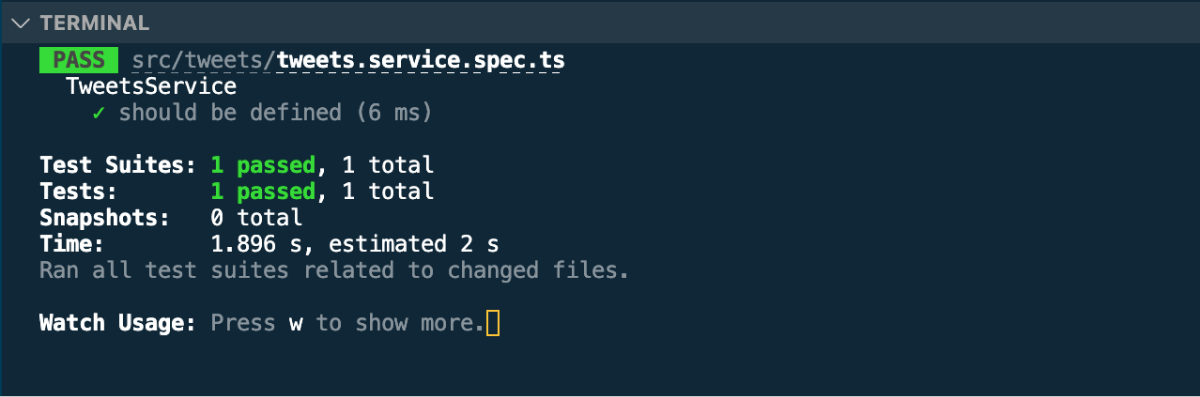
Nice work! The unit tests are now running with hot reloading. Any changes you make to your code will re-run the tests.
Before going on to write any more tests, let's just go through the auto-generated NestJS test file to understand what's going on.
First of all, as the file name includes spec.ts, Jest (the testing framework used in NestJS) automatically picks up the test. Any other files in your project with spec.ts will get picked up by Jest.
Inside the file itself, it starts off with a describe block:
describe('TweetsService', () => {
  // ...
});
The purpose of describe block is to group related tests, so here we are grouping all tests related to the TweetsService.
Next, we have a beforeEach hook:
import { Test, TestingModule } from '@nestjs/testing';
import { TweetsService } from './tweets.service';

describe('TweetsService', () => {
  let service: TweetsService;

  beforeEach(async () => {
    const module: TestingModule = await Test.createTestingModule({
      providers: [TweetsService],
    }).compile();

    service = module.get<TweetsService>(TweetsService);
  });

  // ...
});
A beforeEach hook handles any setup work that needs to happen before running each test.
So what the beforeEach hook is doing here is using the NestJS built-in Test class to create an isolated NestJS runtime (so you get all the NestJS behaviors like dependency injection).
This runtime is limited to what you define when using the Test class - in our example above we're creating a NestJS runtime with just the TweetsService.
Therefore, this setup gives us access to all the methods inside the TweetsService.
The final part to review from the auto-generated NestJS test file is a test!
You'll notice a test called it should be defined:
import { Test, TestingModule } from '@nestjs/testing';
import { TweetsService } from './tweets.service';

describe('TweetsService', () => {
  // ...

  it('should be defined', () => {
    expect(service).toBeDefined();
  });
});
Using the expect function from Jest is an assertion.
All your expect functions will have another method chained to check that certain conditions are met.
In this example, it's toBeDefined(). So this test is ensuring that the TweetsService is defined.
Let's go into some more concrete examples for unit testing.
Inside the tweets.service.ts file, add some CRUD methods:
import { Injectable } from '@nestjs/common';

@Injectable()
export class TweetsService {
  tweets: string[] = [];

  createTweet(tweet: string) {
    if (tweet.length > 100) {
      throw new Error(`Tweet too long`);
    }
    this.tweets.push(tweet);
    return tweet;
  }

  updateTweet(tweet: string, id: number) {
    const tweetToUpdate = this.tweets[id];
    if (!tweetToUpdate) {
      throw new Error(`This Tweet does not exist`);
    }
    if (tweet.length > 100) {
      throw new Error(`Tweet too long`);
    }
    this.tweets[id] = tweet;
    return tweet;
  }

  getTweets() {
    return this.tweets;
  }

  deleteTweet(id: number) {
    const tweetToDelete = this.tweets[id];
    if (!tweetToDelete) {
      throw new Error(`This Tweet does not exist`);
    }
    const deletedTweet = this.tweets.splice(id, 1);
    return deletedTweet;
  }
}
To keep this example simple, you'll notice the state is handled in memory by creating a public field in the class called tweets.
Let's start by considering what we need to test for the first method in our Tweets Service, createTweet:
import { Injectable } from '@nestjs/common';

@Injectable()
export class TweetsService {
  tweets: string[] = [];

  createTweet(tweet: string) {
    if (tweet.length > 100) {
      throw new Error(`Tweet too long`);
    }
    this.tweets.push(tweet);
    return tweet;
  }
}
To help figure out what tests to write, you can ask yourself the question(s):
"What is the intended behavior here? Are there multiple paths the code can go down?"
Let's answer these questions for the createTweets method:
- When a valid tweet is created, it adds the tweet to the state
- When a valid tweet is created, the method returns the respective tweet
- A tweet greater than 100 characters in length should not be allowed
Okay, so let's now start to write some tests to cover these 3 scenarios!
In the tweets.service.spec.ts file, add the first test:
import { Test, TestingModule } from '@nestjs/testing';
import { TweetsService } from './tweets.service';

describe('TweetsService', () => {
  let service: TweetsService;

  beforeEach(async () => {
    const module: TestingModule = await Test.createTestingModule({
      providers: [TweetsService],
    }).compile();

    service = module.get<TweetsService>(TweetsService);
  });

  describe('createTweet', () => {
    it('should create tweet', () => {
      // Arrange
      service.tweets = [];
      const payload = 'This is my tweet';

      // Act
      const tweet = service.createTweet(payload);

      // Assert
      expect(tweet).toBe(payload);
      expect(service.tweets).toHaveLength(1);
    });
  });
});
Let's break down what's happening in this test:
- Arrange: We've done a bit of setup before the test by putting the payload in a variable
- Act: Call the
createTweetmethod, the bit of behavior we are testing - Assert: Declare the intended outcome. Here we've checked that the
createTweetmethod returns the tweet that was passed into the payload. We've also tested that the in-memory state has been updated with the new tweet.
So we've now covered 2 of the 3 scenarios:
When a valid tweet is created, it adds the tweet to stateWhen a valid tweet is created, the method returns the respective tweet- A tweet greater than 100 characters in length should not be allowed
Let's add another test to handle the 3rd scenario!
import { Test, TestingModule } from '@nestjs/testing';
import { TweetsService } from './tweets.service';

describe('TweetsService', () => {
  let service: TweetsService;

  beforeEach(async () => {
    const module: TestingModule = await Test.createTestingModule({
      providers: [TweetsService],
    }).compile();

    service = module.get<TweetsService>(TweetsService);
  });

  describe('createTweet', () => {
    it('should create tweet', () => {
      // ...
    });

    it('should prevent tweets created which are over 100 characters', () => {
      // Arrange
      const payload =
        'This is a long tweet over 100 characters This is a long tweet over 100 characters This is a long t...';

      // Act
      const tweet = () => {
        return service.createTweet(payload);
      };

      // Assert
      expect(tweet).toThrowError();
    });
  });
});
Let's break down this test:
- Arrange: We've done a bit of setup before the test by putting the payload in a variable
- Act: Call the
createTweetmethod inside atweet()function. - Assert: Declare the intended outcome. Here we've checked that the
createTweetmethod throws an error with the payload passed in
The Arrange-Act-Assert is a good pattern to follow when writing tests. It helps keep the tests structured.
I won't include the Arrange-Act-Assert comments in any of the following examples, but I will follow this pattern so try to keep an eye out for it.
Time to practice your unit testing skills! Go ahead and write unit tests for the other methods in the TweetsService. You can compare your work with the tests I've added in the Github repo.
Once you've done that, let's move on to the next part of this tutorial.
Mocking with test doubles in NestJS
So the previous example was quite simple. In the TweetsService, we used 0 dependencies (i.e. nothing was passed into the constructor), which simplifies our unit tests.
However, if you're working on a NestJS project, you'll soon find yourself adding dependencies to your services and controllers.
For example, the TweetsService we defined in the previous step could evolve into something like:
import { Injectable } from '@nestjs/common';
import { HttpService } from '@nestjs/axios';
import { ConfigService } from '@nestjs/config';

@Injectable()
export class TweetsService {
  constructor(
    private readonly httpService: HttpService,
    private readonly configService: ConfigService
  ) {}
  // ...
}
Adding these dependencies, however, will create some challenges for our unit tests.
Our methods can now include any one of the dependencies, so the scope of the unit tests has now extended to consider the behavior of the dependencies as well. Also, the dependencies can be asynchronous (e.g. using the HttpService to make an HTTP request) which can affect the performance of our unit tests.
The solution? Test doubles.
In our unit tests, we can effectively swap out specific dependencies with a 'test double', so when the test runs it uses the test double instead of the actual dependency.
Let's dive into some examples:
Example: Mocking HTTP requests in NestJS
Let's start by creating a new pokemon module:
nest g module pokemon
And then add a pokemon service:
nest g service pokemon
Running these 2 commands will create a directory called pokemon with 3 files inside:
src / pokemon / pokemon.module.ts
pokemon.service.spec.ts
pokemon.service.ts
We're going to use the NestJS HTTP module to fetch data from the Pokemon API.
Let's install the relevant package:
npm i --save @nestjs/axios@0.1.0
When this article was published, there was a bug between Axios and Jest which is why I've installed the 0.1.0 version!
In order to use the NestJS HTTP module in our service, we need to make it available for dependency injection by importing it into the module:
import { HttpModule } from '@nestjs/axios';
import { Module } from '@nestjs/common';
import { PokemonService } from './pokemon.service';

@Module({
  imports: [HttpModule],
  providers: [PokemonService],
})
export class PokemonModule {}
Now we can use the HttpModule in the service by passing it into the constructor.
Inside the service file let's add a simple getPokemon method that returns the name of a Pokemon:
import { HttpService } from '@nestjs/axios';
import {
  BadRequestException,
  Injectable,
  InternalServerErrorException,
} from '@nestjs/common';

@Injectable()
export class PokemonService {
  constructor(private httpService: HttpService) {}

  async getPokemon(id: number) {
    if (id < 1 || id > 151) {
      throw new BadRequestException(`Invalid Pokemon ID`);
    }

    const { data } = await this.httpService.axiosRef({
      url: `https://pokeapi.co/api/v2/pokemon/${id}`,
      method: `GET`,
    });

    if (!data || !data.species || !data.species.name) {
      throw new InternalServerErrorException();
    }

    return data.species.name;
  }
}
Here is some unit tests we will add for the above getPokemon() method:
- An ID less than
1should return aBadRequestException - An ID greater than
151should return aBadRequestException - An ID between
1and151returns the name of the respective pokemon - If the response from the Pokemon API isn't what we expect, then return a
InternalServerErrorException
Let's dive in!
NestJS auto-generated the test file for the Pokemon service:
import { Test, TestingModule } from '@nestjs/testing';
import { PokemonService } from './pokemon.service';

describe('PokemonService', () => {
  let service: PokemonService;

  beforeEach(async () => {
    const module: TestingModule = await Test.createTestingModule({
      providers: [PokemonService],
    }).compile();

    service = module.get<PokemonService>(PokemonService);
  });

  it('should be defined', () => {
    expect(service).toBeDefined();
  });
});
With npm run test:watch running, however, you should see an error stating something like Nest can't resolve dependencies of the Pokemon Service:

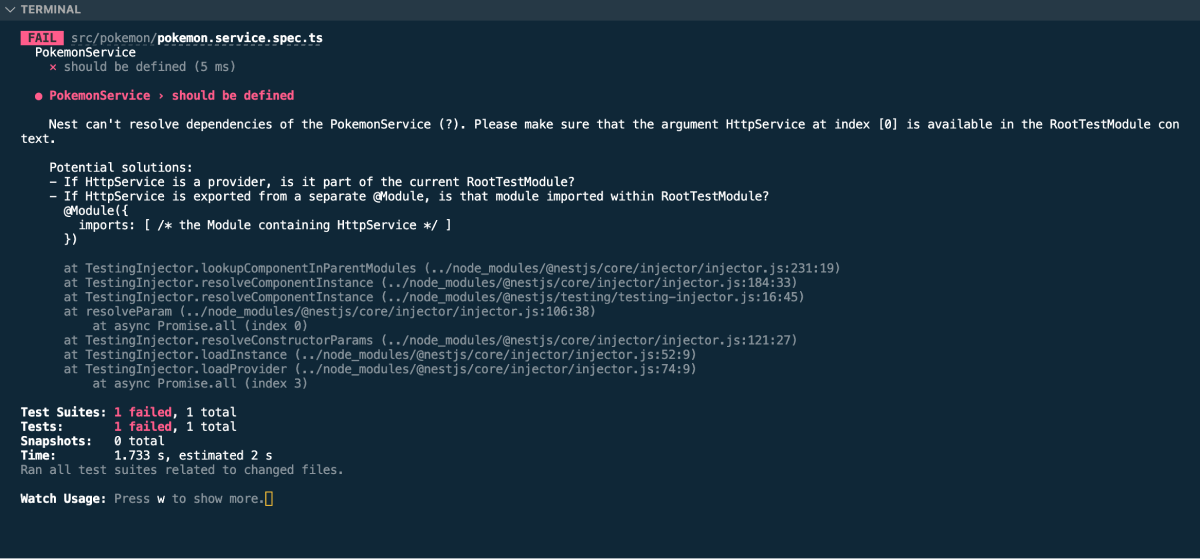
You're seeing this error because Jest is trying to run the test but the testing instance is missing a dependency (the HTTP dependency, to be precise!).
So we need to provide the HTTP dependency to the testing module so that when the tests are run, the dependency we pass into the testing module can be used inside the PokemonService.
This is one of the biggest benefits of dependency injection - you can swap out the dependency with a more appropriate alternative for testing purposes.
For example, we could pass in the actual HttpService which makes HTTP requests to the Pokemon API OR we could pass in a 'test double' of the HttpService which essentially pretends to make the HTTP requests.
This is super powerful!
With all that being said, for demonstration purposes let's start by implementing the tests which will make the actual HTTP requests to the Pokemon API. We'll then update our tests to mock the HTTP requests.
To fix the dependency error inside the pokemon.service.spec.ts file, we just need to add the HttpModule as an import to the test module:
import { HttpModule } from '@nestjs/axios';
import { Test, TestingModule } from '@nestjs/testing';
import { PokemonService } from './pokemon.service';

describe('PokemonService', () => {
  let pokemonService: PokemonService; // renamed variable to pokemonService

  beforeEach(async () => {
    const module: TestingModule = await Test.createTestingModule({
      imports: [HttpModule],
      providers: [PokemonService],
    }).compile();

    pokemonService = module.get<PokemonService>(PokemonService);
  });

  it('should be defined', () => {
    expect(pokemonService).toBeDefined();
  });
});
In the above test, I also renamed the service variable to pokemonService to make it more clear.
You should no longer see any testing errors in your terminal!
Let's recap the 4 unit tests we'd like to add:
- An ID less than
1should return aBadRequestException - An ID greater than
151should return aBadRequestException - An ID between
1and151returns the name of the respective pokemon - If the response from the Pokemon API isn't what we expect, then return a
InternalServerErrorException
Let's add those now:
import { HttpModule } from '@nestjs/axios';
import { BadRequestException } from '@nestjs/common';
import { Test, TestingModule } from '@nestjs/testing';
import { PokemonService } from './pokemon.service';

describe('PokemonService', () => {
  let pokemonService: PokemonService;

  beforeEach(async () => {
    const module: TestingModule = await Test.createTestingModule({
      imports: [HttpModule],
      providers: [PokemonService],
    }).compile();

    pokemonService = module.get<PokemonService>(PokemonService);
  });

  it('should be defined', () => {
    expect(pokemonService).toBeDefined();
  });

  describe('getPokemon', () => {
    it('pokemon ID less than 1 should throw error', async () => {
      const getPokemon = pokemonService.getPokemon(0);

      await expect(getPokemon).rejects.toBeInstanceOf(BadRequestException);
    });

    it('pokemon ID greater than 151 should throw error', async () => {
      const getPokemon = pokemonService.getPokemon(152);

      await expect(getPokemon).rejects.toBeInstanceOf(BadRequestException);
    });

    it('valid pokemon ID to return the pokemon name', async () => {
      const getPokemon = pokemonService.getPokemon(1);

      await expect(getPokemon).resolves.toBe('bulbasaur');
    });
  });
});
In the tests, we're dealing with asynchronous functions as the getPokemon method returns a promise. That's what the resolves and rejects methods from Jest are handling.
Of course, you don't need to create the getPokemon variable, but I find it a bit cleaner and makes the test easier to read instead of passing the method call directly into the Jest expect.
With npm run test:watch running, the tests should be passing!
As we've not done any mocking on the Http dependency, when the getPokemon methods are called in the 2 tests, the actual Http dependency is being used (so in this case, attempting an HTTP request to the Pokemon API).
This has the following challenges:
- 🐌 Making network requests inside your tests will cause your test suite to be slower
- 💰 Perhaps the API you're using costs money, so you only want the API to be called during runtime and not during tests
- 🧘♀️ The test should focus on the intended behavior of the method, regardless of any dependencies
So let's now explore how we can mock the HTTP service in NestJS.
To implement mocking in NestJS, I recommend using the @golevelup/ts-jest package.
Using the createMock utility function from this package will give you all the properties and sub-properties for the thing you want to mock. The alternative is manually defining all the properties you need in a custom object (which can get quite repetitive).
When combined with Jest's mocking capabilities, it's very powerful.
Start by installing the package:
npm install @golevelup/ts-jest
So our objective here is to stop using the actual HTTP service which makes requests to the Pokemon API and instead implement a mocked version.
So instead of using the HttpModule as an import in our testing module, we're going to replace the HttpService directly using the createMock() utility function:
import { createMock, DeepMocked } from '@golevelup/ts-jest';
import { HttpService } from '@nestjs/axios';
import { BadRequestException } from '@nestjs/common';
import { Test, TestingModule } from '@nestjs/testing';
import { PokemonService } from './pokemon.service';

describe('PokemonService', () => {
  let pokemonService: PokemonService;
  let httpService: DeepMocked<HttpService>;

  beforeEach(async () => {
    const module: TestingModule = await Test.createTestingModule({
      providers: [
        PokemonService,
        {
          provide: HttpService,
          useValue: createMock<HttpService>(),
        },
      ],
    }).compile();

    pokemonService = module.get<PokemonService>(PokemonService);
    httpService = module.get(HttpService);
  });

  // ... tests
});
The DeepMocked<HttpService> type makes sure the httpService variable now has all the properties and sub-properties available in your IDE for auto-completion.
What impact does the above changes have on your tests?
Well, for example, one of the tests we defined was to ensure when a valid Pokemon ID is passed in, it returns the respective Pokemon name:
// ...

it('valid pokemon ID to return the pokemon name', async () => {
  const getPokemon = pokemonService.getPokemon(1);

  await expect(getPokemon).resolves.toBe('bulbasaur');
});
In this test, we're calling the getPokemon method. If you look in the getPokemon method, you'll see the HttpService is used to make a request to the Pokemon API.
We've basically replaced the HttpService with a dummy function that we can control in our tests.
So if you're following on with the tutorial and still have npm run test:watch running, you'll see an error like this:

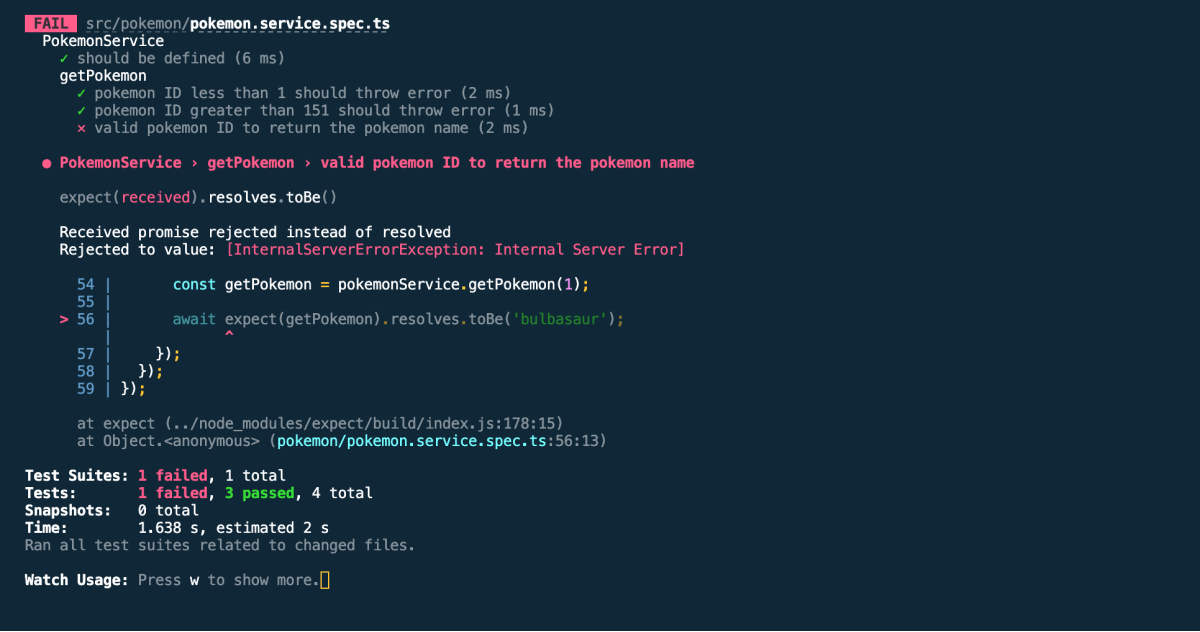
This is because our dummy function isn't doing anything!
In this test, let's update the dummy function to 'mock' the response from the Pokemon API:
import { createMock, DeepMocked } from '@golevelup/ts-jest';
import { HttpService } from '@nestjs/axios';
import { BadRequestException } from '@nestjs/common';
import { Test, TestingModule } from '@nestjs/testing';
import { PokemonService } from './pokemon.service';

describe('PokemonService', () => {
  let pokemonService: PokemonService;
  let httpService: DeepMocked<HttpService>;

  beforeEach(async () => {
    // setup...
  });

  describe('getPokemon', () => {
    // other tests...

    it('valid pokemon ID to return the pokemon name', async () => {
      httpService.axiosRef.mockResolvedValueOnce({
        data: {
          species: { name: `bulbasaur` },
        },
        headers: {},
        config: { url: '' },
        status: 200,
        statusText: '',
      });

      const getPokemon = pokemonService.getPokemon(1);

      await expect(getPokemon).resolves.toBe('bulbasaur');
    });
  });
});
We're implementing a mock to tell the test: "Hey, whenever you run this test, make sure the httpService call returns an Axios response with the specific object inside the data property".
Your test should now be passing.
By the way, you may have noticed that we're missing a test to cover the 4th scenario:
An ID less than 1 should return a BadRequestExceptionAn ID greater than 151 should return a BadRequestExceptionAn ID between 1 and 151 returns the name of the respective pokemon- If the response from the Pokemon API isn't what we expect, then return an
InternalServerErrorException
Let's add a final test for this:
import { createMock, DeepMocked } from '@golevelup/ts-jest';
import { HttpService } from '@nestjs/axios';
import { BadRequestException } from '@nestjs/common';
import { Test, TestingModule } from '@nestjs/testing';
import { PokemonService } from './pokemon.service';

describe('PokemonService', () => {
  let pokemonService: PokemonService;
  let httpService: DeepMocked<HttpService>;

  beforeEach(async () => {
    // setup...
  });

  describe('getPokemon', () => {
    // other tests...

    it('if Pokemon API response unexpectedly changes, throw an error', async () => {
      httpService.axiosRef.mockResolvedValueOnce({
        data: `Unexpected data`,
        headers: {},
        config: { url: '' },
        status: 200,
        statusText: '',
      });

      const getPokemon = pokemonService.getPokemon(1);

      await expect(getPokemon).rejects.toBeInstanceOf(
        InternalServerErrorException,
      );
    });
  });
});
One final optimization we can make to our PokemonService test file is clean up the beforeEach hook a little.
Here's how it looks again:
// imports...

describe('PokemonService', () => {
  let pokemonService: PokemonService;
  let httpService: DeepMocked<HttpService>;

  beforeEach(async () => {
    const module: TestingModule = await Test.createTestingModule({
      providers: [
        PokemonService,
        {
          provide: HttpService,
          useValue: createMock<HttpService>(),
        },
      ],
    }).compile();

    pokemonService = module.get<PokemonService>(PokemonService);
    httpService = module.get(HttpService);
  });

  // the tests...
});
Let's say our PokemonService grows and we add more dependencies like caching and logging:
// imports...

describe('PokemonService', () => {
  let pokemonService: PokemonService;
  let httpService: DeepMocked<HttpService>;

  beforeEach(async () => {
    const module: TestingModule = await Test.createTestingModule({
      providers: [
        PokemonService,
        {
          provide: HttpService,
          useValue: createMock<HttpService>(),
        },
        {
          provide: CacheService,
          useValue: createMock<CacheService>(),
        },
        {
          provide: LoggingService,
          useValue: createMock<LoggingService>(),
        },
      ],
    }).compile();

    pokemonService = module.get<PokemonService>(PokemonService);
    httpService = module.get(HttpService);
  });

  // the tests...
});
Adding a new object to the providers array can get a little tedious every time we want to mock a dependency.
Thankfully, NestJS released in V8 a feature called Auto mocking which makes this code much cleaner:
// imports...

describe('PokemonService', () => {
  let pokemonService: PokemonService;
  let httpService: DeepMocked<HttpService>;

  beforeEach(async () => {
    const module: TestingModule = await Test.createTestingModule({
      providers: [
        PokemonService
      ],
    })
    .useMocker(createMock)
    .compile();

    pokemonService = module.get<PokemonService>(PokemonService);
    httpService = module.get(HttpService);
  });

  // the tests...
});
Passing createMock into the useMocker() method essentially mocks any dependency you haven't defined in the testing module.
Thank you Thiago Martins for the tip on this!
Nice work!
You've now done a deep dive into implementing test doubles in NestJS 🤟.
Unit testing pipes in NestJS
Pipes in NestJS are a way to validate and transform any inputs passed into your controllers.
There are a few built-in ones, like ParseIntPipe that converts the specified parameter into an integer, returning a 404 if the conversion fails.
Here's an example of how the ParseIntPipe could be implemented into a controller:
import { Controller, Get, Param, ParseIntPipe } from '@nestjs/common';
import { PokemonService } from './pokemon.service';

@Controller('pokemon')
export class PokemonController {
  constructor(private readonly pokemonService: PokemonService) {}

  @Get(':id')
  getPokemon(@Param('id', ParseIntPipe) id: number) {
    return this.pokemonService.getPokemon(id);
  }
}
Let's say that as well as the :id parameter being a number, we want to ensure that the value is greater than 0 and less than 152. We could implement something like this in the controller:
import {
  BadRequestException,
  Controller,
  Get,
  Param,
  ParseIntPipe,
} from '@nestjs/common';
import { PokemonService } from './pokemon.service';

@Controller('pokemon')
export class PokemonController {
  constructor(private readonly pokemonService: PokemonService) {}

  @Get(':id')
  getPokemon(@Param('id', ParseIntPipe) id: number) {
    if (id < 0 || id > 151) {
      throw new BadRequestException(`Invalid Pokemon ID`);
    }
    return this.pokemonService.getPokemon(id);
  }
}
Or we could create a custom pipe that handles this for us! Let's add this custom pipe, then add some unit tests for it.
Using the Nest CLI, create a new pipe:
nest g pipe parse-pokemon-id
This will create 2 new files in the root of your /src folder:
src/
  ...
  parse-pokemon-id.pipe.spec.ts
  parse-pokemon-id.pipe.ts
You can move these files into the pokemon directory if you like!
Let's update the pipe to achieve the specified behavior:
import { BadRequestException, Injectable, PipeTransform } from '@nestjs/common';

@Injectable()
export class ParsePokemonIdPipe implements PipeTransform {
  transform(value: string): number {
    const id = parseInt(value);
    if (isNaN(id)) {
      throw new BadRequestException(
        `Validation failed (numeric string is expected)`,
      );
    }
    if (id < 1 || id > 151) {
      throw new BadRequestException(`ID must be between 1 and 151`);
    }
    return id;
  }
}
This pipe we've created could do with the following tests:
- Should throw an error for nonnumbers
- Should throw an error if the number is less than 1 or greater than 151
- Should return the number if between 1 and 151
Open up the pipe test file Nest created for us:
import { ParsePokemonIdPipe } from './parse-pokemon-id.pipe';

describe('ParsePokemonIdPipe', () => {
  it('should be defined', () => {
    expect(new ParsePokemonIdPipe()).toBeDefined();
  });
});
Let's use a similar structure to previous unit tests: use a beforeEach hook to create a reusable pipe variable across all the tests:
import { ParsePokemonIdPipe } from './parse-pokemon-id.pipe';

describe('ParsePokemonIdPipe', () => {
  let pipe: ParsePokemonIdPipe;

  beforeEach(() => {
    pipe = new ParsePokemonIdPipe();
  });

  // ... now we can write tests using the pipe
});
With that set-up, let's add the tests!
import { BadRequestException } from '@nestjs/common';
import { ParsePokemonIdPipe } from './parse-pokemon-id.pipe';

describe('ParsePokemonIdPipe', () => {
  let pipe: ParsePokemonIdPipe;

  beforeEach(() => {
    pipe = new ParsePokemonIdPipe();
  });

  it('should be defined', () => {
    expect(new ParsePokemonIdPipe()).toBeDefined();
  });

  it(`should throw error for non numbers`, () => {
    const value = () => pipe.transform(`hello`);
    expect(value).toThrowError(BadRequestException);
  });

  it(`should throw error if number less than 1`, () => {
    const value = () => pipe.transform(`-34`);
    expect(value).toThrowError(BadRequestException);
  });

  it(`should throw error if number greater than 151`, () => {
    const value = () => pipe.transform(`200`);
    expect(value).toThrowError(BadRequestException);
  });

  it(`should return number if between 1 and 151`, () => {
    const value = () => pipe.transform(`5`);
    expect(value()).toBe(5);
  });
});
Nice work! You now know how to unit test pipes in NestJS.
Automating NestJS unit tests in a CI pipeline with Github Actions
Running your tests locally is great, but you'll probably soon want to set up a Continuous Integration workflow so your tests are automated on key triggers, like a pull request or pushed commits to a specific branch.
This is easy to set up with Github Actions, so let's dive in!
At the root of your project, create the .github/workflows/ directory.
In the .github/workflows/ directory, create a new file called tests.yml and add the following code:
name: Tests
on: pull_request
jobs:
  build:
    runs-on: ubuntu-latest
    steps:
    - uses: actions/checkout@v3
    - name: Install modules
      run: npm ci
    - name: Run tests
      run: npm run test
Let's explore the contents of this file:
- The
on:defines the event that the automation will be triggered on. So any pull requests opened will run the automation - Next, we've defined a job that will spin up a virtual machine and run the following steps:
- First runs the Github Action actions/checkout@v3. This is essentially an authentication step to allow the automation to access your repository
- Next the machine installs the dependencies with
npm ci - And finally then runs the tests
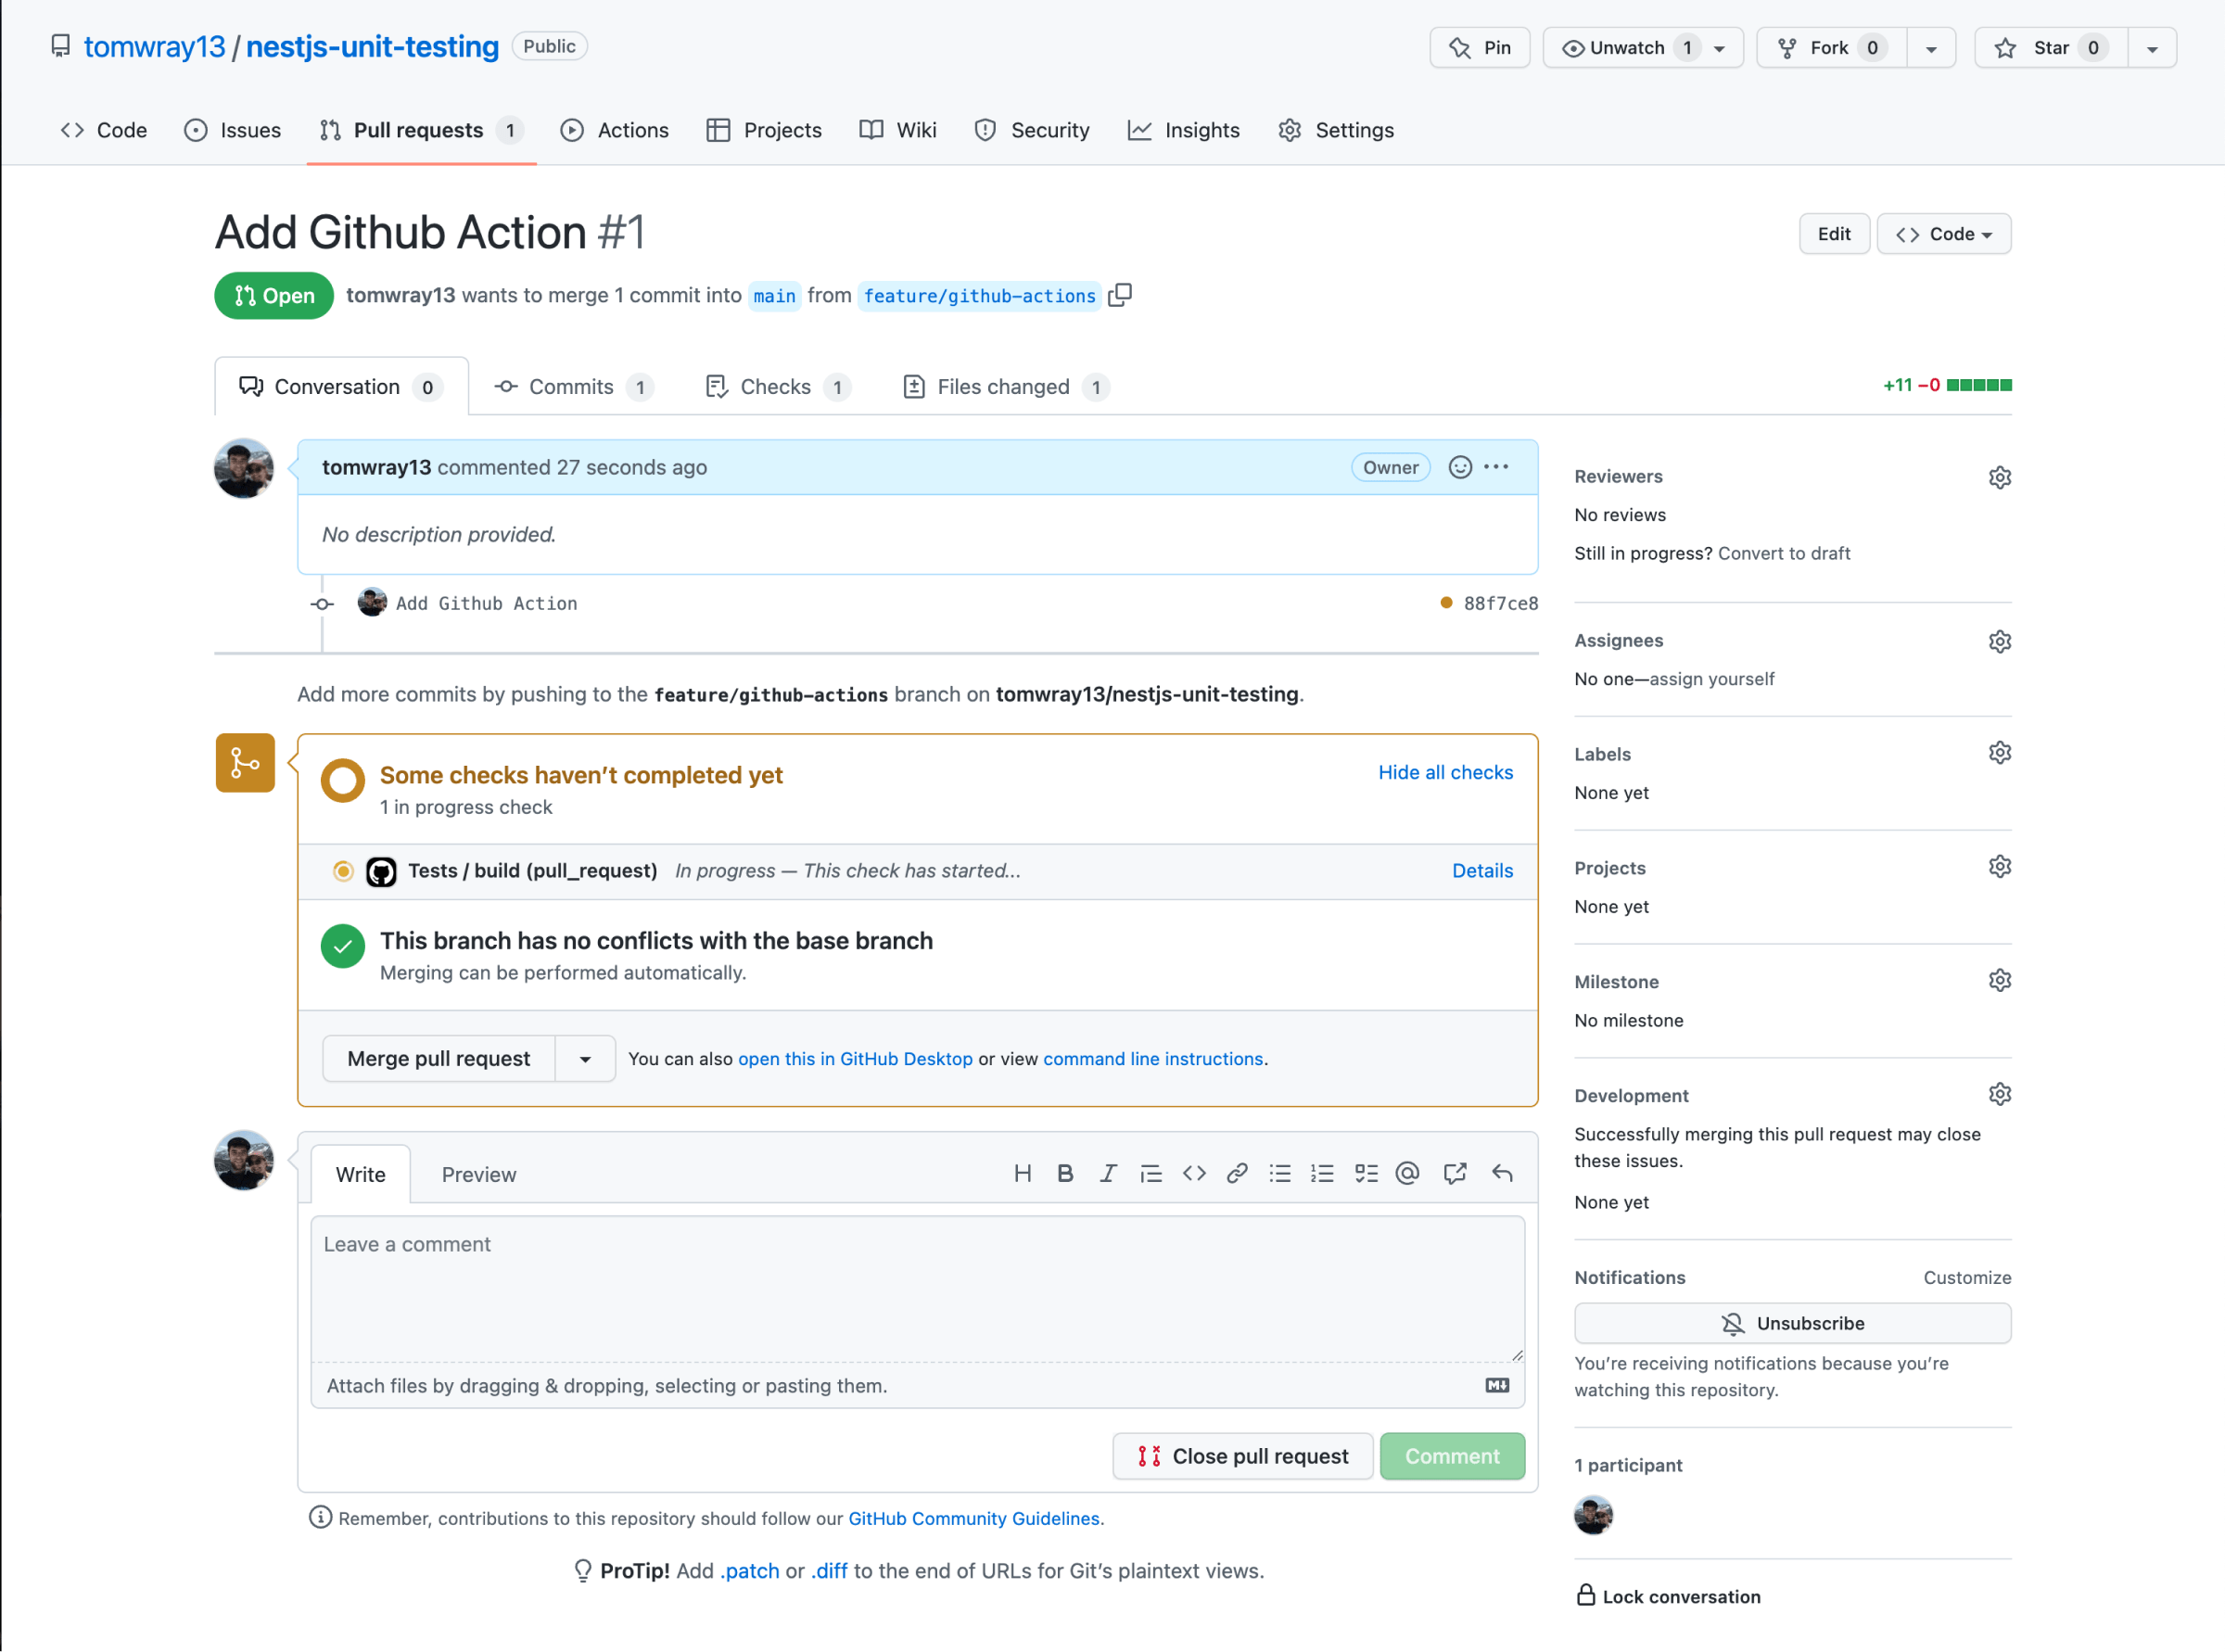
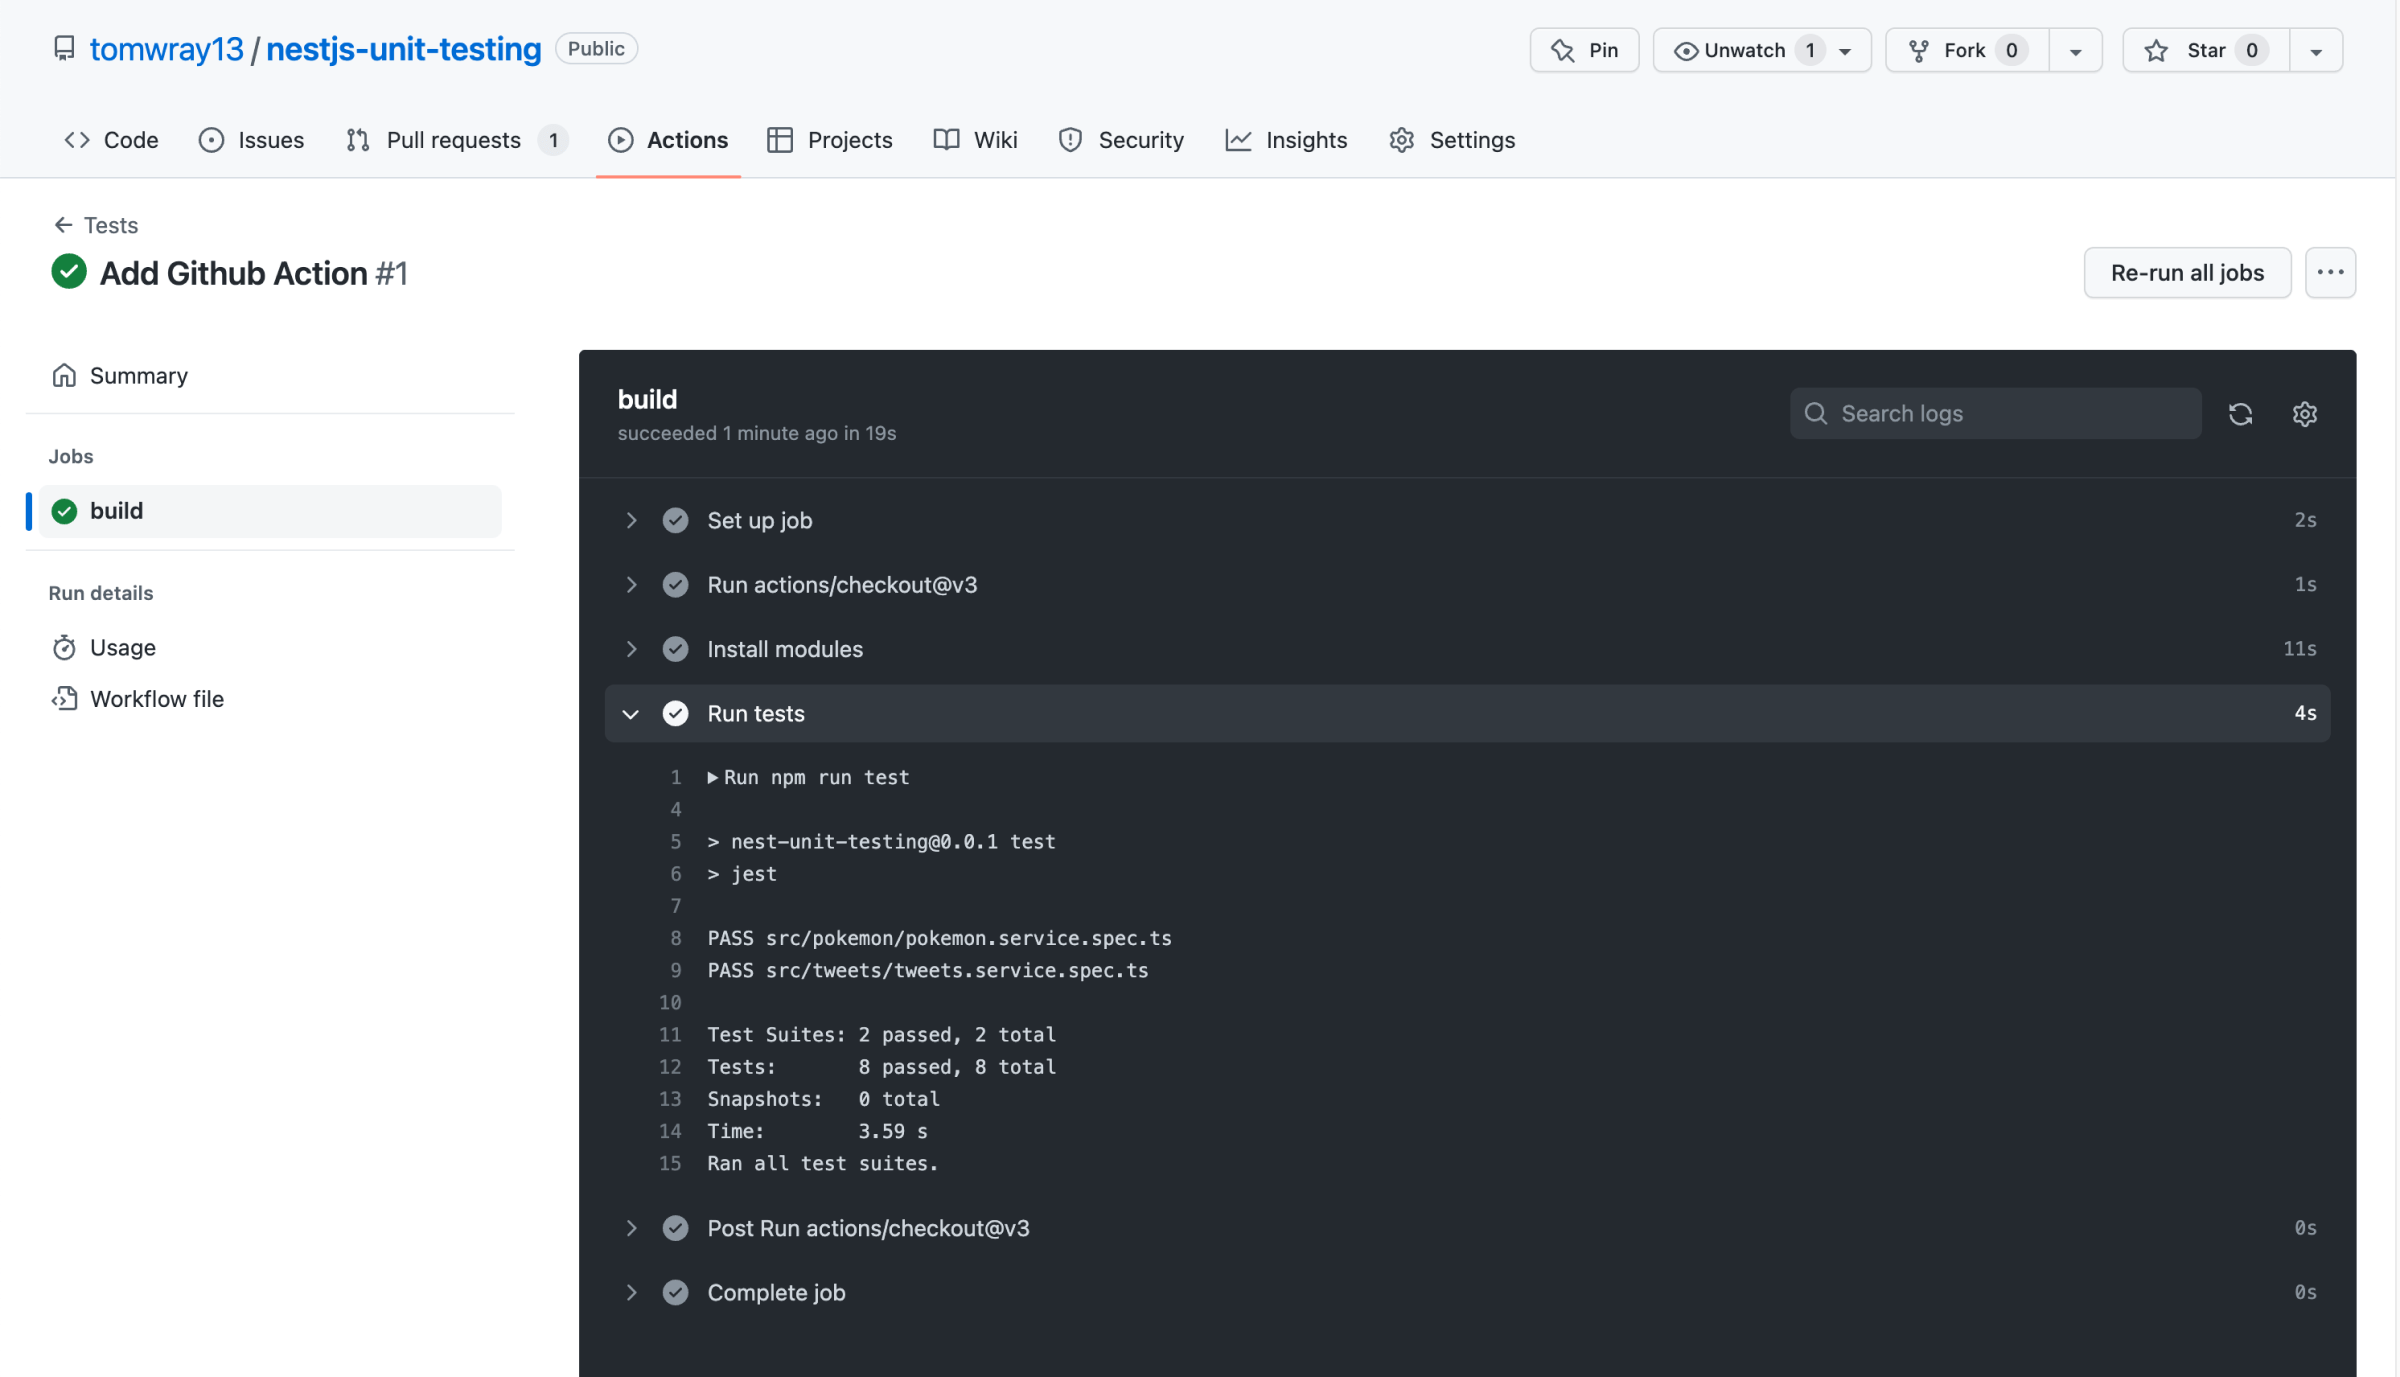
If you now push up your code to Github and open a pull request, you'll see the test is automatically run and you can see if they've passed inside the Pull Request:

Also, every time a workflow is run, you can see the steps and output of the jobs:

If your project has any environment variables that your tests rely on, you'll see an error when the automated tests are run in the Github Action.
You'll need to make the environment variables accessible to the workflow, like this:
name: Tests
on: pull_request
env:
    API_KEY: "an-api-key"
jobs:
  build:
    runs-on: ubuntu-latest
    steps:
    - uses: actions/checkout@v3
    - name: Install modules
      run: npm ci
    - name: Run tests
      run: npm run test
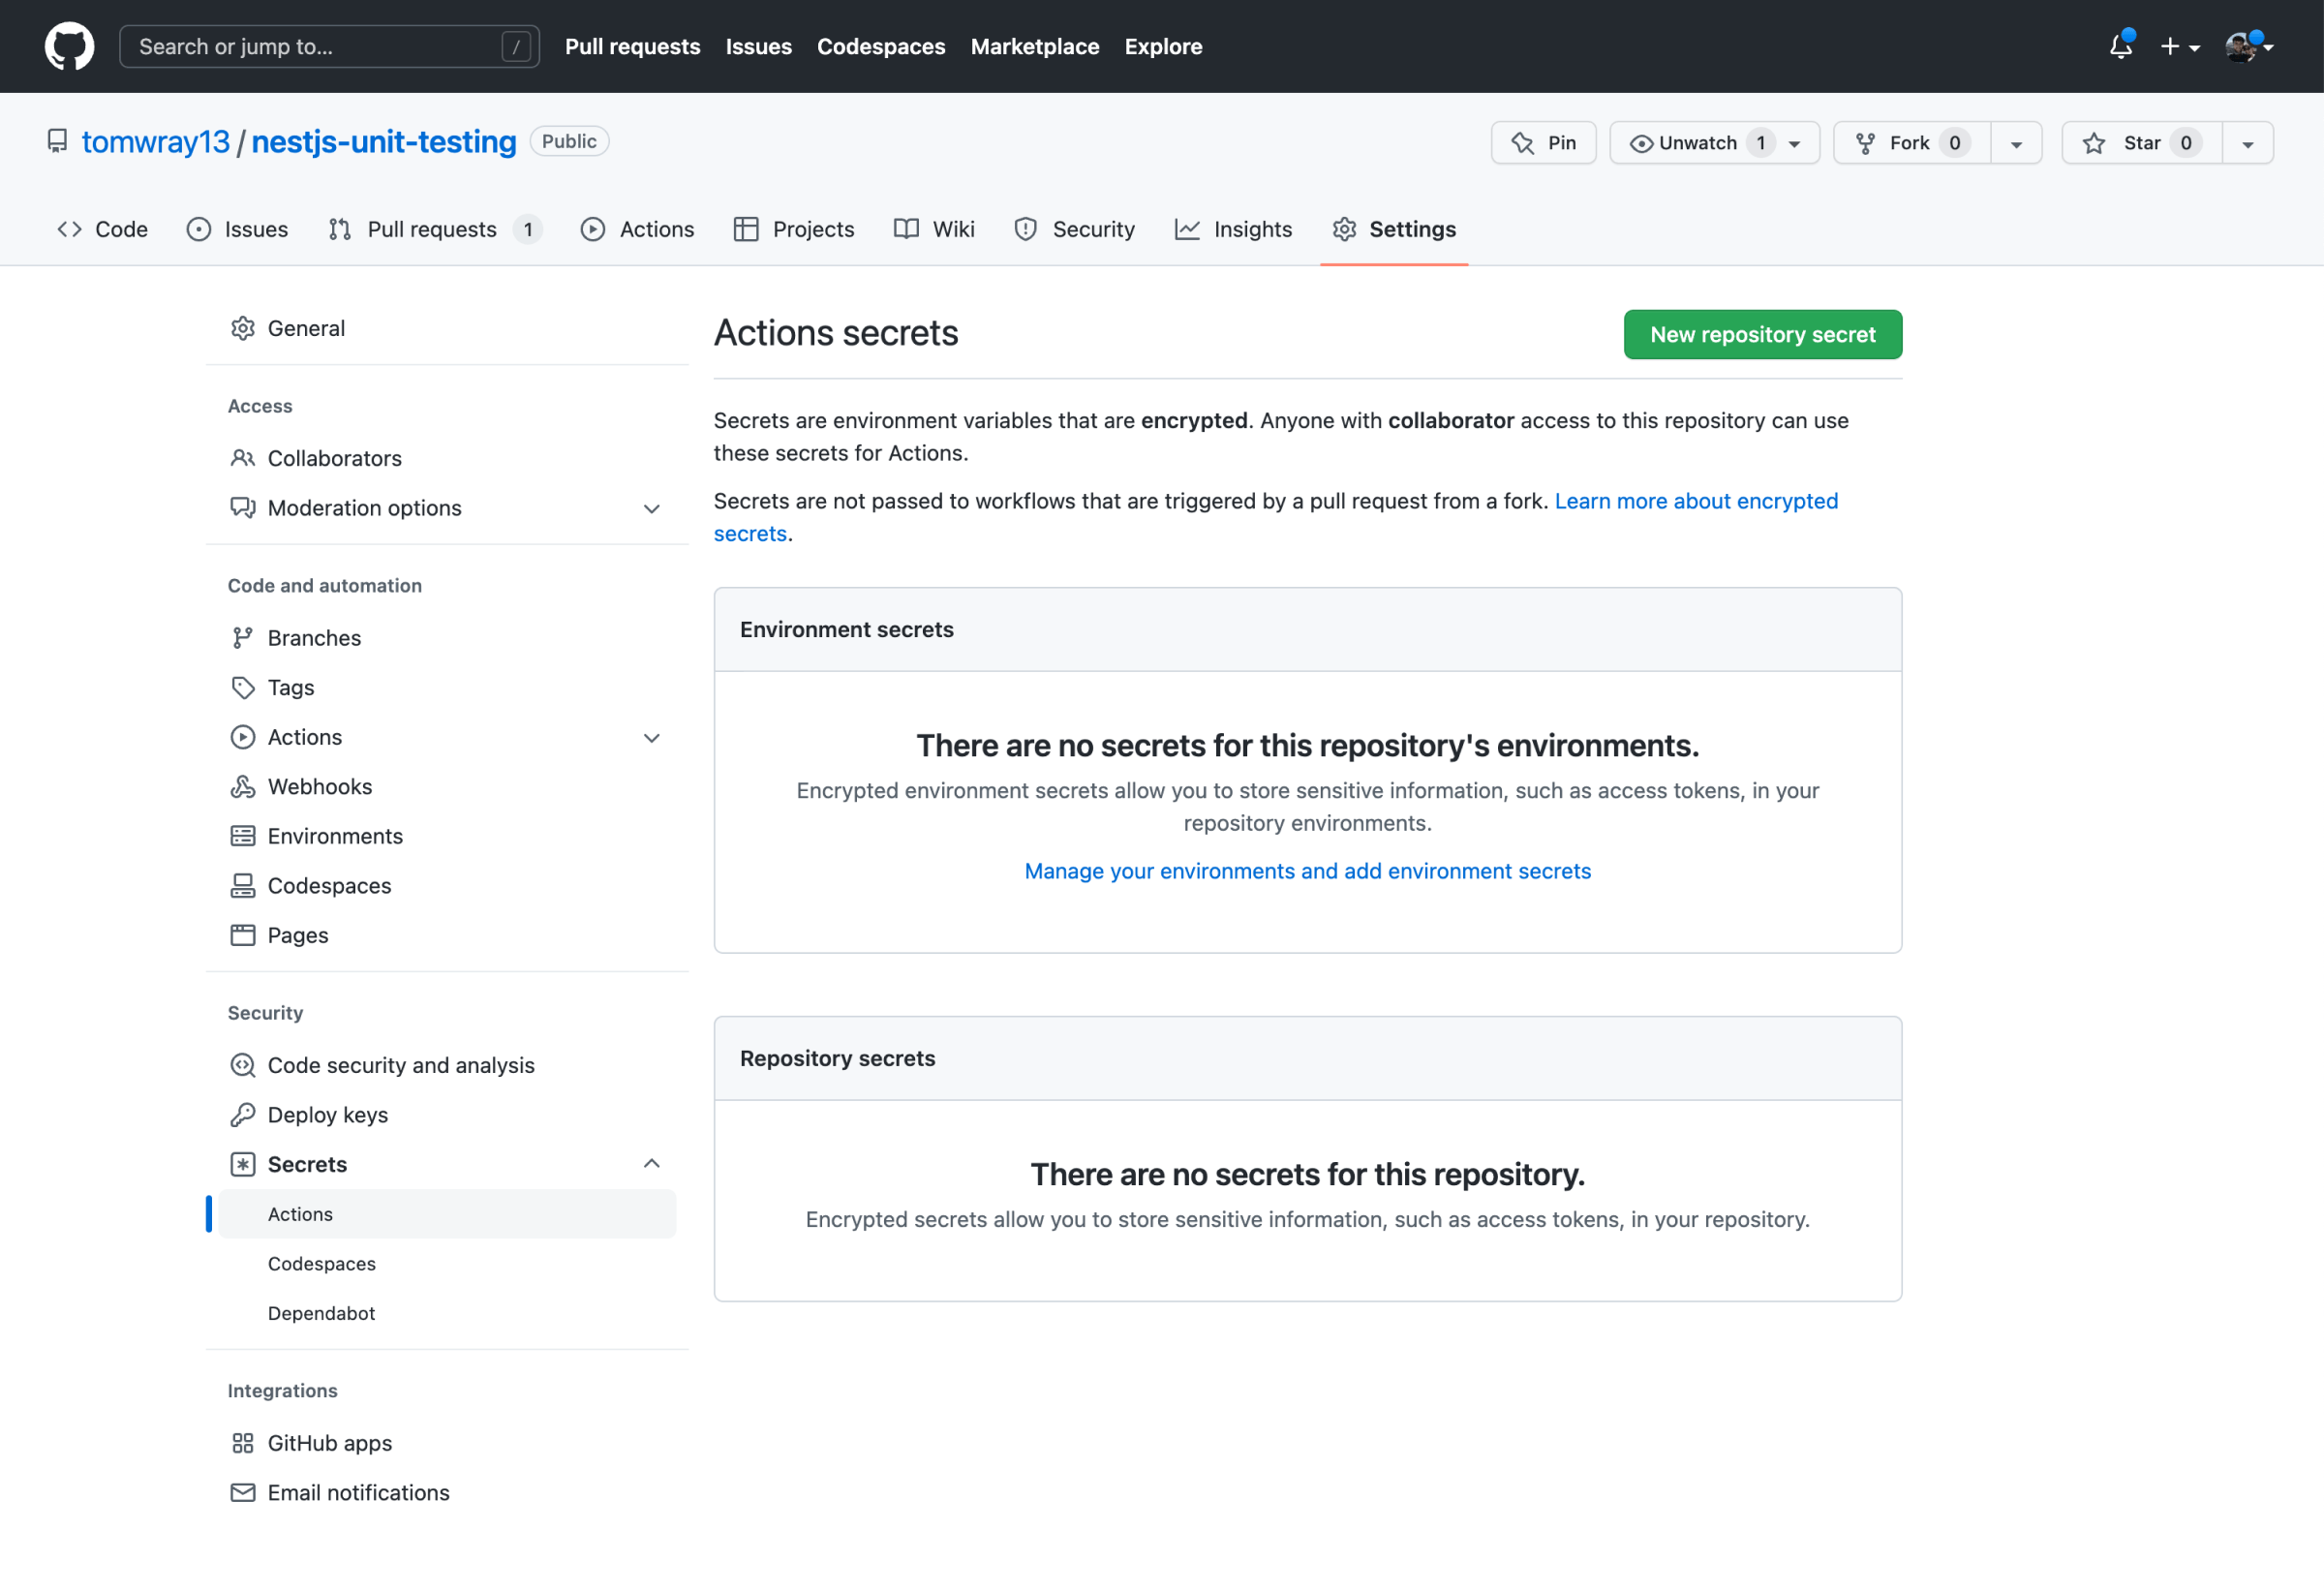
If your environment variables are sensitive (like an API key), you should use Github Secrets instead.
In your repo, go to the Settings tab and add your secret(s):

And then update the worflow to use the secret instead:
name: Tests
on: pull_request
env:
    API_KEY: ${{ secrets.API_KEY }}
jobs:
  build:
    runs-on: ubuntu-latest
    steps:
    - uses: actions/checkout@v3
    - name: Install modules
      run: npm ci
    - name: Run tests
      run: npm run test
Nice work, you now have automated tests anytime a pull request is opened in your project!
Combine this with a Continuous Delivery workflow (which you can also set up with Github Actions) and you'll have an automated CI/CD pipeline.
Resources
Here are a few great resources that I used to help put this in-depth guide together. All are worth checking out!
- Trilion Blog: Advanced Testing Strategies with mocks in NestJS
- Jay's testing-nestjs repo is a great resource to find multiple examples of unit testing across the NestJS ecosystem.