
- Published on
- Last updated:
NestJS, Redis and Postgres local development with Docker Compose

In this tutorial, we're going to use Docker Compose to create a local development environment for NestJS, Redis and Postgres with hot reloading.
You can check out the Github repo if you'd like to look at the finished code.
As a bonus step, we'll add Prisma to this setup as the ORM layer.
Ready? Let's dive in.

Table of Contents
- Add Dockerfile
- Add docker-compose file
- Add Redis to docker-compose
- Add Postgres to docker-compose
- Using Prisma with NestJS and Docker
- Setup prisma
- Running migrations
- Spin up Prisma Studio (optional step)
- Move prisma directory inside /src
- Access the database in the NestJS app with Prisma Client
- Include prisma generate in Dockerfile
- Spin up Docker Compose
- Apple M1 chip configs
Add Dockerfile
To run NestJS locally with Docker, we need to add a Dockerfile:
touch Dockerfile
The Dockerfile lays out the instructions on how to build the image.
In a previous post in this blog, we covered how to create a production optimized NestJS image with a Dockerfile.
We're going to use the Dockerfile from this post as this uses a multistage build approach perfect for local development.
###################
# BUILD FOR LOCAL DEVELOPMENT
###################
FROM node:18-alpine As development
# Create app directory
WORKDIR /usr/src/app
# Copy application dependency manifests to the container image.
# A wildcard is used to ensure copying both package.json AND package-lock.json (when available).
# Copying this first prevents re-running npm install on every code change.
COPY package*.json ./
# Install app dependencies using the `npm ci` command instead of `npm install`
RUN npm ci
# Bundle app source
COPY . .
# Use the node user from the image (instead of the root user)
USER node
###################
# BUILD FOR PRODUCTION
###################
FROM node:18-alpine As build
WORKDIR /usr/src/app
COPY package*.json ./
# In order to run `npm run build` we need access to the Nest CLI.
# The Nest CLI is a dev dependency,
# In the previous development stage we ran `npm ci` which installed all dependencies.
# So we can copy over the node_modules directory from the development image into this build image.
COPY /usr/src/app/node_modules ./node_modules
COPY . .
# Run the build command which creates the production bundle
RUN npm run build
# Set NODE_ENV environment variable
ENV NODE_ENV production
# Running `npm ci` removes the existing node_modules directory.
# Passing in --only=production ensures that only the production dependencies are installed.
# This ensures that the node_modules directory is as optimized as possible.
RUN npm ci --only=production && npm cache clean --force
USER node
###################
# PRODUCTION
###################
FROM node:18-alpine As production
# Copy the bundled code from the build stage to the production image
COPY /usr/src/app/node_modules ./node_modules
COPY /usr/src/app/dist ./dist
# Start the server using the production build
CMD [ "node", "dist/main.js" ]
The great thing about multistage builds is that you can target a specific stage in your docker-compose file and run a specific command against the stage.
See the # BUILD FOR LOCAL DEVELOPMENT stage in the Dockerfile above? That's what we'll isolate and target in the docker-compose.yml file.
We'll set that up now in the next step.
Add docker-compose file
Add a docker-compose.yml file to your project:
touch docker-compose.yml
The docker-compose.yml file lays out the instructions on how to run image(s) into containers - exactly what we need to spin up a local development environment.
Let's add the instruction in the docker-compose.yml file to spin up a local development environment (starting with just the NestJS app):
services:
  api:
    build:
      dockerfile: Dockerfile
      context: .
      # Only will build development stage from our dockerfile
      target: development
    volumes:
      - .:/usr/src/app
    env_file:
    - .env
    # Run a command against the development stage of the image
    command: npm run start:dev
    ports:
      - 3000:3000
Let's highlight a few important parts of this file:
- The
target: developmentpoints to thedevelopmentstage within the Dockerfile. This is great because it means it will ignore the other stages which are purposed for production and not required to run locally. - The
volumessection enables the data to be persisted and is what makes the hot reloading possible. - The
env_filesection tells Docker to load the .env file into the container. Important if you have any environment variables set in your NestJS app. - The
commandsection tells Docker to run thenpm run start:devcommand against the image built in thedevelopmentstage
If you now run the following command in your terminal:
docker-compose up -d
This will execute the instructions in the docker-compose.yml file.
Please note - if your NestJS image already exists (for example, if you tested building the full image in the Dockerfile above), you can run docker-compose up -d --build to rebuild the image.
If you used the same ports config as above, once the container is running, you can access your app at localhost:3000.
Try editing some of your code to test out the hot reloading.
What I like about this setup is that your Dockerfile handles both local development (with the use of docker-compose) AND builds a fully optimized, production-ready image for deployment.
Add Redis to docker-compose
Before diving into the Redis docker-compose configurations, it's worth noting that this tutorial assumes you already have the CacheModule configurations setup in your NestJS app and you just need a Redis local server.
For example, here's a CacheModule implementation applied globally to a NestJS app in the app.module.ts file:
import { CacheModule, Module } from '@nestjs/common';
import * as redisStore from 'cache-manager-redis-store';
import { ConfigModule } from '@nestjs/config';

@Module({
  imports: [
    ConfigModule.forRoot(),
    CacheModule.register({
      isGlobal: true,
      store: redisStore,
      host: process.env.REDIS_HOST,
      port: process.env.REDIS_PORT,
    }),
  ],
})
export class AppModule {}
If you want to learn more about caching and how to configure Redis caching in a NestJS app, check out this tutorial on how to use cache in NestJS.
In terms of tweaking the docker-compose file to set up a local Redis server, you can make the following changes:
services:
  api:
    # ... other Nest container configs
    depends_on:
      - redis
  redis: # Name of container
    image: redis
    ports:
      - 6379:6379
    volumes:
      - redis:/data
volumes:
  redis:
    driver: local
Here's the edits that have been made to the docker-compose.yml file:
- Inside the
apiservice, includeredisas adepends_ondependency. This will ensure the the Redis container starts before the API container. - A new container named
rediswhich uses theredisdocker image. - The
volumesconfigurations enable the cache to be persisted between container restarts
Before spinning up the containers, you'll need to make sure the Redis environment variables have been set. In the above Redis configuration in the app.module.ts file, we defined the following environment variables:
REDIS_HOST="redis"
REDIS_PORT="6379"
Important: If you're following along with this tutorial and are running the NestJS app as a container alongside the Redis container, then you'll need to set the REDIS_HOST to the name of your Redis container (redis in this case). If you're running the NestJS app on your local machine (with npm run start:dev), then you'll need to set the REDIS_HOST environment variable to localhost instead.
Let's now run the command to stop and remove all running containers (this is necessary as we've made changes to the docker-compose.yml file)
docker-compose down
And then run the command to execute the docker-compose file:
docker-compose up -d
And that's it! You now have a local Redis server running.
Add Postgres to docker-compose
So at this stage, your NestJS app is running locally with hot reloading and a local Redis server is also running.
Let's now spin up a local Postgres server with docker-compose.
To do that, we just need to tweak the docker-compose.yml file:
services:
  api:
    # ... other Nest container configs
    depends_on:
      - redis
      - postgres
  redis:
    # ... other Redis container configs
  postgres:
    image: postgres
    restart: always
    environment:
      POSTGRES_DB: ${POSTGRES_DB}
      POSTGRES_USER: ${POSTGRES_USER}
      POSTGRES_PASSWORD: ${POSTGRES_PASSWORD}
    ports:
      - '5432:5432'
    volumes:
      - docker-nest-postgres:/var/lib/postgresql/data

volumes:
  redis:
    driver: local
  docker-nest-postgres:
Here's the edits that have been made to the docker-compose.yml file:
- Add a
depends_onsection to theapiservice. This creates a dependency between theapiservice and thepostgresservice (useful as the NestJS service will need to access the Postgres database). - Added the
postgresservice with all the configurations we need to spin up a local Postgres server.
Make sure you update the mention of docker-nest-postgres to more suitable values for your project.
You'll also need to make sure you have the 3 environment variables set in your local .env file like this:
POSTGRES_DB="docker-nest-postgres"
POSTGRES_USER="username"
POSTGRES_PASSWORD="password"
Let's now run the command to stop and remove all running containers (this is necessary as we've made changes to the docker-compose.yml file)
docker-compose down
And then run the command to execute the docker-compose file:
docker-compose up -d
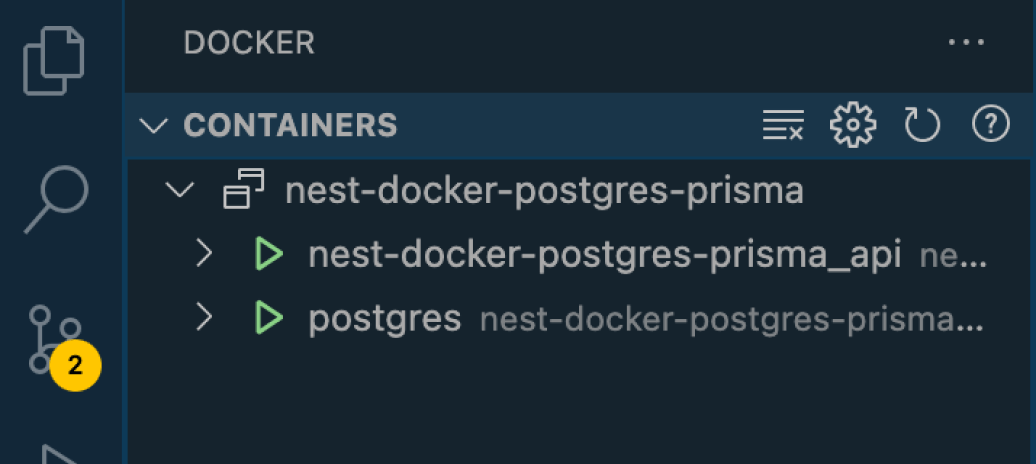
The local Postgres server will now be running as well as the NestJS app. If you're using the Docker extension in Visual Studio Code, you will be able to see all your running containers.
For example, here's NestJS and Postgres running containers:

From here you can go ahead and choose your ORM of choice and start building your application. If you're interested to use Prisma, continue reading!
Using Prisma with NestJS and Docker
NestJS and Prisma are a great combination.
Let's dive into some of the steps to get the Docker + NestJS + Postgres + Prisma stack up and running locally.
We'll be using the Dockerfile and docker-compose files from the above section as a starting point before making some tweaks below.
If you'd prefer to see the finished code, take a look at the Github repo.
Setup prisma
Ensure the Prisma CLI is setup as a dev dependency in your project:
npm install prisma --save-dev
Then setup Prisma in your project by running:
npx prisma init
This will:
- Create a prisma directory with a
schema.prismafile - Create (or update if it already exists) an
.envfile in the directory with theDATABASE_URLenvironment variable.
Make sure you update DATABASE_URL in your env file to leverage the existing variables you set above - this will ensure you're using the same Postgres configurations set in the docker-compose file.
POSTGRES_DB="docker-nest-postgres"
POSTGRES_USER="username"
POSTGRES_PASSWORD="password"

DATABASE_URL="postgresql://${POSTGRES_USER}:${POSTGRES_PASSWORD}@localhost:5432/${POSTGRES_DB}?schema=public"
In the Dockerfile, because we're using node-alpine as the base image we'll need to configure Prisma's binary targets which you can do in the schema.prisma file:
generator client {
  provider = "prisma-client-js"
  binaryTargets = ["native", "linux-musl"]
}
Finally, add some models to your prisma schema. For example, I'll add a simple Tweets model below:
generator client {
  provider = "prisma-client-js"
  binaryTargets = ["native", "linux-musl"]
}

datasource db {
  provider = "postgresql"
  url      = env("DATABASE_URL")
}

model Tweets {
  id          Int       @default(autoincrement()) @id
  content     String
  published   Boolean?  @default(false)
  createdAt   DateTime  @default(now())
}
Running migrations
Assuming your local Postgres server is still up and running (from the Docker Compose set up we configured above), we can now run migrations.
When you add a new Prisma schema or when you make tweaks to your existing Prisma schema, you need to run migrations locally.
When you run migrations locally, it checks the DATABASE_URL in your .env file and runs the migrations against this value, so you must update the DATABASE_URL variable in your .env file (as noted in a previous step above) to match your local Postgres server configurations.
To run migrations locally, you can run a command in your terminal (change init to a more suitable migration name):
npx prisma migrate dev --name init
Note that you don't need to run this inside the shell of the running NestJS Docker container, just in your terminal on your local machine.
Spin up Prisma Studio (optional step)
I find it useful to spin up Prisma Studio to add some quick mock data (and confirm the migrations from the previous step worked as expected).
Again, assuming your local Postgres server is still up and running, you can spin up Prisma Studio with the following command in your terminal:
npx prisma studio
Move prisma directory inside /src
I like to move the prisma directory inside /src for 2 reasons:
- It feels cleaner
- We don't need to modify the
Dockerfile(adding an extra step to copy theprismadirectory is not required)
I usually create a database directory and include the prisma files in there, like this:
src/
  database/
    schema.prisma
    migrations/
Check the Github repo if you want to take a closer look.
If you've moved the prisma directory, you'll need to add the location to the package.json file so the Prisma CLI knows where to find your schema:
"prisma": {
  "schema": "src/database/schema.prisma"
}
Access the database in the NestJS app with Prisma Client
So far we've setup the database side of things, but we're not yet able to make reads/writes to the database inside the NestJS app.
Before diving into Prisma Client (which makes the reads/writes possible) we need to make a small tweak to the docker-compose.yml file to ensure the NestJS local container and the Postgres local container are correctly integrated:
services:
  api:
    ...
    env_file:
        - .env
    environment:
      DATABASE_URL: postgresql://${POSTGRES_USER}:${POSTGRES_PASSWORD}@postgres:5432/${POSTGRES_DB}?schema=public
    ...
I've added an overriding DATABASE_URL variable to the docker-compose.yml file, so that the DATABASE_URL variable in the docker-compose.yml file overrides the DATABASE_URL variable in the .env file.
You'll notice the DATABASE_URL variable in the docker-compose.yml file is the same as the DATABASE_URL variable in the .env file - except the host has been updated to postgres instead of localhost.
This will prevent you from getting the error: Error: Can't reach database server at localhost:5432
The next step is to add Prisma Client to your app.
First install Prisma Client:
npm install @prisma/client
Next we need to use Prisma Client in our NestJS services. For this step, I'd recommend following the NestJS docs approach where you abstract the Prisma Client into a separate service.
Include prisma generate in Dockerfile
The way Prisma Client works is that it auto-generates the database client code for you into the node_modules folder of your project. This auto-generation happens automatically when you run local migrations or when you install @prisma/client npm package.
In our current Dockerfile, we're installing our dependencies in the npm ci step, so you might be thinking that the Prisma Client is all taken of.
However, this auto-generation won't happen because we're running npm ci before the step to copy over the files in our local directory.
Therefore, we need a command to do the auto-generation manually, which is exactly what the command prisma generate is for.
Let's first add a custom script to the package.json file:
"scripts": {
    ...
    "prisma:generate": "npx prisma generate"
  },
We can now use this custom script in our Dockerfile. It just needs to be run after we copy over the files in our local directory to the image:
###################
# BUILD FOR LOCAL DEVELOPMENT
###################
FROM node:18-alpine As development
# Create app directory
WORKDIR /usr/src/app
# Copy application dependency manifests to the container image.
# A wildcard is used to ensure copying both package.json AND package-lock.json (when available).
# Copying this first prevents re-running npm install on every code change.
COPY package*.json ./
# Install app dependencies using the `npm ci` command instead of `npm install`
RUN npm ci
# Bundle app source
COPY . .
# Generate Prisma database client code
RUN npm run prisma:generate
# Use the node user from the image (instead of the root user)
USER node
###################
# BUILD FOR PRODUCTION
###################
Spin up Docker Compose
Compared to the original Dockerfile and docker-compose.yml files at the start of this tutorial, we've made some changes to them and other files to get our local setup working with Prisma.
Specifically, we've:
- Updated our image by tweaking the
Dockerfileby adding the Prisma Generate command - Updated our
docker-compose.ymlfile by adding an overrdingDATABASE_URLvariable - Installed new npm packages (
prismaand@prisma/client) - Added an abstracted Prisma Service
Whenever I make tweaks to the Docker Compose file I stop and remove the running containers with:
docker-compose down
And then execute the following command to your terminal to spin up your local environment:
docker-compose up -d -V --build
You might be wondering what those extra flags are in the command:
-d: Run the containers in detached mode-V: Forces a fresh install of the dependencies in the container (required as we've installed new npm packages)--build: Rebuilds the images (required as we tweaked the Dockerfile)
Apple M1 chip configs
Annoyingly, if you're working on an Apple Macbook/Mac on the M1 chip, you will run into the following error when you spin up the local environment:
Error: Unknown binaryTarget linux-arm64-openssl-undefined and no custom engine files were provided
This is a open issue and on Prisma's radar to fix.
This is pretty frustrating as one of the main benefits of working with Docker locally is that your whole team can have a consistent development environment (no matter what local machine you're using).
If you're working as a solo dev and are not using a Macbook/Mac on the M1 chip, you can ignore these final paragraphs and stick to the setup described above.
However, if you (or your colleagues) are working on a Macbook/Mac on the M1 chip then you'll need to make the following 2 tweaks:
Update the docker-compose.yml file to:
services:
  api:
    ...
    volumes:
      - .:/usr/src/app
      - ./usr/src/app/node_modules # This is the only change
    ...
This ensures that the NestJS container manages the node_modules folder (rather than being synced with the host machine).
Annoyingly this will mean that everytime you install a new npm package on your host machine, you'll need to restart the containers to pick up the new dependencies by running:
docker-compose down
And then run the command:
docker-compose up -d --build -V
The final tweak to make is in the multi-stage Dockerfile:
###################
# BUILD FOR LOCAL DEVELOPMENT
###################
# Update to node:18 instead of node:18-alpine
FROM node:18 As development
# Required for Prisma Client to work in container
RUN apt-get update && apt-get install -y openssl
WORKDIR /usr/src/app
COPY package*.json ./
RUN npm ci
COPY . .
RUN npm run prisma:generate
USER node
###################
# BUILD FOR PRODUCTION
###################
# Remaining multi-build steps do not change from the original Dockerfile above
The only thing tweaked to the Dockerfile is using node:18 as the base image instead of node:18-alpine and also including RUN apt-get update && apt-get install -y openssl.
This won't have an impact on the image size for the production image as the base image for production uses node:18-alpine.
And that's it! You're now running your local NestJs + Postgres + Prisma development environment using Docker containers.